• Skip to main content
  • Skip to primary sidebar

Techbout

Technology Simplified.

  • Windows
  • Mac
  • iOS
  • Android
  • Office

How to Authorize Windows or Mac Computer On iTunes

By: Salman Patwegar

Apple’s licensing system requires users to authorize computers on iTunes in order to access and play digital content from iTunes. You won’t be able to access much of your purchased content in case your computer is not authorized to use iTunes. In this article we will be showing you the steps to authorize iTunes on Windows and Mac computers.

Authorize a Computer on iTunes

Why Authorize Computers on iTunes

The requirement to authorize a computer on iTunes in order to use its digital content is designed to protect media companies and content owners against unlicensed sharing of their digital products.

Currently, Apple allows you to authorize up to 5 computers on iTunes. This means that it is equally important to deauthorize a computer on iTunes, before getting rid of it. Otherwise, Apple may treat your new computer as a sixth computer and hence ineligible for use with iTunes.

Note: iOS devices are not counted in the activation total. You can have as many iPads, iPhones, iPods and Apple TV devices accessing content from iTunes.

Steps to Authorize Computer on iTunes (Windows and Mac)

Authorizing a computer on iTunes is a fairly straight forward affair, just follow the steps below.

1. Make sure you have the latest version of iTunes

Make sure that your computer has the latest version of iTunes. You can easily download the latest version of iTunes on your computer by visiting the iTunes website.

2. Open iTunes on your computer

Open iTunes on your computer by clicking on the iTunes short cut on your desktop.

3. Hold Down the Ctrl + B Keys

In order to authorize a Windows computer on iTunes, you need to access a hidden Menu on iTunes. This hidden Menu can be accessed by holding down Ctrl and B keys at the same time.

As you must have observed the highlighted Menu (in image below) is not visible when you land on iTunes from a Windows computer, you need to press Ctrl + B Keys at the same time to access this Menu.

iTunes Hidden Menu Bar

You can skip this step and move to step#4, in case you are trying to authorize a Mac computer.

4. Click on Store then on Authorize This Computer

Next, click on Store to open a drop-down. From the drop-down click on Authorize this Computer option.

iTunes Authorize This Computer Option

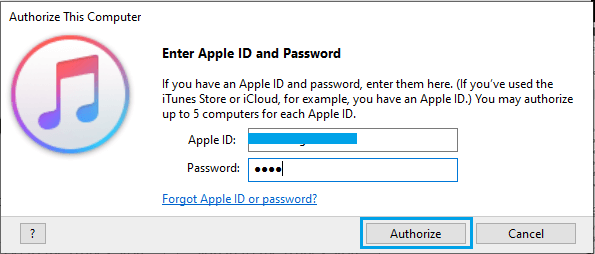
5. Enter Apple ID and Password

Next, a window will prompt you to enter your Apple ID and password. Type in the required information and click Authorize.

Your computer is now authorized to view, access and play digital content from iTunes. You will see a dialog box indicating how many computers you have currently authorized to access your Apple account.

In case you have reached your limit of 5 computers, it is time to Deauthorize a computer on iTunes in order to create a slot for the new computer that you are now trying to authorize on iTunes.

Related
  1. How to Add Folders to iTunes, Instead of Single Music Files

Primary Sidebar

Twitter
Facebook

Popular Now

  • How to Boot Windows 10 From USB Drive
  • How to Backup iPhone to iCloud
  • How to Check Computer Specs in Windows 10
  • How to Remove Bloatware From Windows 10 PC
  • How to Setup Chromecast on Android and iPhone

Gadget Guide

  • Mac vs PC Comparison: Should You Buy Mac or PC
  • Chromebook vs Windows Laptop
  • Kindle E-Reader Comparison | Which Kindle to Buy
  • iPad vs iPad Pro Comparison
  • Advantages of Chromebooks


About | Privacy Policy | Disclosure | Terms | Contact
© Copyright 2021 @Techbout.com · All Rights Reserved