Microsoft Excel can automatically save previous versions of your workbook. You can find below the steps to automatically backup files in Excel.

Automatically Backup Files in Excel
As you must have experienced, accidental deletions or changes in a complicated Excel worksheet can be difficult to correct. Such errors can leave you frustrated and stressed out, especially if you are working on a tight deadline.
You can be better prepared for such a possibility by making use of the AutoBackup feature in Excel, which automatically creates a backup copy of your original Excel File.
The Auto Backup feature makes a copy of your Excel File when you save it for the first time. This allows you to go back to the backup, in case you accidentally delete something or make unwanted changes in the working File.
Every time you save the original file, the backup file is also updated. This practically means that the backup copy is always going to be one version behind the current status of the Excel file that you are working on.
Note: You will find the Backup Copy in the same location/folder as the original file.
How to Setup Auto Backup in Excel
Follow the steps below to Automatically Backup Files in Excel.
1. Click on the File tab located in the top menu bar.

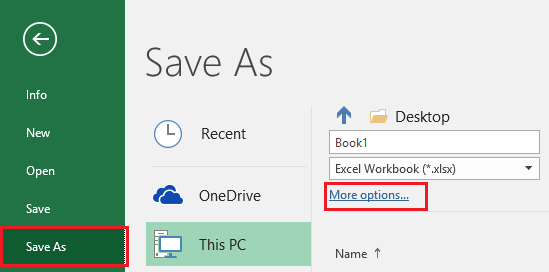
2. In the menu that appears, click on Save As in the side menu and then click on More options…

Note: In the earlier versions of Excel (prior to 2016) you should be able to skip this step.
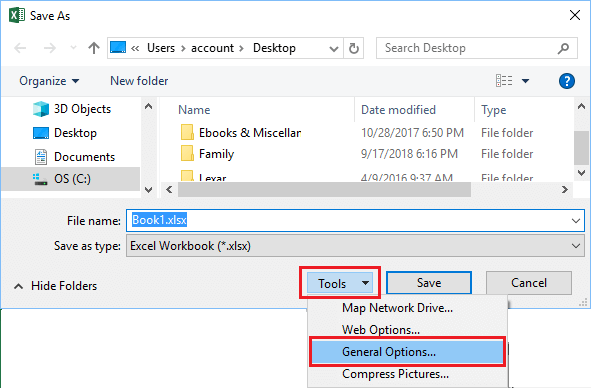
3. On next screen, click on the Tools button and then click on General Options… in the tools drop-down menu.

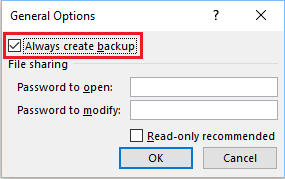
4. On the General options pop-up, check the little box next to Always create backup and click on OK.

5. Next, click on Save in the Save As window.
After this setting, Microsoft Excel will create a backup copy of your current working Excel File and automatically update the backup file, so that it always remains one version behind your current working File.