If your computer is automatically shutting down and restarting at random intervals, the problem could be due to outdated device drivers, corrupted system files, faulty hardware, loose connections or overheating.
Depending on the nature of the problem, you may find the computer briefly shutting down and immediately restarting or shutting down and restarting in Automatic repair mode.
Windows Computer Restarting Randomly
If your computer is shutting down and restarting without going in to automatic repair mode, you should be able to fix the problem using the following troubleshooting steps.
1. Check Cable Connections
As mentioned above, the problem could simply be due to an unstable electrical connection, causing random restarts.
Hence, make sure that the power cables are securely connected, both at the power outlet on the wall and the socket on the compute.
2. Check Temperature and Fans
If the computer is overheating, it has been designed to automatically shut down and protect itself from any possibility of being damaged.
Hence, make sure that the exhaust fans of the computer are working and the vents are not being blocked by any obstruction or accumulation of dust/debris.
In general, a computer that is overheating is likely to be noisy and most users should be able judge whether or not the computer is overheating.
3. Scan For Hardware Changes
An outdated or corrupted device driver can make the computer to restart randomly.
1. Right-click on Start button and click on Device Manager.
2. On Device Manager screen, click on Scan Icon to scan the computer for Hardware changes.
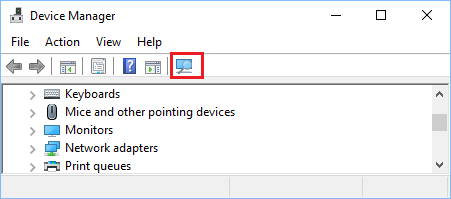
This will make Windows to scan the computer and update drivers (If updates are available).
4. Run Memory Diagnostics Tool
The reason for the computer restarting Randomly could be related to problems with its short term memory (RAM).
1. Click on Start button > type Memory in the search bar and click on Windows Memory Diagnostics App in the search results.
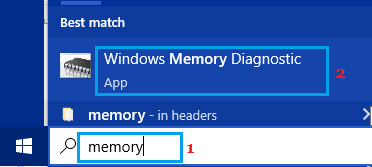
2. On Windows Memory Diagnostic screen, select Restart Now and check for problems option.
Windows Memory Diagnostic tool can help in detecting a defective or failing RAM by performing a series of tests.
5. Disable Automatic Restart Feature
If your computer is preventing you from fixing the problem due to frequent restarts, you can disable the Automatic Restart feature for a short period of time.
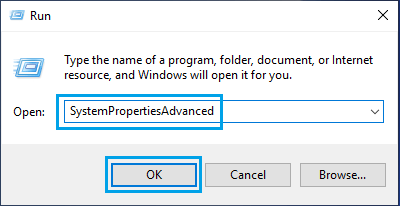
1. Right-click on the Start button and click on Run.
2. In Run Command window, type SystemPropertiesAdvanced and click on OK.
3. On System Properties screen, switch to Advanced tab and click on Settings button under “Startup and Recovery” section.
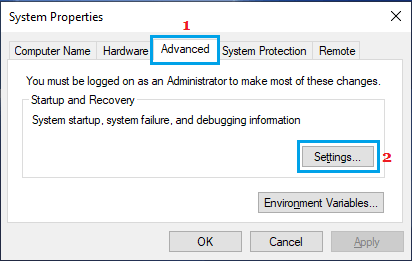
4. On the next screen, uncheck Automatically restart option under “System Failure” section and click on OK.

Important: The Automatically Restart feature is a protective mechanism, designed to prevent the computer from being damaged.
Hence, it is strongly recommended that you remember to re-enable the Automatically Restart feature, as soon as you are done fixing the problem on your computer.
6. Scan System Files For Corruption
As mentioned above, the problem could also be due to presence of damaged or corrupted system files on the computer.
This can be checked and also repaired by using the built-in SFC and DISM tools that are available on every Windows computer.
For the actual steps to check the computer for system file damage and repair them, you can refer to this guide: How to Repair Corrupted System Files In Windows 11/10.
7. Reset the Computer
Windows operating system provides the option to Reset the computer, which removes all apps, programs, settings and installs the latest version of operating system on the computer.
The good thing about Reset option in Windows is that it provides the option to keep all your personal files intact.
For the actual steps to Reset the computer, you can refer to this guide: How to Factory Reset Windows Computer.