If you have just bought a pair of AirPods, and wondering how to use them, you can find below the steps to Pair and Connect AirPods to Windows 10 Laptop or Desktop computer.

Connect AirPods to Windows PC
While AirPods are designed to work flawlessly with Apple Devices, they are basically Bluetooth Headphones and can be connected and Paired to any non-Apple Device, including Windows computer.
All that is required to use Apple AirPods with a Windows PC is to Pair them with your computer using steps as provided below.
1. Pair AirPods with Windows PC
Place AirPods in the charging case, close the Lid and wait for 1 minute. After 1 minute, open the Lid and follow the steps below to Connect AirPods to Windows PC.
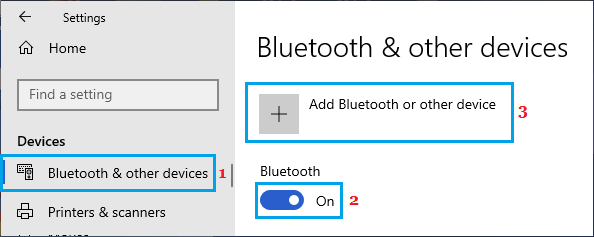
Go to Settings > Devices > select Bluetooth and other devices in the left-pane. In the right-pane, enable Bluetooth and click on Add Bluetooth or other device option.
On Add Device screen, click on the Bluetooth option.

Next, press and hold the Setup button located on the Charging case, until Bluetooth Headphones appear on Add Device Screen.

Once AirPods are discovered, click on Headphone and allow Windows to install the required drivers.

After AirPods are added, click on Done to exit the screen.

Once AirPods are paired with Windows 10, they should work flawlessly with YouTube, Netflix, Skype and other Apps.
Disconnect or Remove AirPods from Windows PC
At any time, you can Disconnect AirPods from the computer by going to “Bluetooth & Other devices” Settings on your computer.
Go to Settings > Devices > select Bluetooth and Devices tab in the left-pane. In the right-pane, select AirPods and click on Disconnect or Remove Device option as required.

Note: If you are having problems with AirPods and if they are not working on other devices, select Remove Device option.