If you are dealing with the issue of a disappearing and reappearing mouse pointer on a Windows computer, the problem is most likely due to the wireless mouse running on weak batteries.
If the mouse pointer has suddenly disappeared, the problem could be due to the mouse or trackpad being disabled due to accidental pressing of a keyboard shortcut that can disable the mouse/trackpad.
In addition to this, the mouse pointer or cursor can disappear due to outdated drivers, non-functioning USB Port/Receiver and the mouse being disabled by a Windows update.
Mouse Pointer Disappeared in Windows 11/10
Before going ahead with other troubleshooting steps, unplug the mouse from its current USB port and plug it back again. If it is a wireless mouse, unplug the receiver and plug it back again.
If you are dealing with the issue of cursor not appearing while using the Trackpad, press the designated key to toggle back the trackpad. Depending on the manufacturer, it could be Fn + F6, F8 or F9 key.
Also, press the Ctrl key, to rule out the possibility of the pointer location being camouflaged or not clearly being visible on the screen.
1. Enable Touchpad
If you were not able to enable the Touchpad using Function keys, you can try enabling it using the Settings menu.
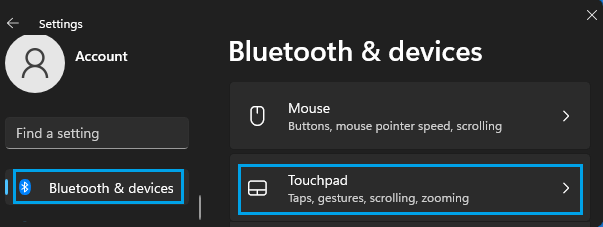
1. Press Windows + i to open the Settings menu on your computer.
2. Use the Tab and Arrow keys to select Bluetooth & Devices tab and press the Enter key. Next, use the Tab and Arrow keys to select Touchpad and press the Enter key.
3. On the next screen, use the Tab key to access Touchpad entry and use the Spacebar to switch on the Touchpad.
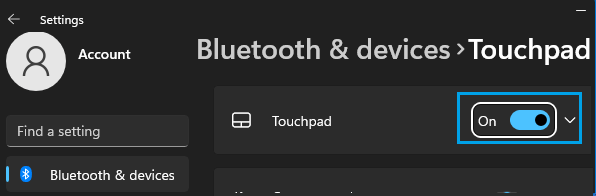
After this, you should be able to use the Touchpad and see the mouse pointer.
2. Re-enable Mouse
As mentioned above, mouse can get disabled due to accidental pressing of a keyboard shortcut or due to a Windows update. This issue can be easily fixed by re-enabling the mouse.
Depending on the manufacturer, the function key combinations to switch-on or re-enable the mouse might be any of the following.
- Fn + F3 or Fn + F5.
- Fn + F9 or Fn + F11.
3. Change USB Port
Remove the mouse from its current USB port and plug it into another USB port. If it is a wireless mouse, plug the wireless receiver into another USB port.
If you are using a USB Hub, remove the Mouse from USB Hub and plug it directly into the USB Port of the computer.
4. Replace Batteries
The problem might simply be due to the mouse running out of battery power. Hence, replace the batteries in the mouse and see if this helps in fixing the issue.
5. Restart the Computer
Restarting the computer can help, if the problem is occurring due to a software glitch.
1. Press Alt + F4 keys and this will bring up the Shut Down dialog box.
2. Use the Arrow key to select the Restart option and click on OK to restart the computer.

After the computer restarts, try to use the Mouse and you should be able to see the Mouse Pointer.
6. Update Mouse Driver
Since, the mouse is not working on your computer, you need make use of Arrow, Enter keys and certain keyboard shortcuts to update the mouse driver.
Note: If you are not logged-in to an admin account, press Alt + F4 keys > use the Arrow keys to select the Switch User option > use Tab key to select the Admin User and login to your Admin Account.
1. Press Windows Logo + X key to open the Winx menu.
2. Use the Arrow key to select Device Manager and press the Enter key to open Device Manager.
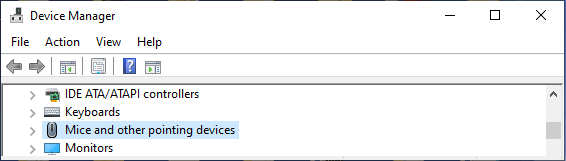
3. Press the Tab key to enter Device Manager screen > use Arrow key to select Mice and other Pointing Devices entry.
4. Next, press Alt + Right Arrow key to open Mice and other pointing devices entry > use the Arrow key to select your Mouse and press Shift + F10 key to open the right-click menu.
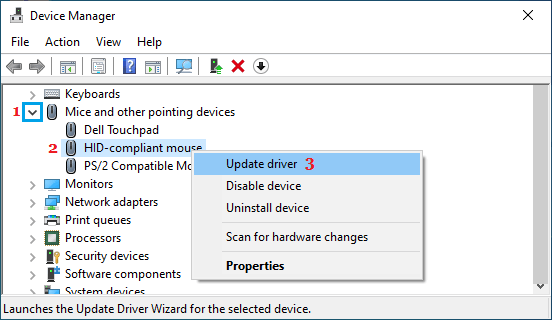
5. After opening the right-click menu, use the Arrow key to select Update Driver option and press the Enter Key.
6. On the next screen, select Search automatically for updated driver software option and press the Enter key to make Windows automatically search and update the driver software.
7. Disable Hide Pointer While Typing Option
Since, you cannot use the Mouse, you can make use of the Tab and Arrow Keys on the keyboard to unselect the Hide Pointer while typing option,
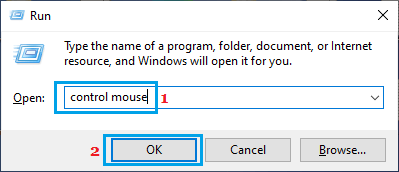
1. Press Windows + R keys to open Run Command.
2. Type control mouse and press the Enter Key.
2. On Mouse Properties screen, press Ctrl + Tab keys to select Pointer Options tab > use the Tab key to select Hide pointer while typing entry and press the Spacebar to uncheck the checkbox.
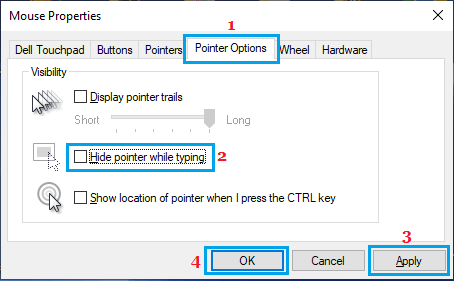
3. After disabling “Hide pointer” option, use the Tab, Arrow keys to select Apply/OK buttons and press the Enter key to save the changes.
8. Test Mouse on Another Computer
If above steps did not help, try using the mouse on another computer and see if the mouse pointer appears.
If the mouse pointer does not appear, it confirms that the problem is confined to the mouse and it is time to replace the mouse.