While it is easy to completely disable the “Location Tracking” feature on a Windows computer, you may also want to consider the option of configuring the Location Tracking feature to suit your privacy requirements.
For example, you can prevent almost all the Apps from accessing your location information, while allowing Microsoft’s “Find My Device” service to track the location of your device. This allows you to remotely Lock your computer, if it gets lost or stolen.
In addition to this, enabling “Location Services” feature while travelling allows the computer to automatically adjust Time/Date based on its location.
Disable Location Tracking in Windows 11/10
In general, “Location Services” feature gets enabled during the initial setup process of the computer, when users are prompted to provide access to Location and also when they go for “Express” setup (OOBE – Out of the Box Experience).
However, you can always disable or switch-off the Location Tracking feature on your computer and configure the Location Tracking feature to allow only the most essential apps to access your location information.
1. Totally Disable Location Tracking on Windows Computer
As mentioned above, you can totally disable the Location Tracking feature on your computer.
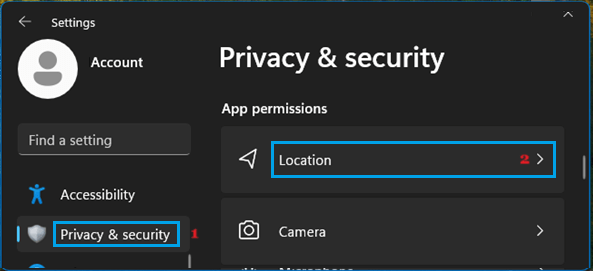
1. Go to Settings > Privacy & Security > scroll down to “App Permissions” section and click on Location tab.
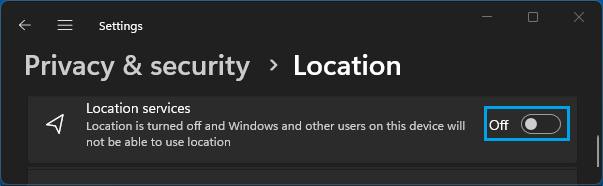
2. On the next screen, disable Location Services by moving the slider to OFF position.
Windows 10: Go to Settings > Privacy > Location > In the right-pane, click on the Change button and move Location for this device toggle to OFF position.
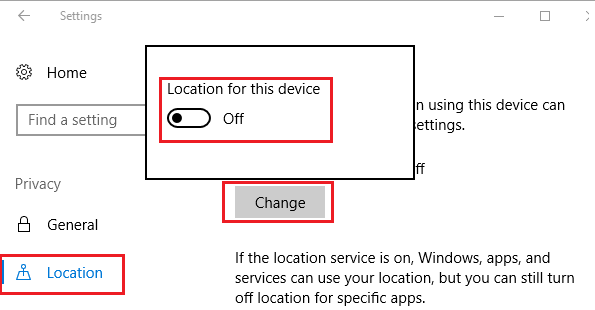
This will completely turn OFF the Location Tracking feature on your computer.
2. Disable Location Tracking For Specific Apps
The other option is to allow only the most essential apps like Find My Device and Maps to access your Location information and prevent all others apps from tracking your location.
1. Go to Settings > Privacy & Security > Location.
2. On the next screen, you can disable Location Services for specific Apps that you do not want to track your Location.
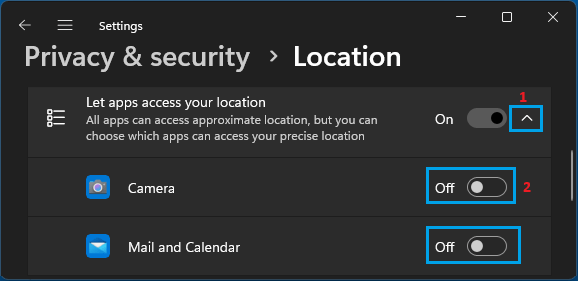
As you can see in above image, Location Services for the Camera, Mail and Calendar App has been disabled.
Windows 10: Go to Settings > Privacy > Location > In the right-pane, disable Location Services for specific apps by moving the toggle next to the apps to OFF position.
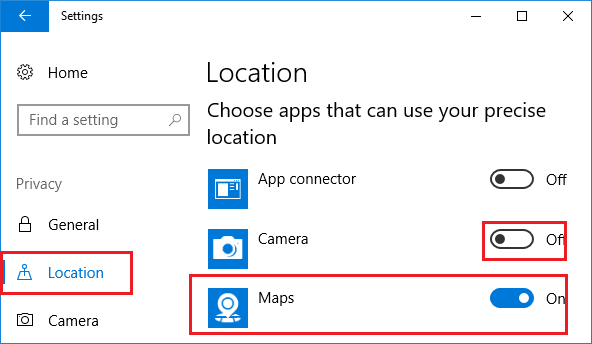
As you can see in above image, the Maps App has been provided with access to Location, while the Camera App has been prevented from accessing location information.
3. Clear Location History Stored on your Computer
When Location services is enabled, your Location related information remains available on the computer for a limited amount of time and it can be cleared by using the following steps.
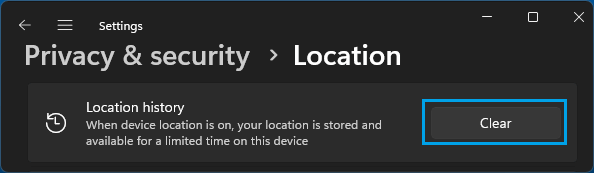
1. Go to Settings > Privacy & Security > Location.
2. On the next screen, scroll down to “Location History” tab and click on the Clear button.
Windows 10: Go to Settings > Privacy > Location > In the right-pane, scroll down to ‘Location History’ section and click on the Clear button.
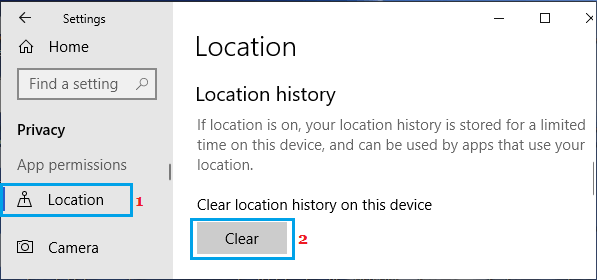
This will clear all your Location History that was stored on your computer.
4. Clear Location History Stored on Cloud Servers
If Location Service is enabled and you are signed-in with Microsoft Account, your Location information may get periodically saved on Microsoft’s cloud servers.
However, you can clear the Location information linked to your Microsoft ID and stored on cloud servers by going to account.microsoft.com, signing into your Microsoft Account and selecting the Clear Location Activity option.