If your Windows Laptop or Desktop computer is running slow, you should be able to improve its speed and overall performance by removing bloatware and taking other measures to cut down the resource usage on your computer.
In the case of new computers, the reason for sluggish performance and problems like High RAM, CPU and Disk Usage is usually due to presence of bloatware programs on the computer.
Another reason for slowing down of both new and used Windows computers is due to the default tendency of certain resource draining apps to startup with the computer and keep running in background.
Speed Up Windows 11 Computer
You can find below a number of steps to improve the overall performance of Windows 11 and make your computer run faster.
1. Disable Startup Apps
As mentioned above, Microsoft Apps like Skype, Teams, OneDrive and others have a default tendency to automatically start up with the computer and keep running in background.
1. Go to Settings > Apps (left-pane) > click on Startup in the right-pane.

2. On the next screen, you can prevent Apps from starting up automatically on the computer by moving the toggle to OFF position.

When you restart the computer, the apps that you switched OFF won’t be able to start up with the computer and keep running in the background.
2. Prevent Apps from Running in Background
Even if you prevent apps from starting up with the computer, Microsoft Apps like Skype and OneDrive have a tendency to keep running in the background, once you start using them.
1. Open Settings > select Apps in the left-pane and click on Installed Apps in the right-pane.

2. On the next screen, click on the 3-dots icon located next to the App that you want to stop from running in background and click on Advanced options.

3. On the next screen, scroll down to “Background apps permissions” section and set Let this app run in background entry to Never option.

Repeat the above steps, to stop other resource consuming apps from running in background.
3. Remove Bloatware
Most Windows computers come with many unwanted apps and programs pre-installed by the manufacturer. Uninstalling such apps can help in improving the performance of your computer.
1. Type Control Panel in the Search bar and click on Control Panel Desktop App in the search results.

2. On the Control Panel screen, click on Uninstall a program link located under Programs.

3. On the next screen, right-click on the program that want to remove and click on Uninstall.

4. On the confirmation pop-up, click on Yes to confirm.
Repeat the steps to remove other unwanted programs from the computer.
4. Run Disk Cleanup
Use Disk Cleanup utility to get rid of redundant files taking up storage space on your computer.
1. Type Disk Cleanup in the Search bar and click on Disk Cleanup App.

2. On the next screen, select all types of files that you want to clear and click on OK.

Note: You may be prompted to enter an Admin Password.
5. Disable Tips & Tricks
Microsoft wants to provide users with tips and suggestions on its products. However, this feature has been also been associated with High Resource usage, especially on budget computers.
1. Go to Settings > System > Notifications > scroll down and tap on Additional Settings.
2. On the next screen, uncheck Get tips and suggestions when using Windows option.

After this, you may find a reduction in disk usage and some improvement in the performance of your device.
6. Switch OFF Diagnostic Data & Tailored Experiences
Disabling Telemetry services can help in reducing resource usage on the computer.
1. Go to Settings > select Privacy & Security in the left-pane. In the right-pane, scroll down and click on Diagnostics & Feedback Card.

2. On the next screen, disable Diagnostic data, Improve inking & typing and Tailored experiences.

While this last fix is not exactly related to OneDrive, users have reported reduced CPU Usage, when these options are disabled.
7. Disable Updates from More Than One Place
1. Go to Settings > Windows Update > click on Advanced Options in the right-pane.
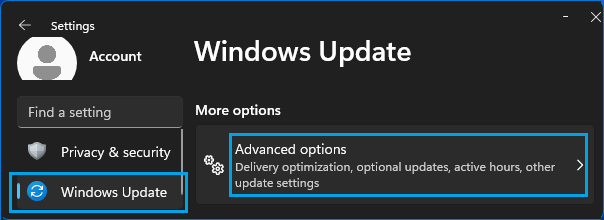
2. From the next screen, go to Delivery Optimization > Disable Allow Downloads from other PCs option.

Disabling this update option is known to reduce Runtime Broker Activity and this should reduce High RAM and CPU usage on your computer.
8. Setup Visual Effects for Best Performance
1. Right-click on the Start button and click on Run.
2. In the Run Command window, type SystemPropertiesAdvanced and click on OK.

3. On the next screen, switch to the Advanced tab and click on the Settings button under “Performance” section.

4. On the next screen, switch to Visual Effects tab and select Adjust for best performance option.

5. Click on Apply > OK to save these settings on your computer.
9. Update Device Drivers
Login to the computer as Admin and make sure that the Device drivers on your computer are up-to-date and compatible with the latest version of Windows operating system.
1. Right-click on the Start button and click on Device Manager.
2. On Device Manager Screen, click on Action > Scan for hardware changes.

Windows will scan your computer for Hardware changes and update device drivers (if required).
10. Adjust Visual Effects for Best Performance
Setting the Visual Effects on your computer for best performance, instead of best appearance can help in fixing the problem by reducing the load on GPU.
1. Right-click on Start and click on Run.
2. In the Run command pop-up, type SystemPropertiesAdvanced and click on OK.
3. On System Properties screen, switch to Advanced tab and click on the Settings button under “Performance” section.
4. On the next screen, make sure you are on the Visual Effects tab and select Adjust for best performance option.
5. Click on Apply > OK to save this setting on your computer.
11. Check for Viruses and Malware
Apart from being a security risk, presence of Viruses and Malware can have an adverse impact on the performance of the computer.
Hence, make sure that the Antivirus program on your computer is up to date. Also, make use of free Microsoft Safety Scanner to scan your computer for Malware and reverse changes made by Malware programs.
12. Check Hard Drive for Errors
1. Type PowerShell in the Search bar, right-click on Windows PowerShell in the search results and click on Run as Administrator.
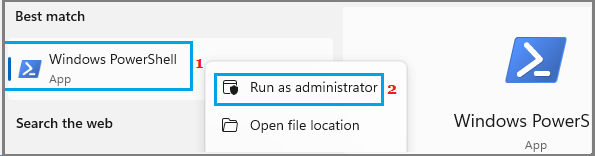
2. On the PowerShell screen, type chkdsk.exe /f /r and press the Enter key. If prompted to schedule volume to be checked on next restart, type Y.

3. Close the PowerShell Window and Restart the computer and patiently wait for Windows to scan the Hard drive for errors and repair bad sectors (if any).
Note: This process can take a very long time (5 to 12 hours or more).