Since, OneDrive is deeply integrated with Windows operating system, it naturally has a tendency to automatically startup with the computer, making it easy for you to sign-in to your cloud account and to setup the OneDrive service on your computer (if you haven’t done it yet).
While this default setting is ideal for signing-in to OneDrive and allowing it to perform its cloud related background services, it is of no use to those who are not actively using OneDrive or using other cloud storage services.
Hence, we are providing below three different methods to stop the OneDrive App from starting up automatically on your computer.
Stop OneDrive Starting Automatically in Windows 11/10
While OneDrive won’t be able to sync files and perform its cloud related operations without being signed-in, it still remains active in background; as indicated by the appearance of OneDrive related processes in the Task Manager.
Hence, it is reasonable for users to think in terms of preventing the OneDrive app from starting up automatically and unnecessarily maintaining its sign-in & system integration related background processes on the computer.
1. Stop OneDrive Auto Start Using Settings
You can make use of the Settings App to stop OneDrive from automatically starting up with your computer.
1. Press the (Win + I) keyboard shortcut to open the Settings menu on your computer.
2. From the Settings screen, go to Apps > Startup > Locate Microsoft OneDrive and switch it off.
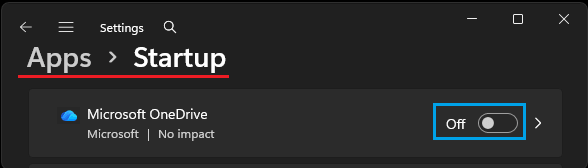
After this, you should no longer find OneDrive starting up automatically on your computer.
2. Disable OneDrive Auto Start Using Task Manager
Another easy way to prevent OneDrive from automatically launching itself on a Windows computer is by using Task Manager.
1. Right-click on the Taskbar and click on Task Manager.
2. On the Task Manager screen, go to Startup Apps tab, right-click on Microsoft OneDrive & select the Disable option.
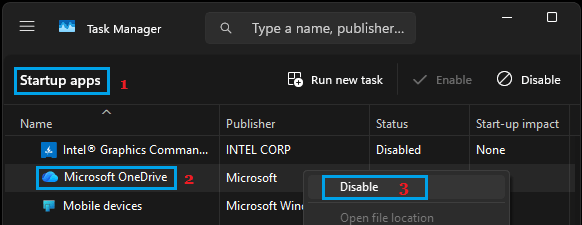
Note: You can bring up OneDrive by typing Microsoft OneDrive in the Search bar.
3. Stop OneDrive Auto Start Using OneDrive Settings
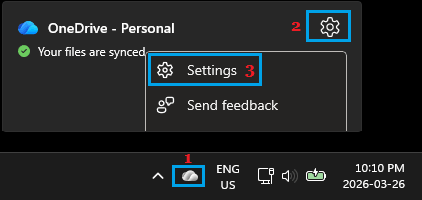
The Settings menu of the OneDrive App also provides the option to prevent OneDrive from starting up automatically on your computer.
1. Click on OneDrive Icon on the Taskbar > select the Gear-shaped Icon and click on Settings.
2. On the next screen, uncheck Start OneDrive automatically when I Sign in to Windows option and click on OK.
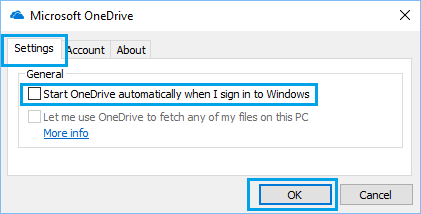
3. Next, right-click on the OneDrive Icon and select the Exit option in the menu that appears.
After this, you should no longer find the OneDrive App starting automatically on your computer.
4. Uninstall OneDrive from the Computer
If you are not at all interested in using any cloud storage service, you can consider the option of uninstalling the OneDrive App from your computer.
You can find the steps to Uninstall OneDrive in this guide: How to Disable or Uninstall OneDrive in Windows 11/10.