You can change the default Desktop Background on your MacBook by customizing the system wallpaper and also by making use of dynamic and static wallpapers that come pre-installed in macOS.
In addition to this, you can use solid color as Desktop background and upload your own images/photos to be used as the Desktop Background on your MacBook.
Change Desktop Background on MacBook
The easiest way to change the Desktop Background on a MacBook is by right-clicking on an image/photo located on the desktop and selecting Use Image as Desktop Picture option in the right-click menu.
Similarly, you can select photos from the internet and photos located within the Photos App as the Desktop background on your Mac.
Related: How to Change Login Screen Wallpaper on Mac.
1. Change Desktop Background Using Photos App
You can follow the steps below to change the Desktop Background on Mac using a Photo located within the Photos App on your Mac.
1. Open Photos app on your Mac.
2. Locate the particular Photo that you want to set as the Desktop background and open the photo by double-clicking on it.
3. Once the photo is open, click on the Share icon (Square with Arrow) and select Set Desktop Picture option.
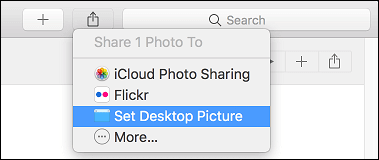
The selected photo will now appear as the Desktop Background on your MacBook.
2. Set Any Photo As Desktop Background
As mentioned above, the easiest way to change the Desktop Background on a Mac is by using any photo located on the Desktop.
1. Right-click on the Photo located on the Desktop of your Mac and select Set Desktop Picture option.
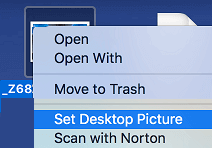
2. The selected Photo will now appear as the Desktop Background on your Mac.
Similarly, if the photo is located anywhere else, open the Folder where the photo is located > right-click on the photo and select Set Desktop Picture option in the right-click menu.
3. Change Desktop Background Using Safari Browser
You can also make use of the Safari browser to change the Desktop Background on your MacBook.
1. Open the Safari browser on your Mac
2. Go to the photo that you want to set as your new desktop background on Mac.
3. Right-click on the photo and select Use Image as Desktop Picture option.
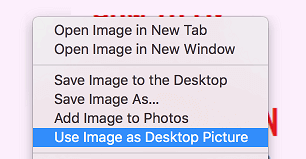
The selected photos/image will now be set as the Desktop Background image on your MacBook.
4. Set Stock Apple Photo as Desktop Background on Mac
As mentioned above, MacBook comes pre-loaded with high quality photos; which can be used as Desktop Background.
1. Click on Apple icon in the top-menu bar and select System Settings in the drop-down menu.
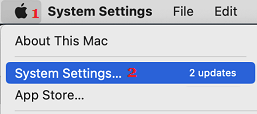
2. From System Settings screen, go to Desktop & Screen Saver screen > select Apple in the left-pane. In the right-pane, you can select the photo that you want to set as the Desktop Background on your MacBook.
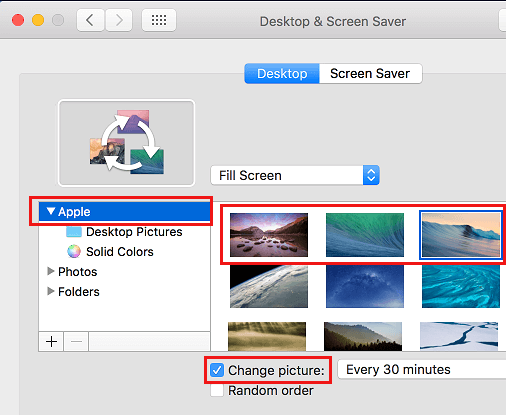
Note: You can make your MacBook to automatically switch Desktop Background after a set period of time by selecting the “Change Picture” option.
5. Change Desktop Background to Solid Color
As mentioned above, you can select a solid Color as the Desktop Background on your MacBook.
1. Click on Apple Logo (top-menu bar) > go to System Settings > Desktop & Screen Saver.
2. Select Solid Colors in the left-pane and select the color that you want to set as the Desktop background in the right-pane.
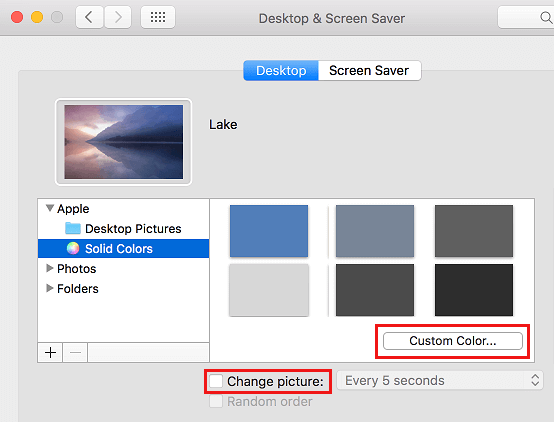
Note: You may have to expand the Apple entry to access the “Solid Colors” option.
As you can see in the above screenshot, you can create new colors by clicking on the Custom Color button and select Change Picture option to setup your device to automatically change its Background color.
Fix Blurred Out Desktop Background
After changing Desktop Background to an image or photo, you may notice that the image has blurred out. This happens because the image is set to Fill the screen; which causes it to resize.
1. Click on Apple Logo in the top-menu bar and select System Settings in the drop-down menu.
2. From System Settings screen, go to Desktop & Screen Saver screen and you will see the current desktop background along with a dropdown menu beside it.
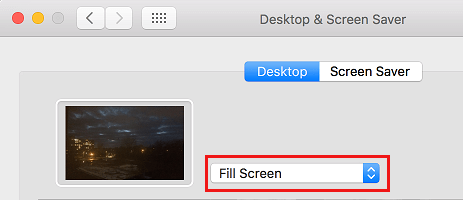
3. Click on the dropdown menu and select either Center or Tile option.
- Center: Choosing center will place your background image with its original size in the center of your Mac’s screen. The rest of the area will be filled out with a solid color.
- Tile: As the name suggest, choosing Tile will cause the image to appear over and over again in its original size.