The most likely reason for the problem of “Change Screen Saver Option” being grayed out on a Windows computer is due to this option being disabled on your device.
When the option to change Screen Saver is disabled, you won’t be able to access the drop-down menu that allows you to select another Screen Saver.
Hence, the problem can be fixed by enabling the option to change Screen Savers using the Registry Editor in case of Windows Home Edition and using Group Policy in case of Professional and the Enterprise Edition of Windows.
Change Screen Saver Option Grayed Out in Windows 11/10
If “Change Screen Saver” option is greyed out or not working on your computer, you can find below the steps to Enable Save Screen Saver option by using Registry Editor and also by using Group Policy Editor.
1. Enable Screen Saver Using Registry Editor
If you are using the Home Edition of Windows, you can enable the option to Change Screen Saver by using Registry Editor.
1. Right-click on Start button and click on Run.
2. In the Run Command window, type Regedit and click on OK.

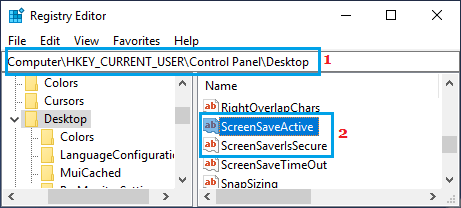
3. On the Registry Editor Screen, navigate to HKEY_CURRENT_USER\Control Panel\Desktop and double-click on ScreenSaveActive.

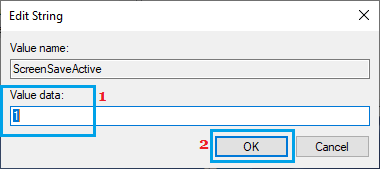
4. In the pop-up, change the Value Data for ScreenSaveActive key from 0 to 1.

5. Similarly double-click on ScreenSaverIsSecure and change its Value Data to 1.
Restart the computer to apply this change and try to change the Screen Saver on your computer.
2. Enable Screen Saver Using Group Policy Editor
If you are using the Professional Edition of Windows, you can enable the Save Screen Saver option by using Group Policy Editor.
1. Click on the Start button > Run.
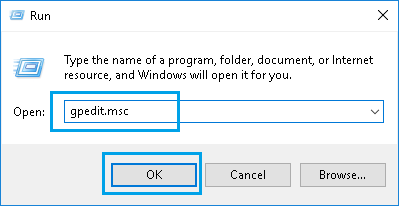
2. In the Run Command Window, type gpedit.msc and click on OK.

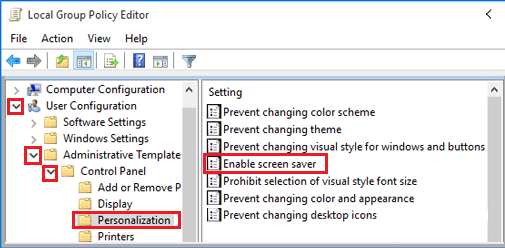
3. In Group Policy Editor, navigate to User Configuration > Administrative Templates > Control Panel > Personalization and Double click on Enable Screen Saver policy.

4. In the pop-up, make sure that Not Configured or Disable option is selected.

After this, you will be able to Change the Screen Saver on your computer.