As you must have experienced it, the presence of a blank page somewhere in the middle of a Microsoft Word document can mess up with page numbering, especially when you print the document. Even if you are not actually printing the file, presence of Blank Pages in a Microsoft Word document can make it look unprofessional and unsuitable for converting to PDF format and sending it to anyone by email.
Hence, we are providing below different methods to delete Blank Pages in Microsoft Word, both when they occur at end of the document or a table (usually the case) and also from anywhere in middle of the document.
Delete Blank Pages in Microsoft Word Document
In order to delete a Blank page in a Microsoft Word document, the first step is to go to the location of the Blank page, which can be done either by scrolling down to the Blank page or by making use of the Ctrl + G shortcut (if you know the page number). Once you are on the Blank page, you can remove the Blank page by using any of the following methods.
1. Delete Blank Page Using Keyboard Shortcut
While the Ctrl + G shortcut is usually used to go to a particular page in a Word Document, it can also be used to delete pages with and without content in a Microsoft Word document.
1. Open the Word Document from which you want to remove Blank Pages.
2. Go to location of the Blank page that you want to remove from the document.
3. Click anywhere on the Bank page and press Ctrl + G keys (Windows) or Option + Command + G keys (Mac).
4. On the “Find & Replace” dialogue box that appears, type \page and press the Enter key on the keyboard of your computer.
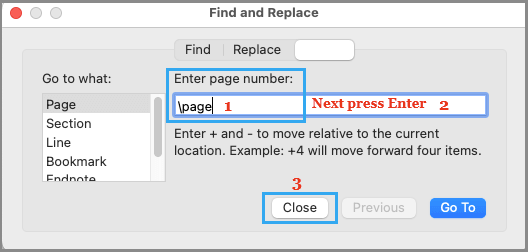
5. After this click on Close and press the Delete key on the keyboard of your computer.
If you are unable to delete the Blank page using this method, you should be able to do it using other methods as provided below in this guide
2. Delete Blank Pages at End of Microsoft Word Document
You can follow the steps below to delete Blank pages that are appearing at the end of the document.
1. Open the Microsoft Word Document that contains the blank page.
2. Click on the View tab in the top-menu bar and select Print Layout.
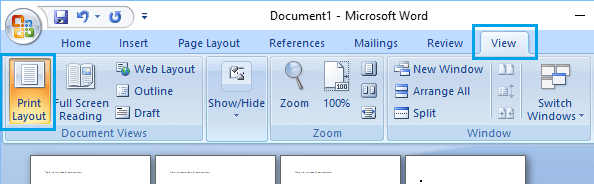
3. Next, switch to Home tab and click on Paragraph Markers icon.
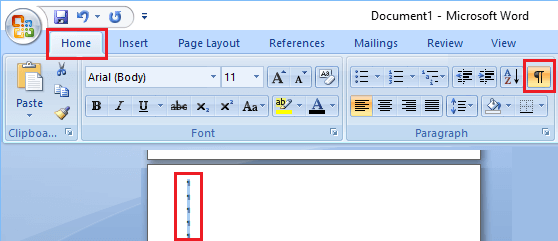
4. After this, scroll down to the blank page, select all the paragraph markers in the blank page and press the Delete key on the keyboard of your computer.
In case of multiple blank pages, select paragraph markers from the first to the last blank page and hit the delete key.
3. Delete Blank Pages from Middle of Word Document
An easy way to locate and delete blank pages from the middle of Microsoft Word document is to adjust the zoom % to about 20% and view the document in Multiple Page view.
1. Open the Word Document that contains blank page/pages in the middle of the document.
2. Click on the View tab located in the top-menu bar and select the Print Layout option.
3. Next, click on the Zoom Icon and adjust the Zoom to about 20%. This will allow you to view multiple pages in the document, making it easy to find a blank page in the middle of a Word Document.

4. Switch to Home tab and click on the Paragraph Markers icon.
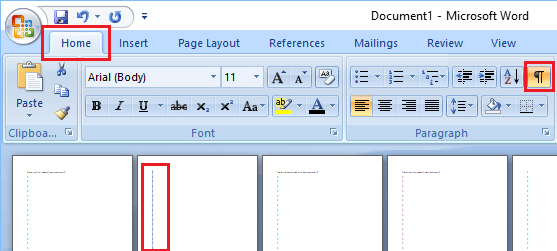
5. To delete a blank page, select all the paragraph markers in the blank page and press the delete key on the keyboard of your computer.
4. Delete Blank Page Below Table in Microsoft Word
Every time you insert a table in a Word document, Microsoft Word automatically adds a blank space at beginning and bottom of the table, which results in a blank pages.
Unlike other blank pages, a blank page created due to insertion of tables is difficult to remove. However, there is an easy workaround that can be used to delete a blank page appearing after a table in Microsoft Word.
1. Click on the Home tab and click on Paragraph Markers icon.
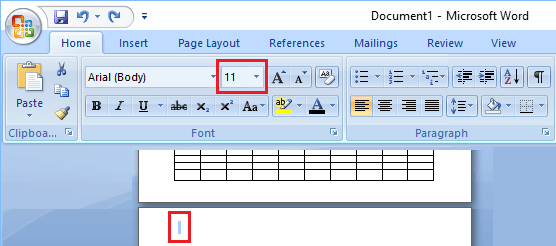
2. To remove blank page after a table, select the paragraph markers right below the table and change the Font Size to 1 pt.
5. Remove Blank Page from Two Page Word Document
If a blank page is appearing in a two-page Word document, you can use the following steps.
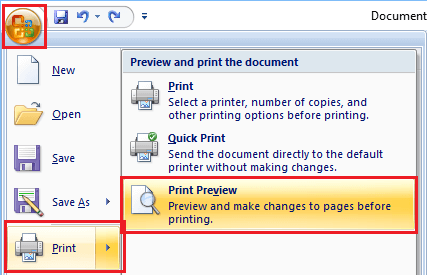
1. Click on the Office button > select the Print option and click on Print Preview.
2. On the Print Preview screen, click on Shrink one page and this will automatically delete the second blank page.
