In general, people think in terms disabling USB Ports on their computer in order to prevent the possibility of malware being transferred from infected USB devices.
Another reason for disabling USB Ports on a computer is to prevent the possibility of personal or sensitive data being copied and also to prevent usafe/unwanted files being transferred from USB drives to the computer.
Hence, we are providing below three different ways to Disable USB Ports in Windows 11/10 computers.
1. Disable USB Ports Using Device Manager
An easy way to disable USB Ports on a computer is by using the Device Manager Utility as available in Windows operating system.
1. Right-click on the Start button and click on Device Manager.
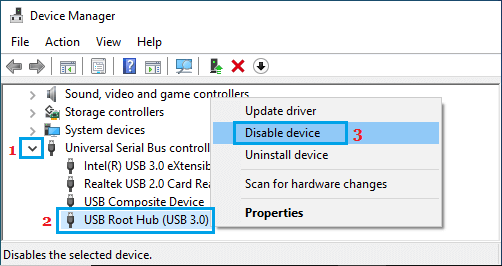
2. On the Device Manager screen, expand Universal Serial Bus Controllers entry, right-click on the USB Root Hub and select the Disable option.

After this, connect any USB device to the computer and see if it appears in the File Explorer.
If the USB device is being picked up by the computer, repeat the above steps to disable other USB Root HUB entries.
2. Disable USB Ports Using Registry
You can also disable USB Ports by changing Registry values for USBSTOR folder, which prevents USB storage devices (Flash drives) from starting on the computer, while still allowing mouse and keyboard to function normally.
1. Right-click on the Start button and click on Run.
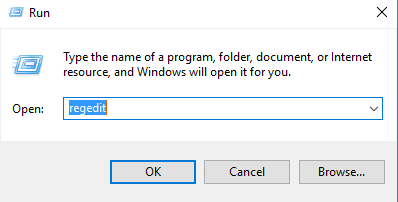
2. In the Run command window, type regedit and click on OK.

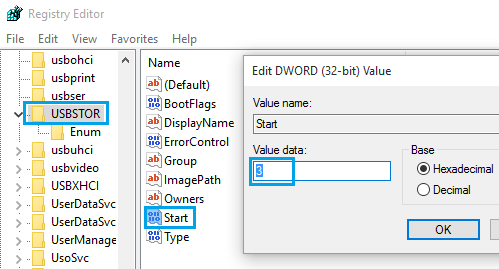
3. On the Registry screen, navigate to HKEY_LOCAL_MACHINE\SYSTEM\CurrentControlSet\Services\USBSTOR and double-click on the Start entry in the right-pane.
4. In the Edit DWORD (32-bit) pop-pop, change the Value Data from 3 to 4 and click OK to save the change.
This method only works on computers on which USB Storage Driver has already been installed.
On new computers, if the USB driver has not been installed yet, the Windows plug & play system automatically resets the Start value to 3 (Manual) and USB drives will start working.
3. Disable USB Ports Using BIOS or UEFI Settings
If the above methods did not work, you should be able to disable USB Ports for sure by going to BIOS/UEFI Settings on your computer.
1. Restart the computer and closely watch the screen for instructions on which key to press for entering BIOS or UEFS Settings on your computer.
2. Restart the computer and press the suggested Key to enter BIOS/UEFI Settings on your computer.
3. Once you are in BIOS, use the Arrow key to select Advanced, Onboard Devices or Integrated Peripherals and press the Enter key.
4. On the next screen, select USB Controller entry and press the +Key or any other suggested key to change USB Controller setting to Disabled.
If you do not see USB Controllers entry, look for USB Legacy Support, USB Keyboard Support or similar entries and change their setting to Disabled.
5. After making the changes, make sure that you Save the changes and exit BIOS by pressing the suggested key for your system (mostly F10 Key).
After this, restart the computer and check USB ports to make sure that they have been disabled.