• Skip to main content
  • Skip to primary sidebar

Techbout

Technology Simplified.

  • Windows
  • iOS
  • Mac
  • Android
  • Office
Home ยป Disable Web Results in Windows Start Menu Search

Disable Web Results in Windows Start Menu Search

By: Waseem Patwegar

As you must have noticed, search results from the internet appear when you search using the start menu search bar on your Windows 10 or 11 computer. You will find below the steps to Disable Web Results in Windows Start Menu Search.

Disable Web Results in Windows Start Menu Search

Disable Web Results in Windows Start Menu Search

As you must have noticed, the Start Menu Search in Windows 10 bring up web search results from the internet whenever you type anything into the Start Menu Search Bar.

This happens, because Windows 10 search is built on Microsoft’s Bing Search Engine which also powers Internet Explorer and Microsoft’s Edge browser.

While web suggestions might be useful in certain cases, they are totally unnecessary when a user is only trying to look for Files, Programs or Apps located right on the Hard Disk of the computer.

Another reason for disabling web results in Windows Start Menu Search would be to prevent your search terms using personal file names being sent to Microsoft servers.

Luckily, it is possible to disable Bing in the Start Menu and prevent your private searches from being sent to Microsoft servers.

Disable Web Results in Windows Start Menu Using Registry

In earlier versions of Windows 10, there was an option to disable Cortana in the Start Menu and this was enough to disable Bing search in Windows 10 start menu.

In the current version, the only way to Disable Bing Search in Windows 10 start menu is to edit the relevant Registry Files.

Right-click on the Start button and click on Run. In Run Command window, type regedit and click on OK.
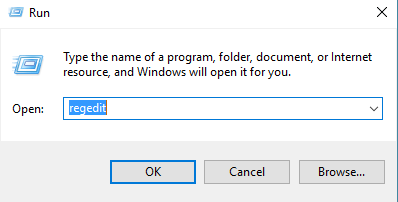
Open Registry Editor Using Run Command

On the Registry Editor screen, navigate to HKEY_CURRENT_USER\SOFTWARE\Microsoft\Windows\CurrentVersion\Search.

Right-click on the Search Folder and select New > DWORD (32-bit) option in the contextual menu.
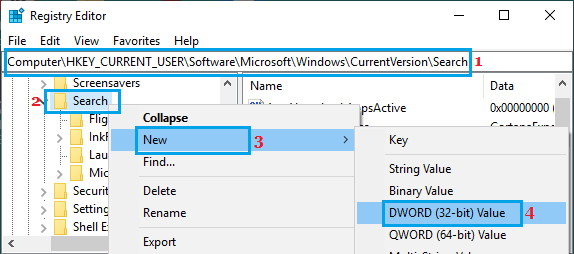
Create New DWORD in Windows Search Registry

Name the newly created DWORD as BingSearchEnabled and double-click on it.
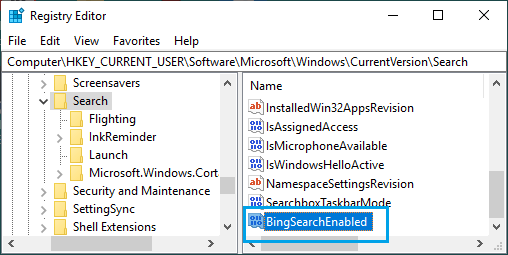
BingSearchEnabled Registry Entry

On Edit DWORD pop-up, make sure the Value data field is 0 and click on OK.
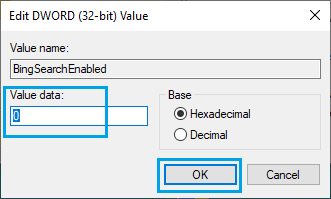
Disable Bing Search in Start Menu Using Registry

Next, double click on CortanaConsent entry.
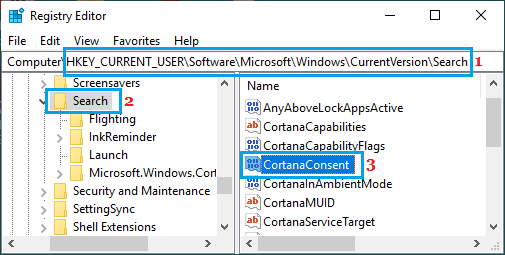
Open CortanaConsent Entry in Windows Registry

On Edit DWORD pop-up, type 0 in the Value Data field and click on OK.
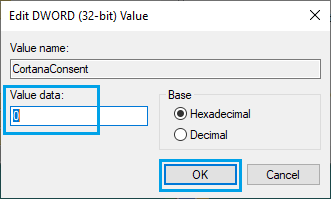
Disable Cortana in Windows Start Menu Search

Note: If you do not see CortanaConsent, create this field by following the same steps as used to create BingSearchEnabled.

After this change to Registry, Windows 10 will no longer bring up search results from the internet and all your searches in the Start Menu search bar will be limited to your computer.

In case required, you can always bring back the web search results by opening Registry Editor and changing BingSearchEnabled and CortanaConsent Data Values to 1.

Related
  • How to Clear All Types of Cache in Windows 10
  • How to Change Default Search Engine in Windows 10

You May Also Like
    • Google Chrome Not Updating
      Google Chrome Is Not Updating: How to Fix?
      • Disable Lock Screen in Windows 10/11
        How to Disable Lock Screen in Windows 10/11
        • Change Default Music Player in Windows 10/11
          How to Change Default Music Player in Windows 10/11

Primary Sidebar


Gadget Guide

  • Should You Buy MacBook or Windows Laptop
  • Chromebook vs Windows Laptop
  • 12 Reasons to Switch to Chromebook
  • Kindle E-Reader Comparison
  • Best Asus Laptops Under 500


About | Privacy Policy | Disclosure | Terms | Contact
© 2023 Techbout.com · All Rights Reserved