While the default setting on a Windows computer is to Boot from its Local Hard Drive, it is also possible to change the Boot sequence in BIOS/UEFI settings and make the computer Boot from USB Drive.
In general, the most common reason for enabling USB Drive Boot on a Windows computer is to start the computer using a Bootable Drive, which makes it easy to diagnose and troubleshoot problems.
Enable USB Drive Boot in BIOS
If you are only trying to fix the problem of a computer not starting up or refusing to boot into Windows, you can Boot the computer from USB Drive using steps as provided in this guide: How to Boot Windows Computer from USB Drive.
However, if your intention is to make the computer always Boot up from USB Drive, you need to change the Boot Sequence in BIOS/UEFI settings by using steps as provided below in this guide.
Steps to Enable USB Drive Boot in BIOS/UEFI
You can follow the steps below to login to BIOS/UEFI settings on your computer and set it up to always Boot from the USB Drive.
1. Restart the computer and watch the scrolling messages appearing on the screen of the computer. In this case, we are looking for something like Press [XXX Key] to enter setup.
Note: You will only have a few seconds to read the instructions. You can reboot the computer again, in case you missed the opportunity to read the instructions properly.
2. After noting down the suggested key, restart the computer and press/release the suggested key to enter the BIOS/UEFI settings on your computer.
Note: You may find the need to press/release the suggested key more than once. However, make sure that you do not press the key too many times, as it may end up locking the system.
If you are unable to access BIOS/UEFI settings using this method, you make use of other methods as provided in this guide: 8 Ways to Enter BIOS/UEFI in Windows 11/10.
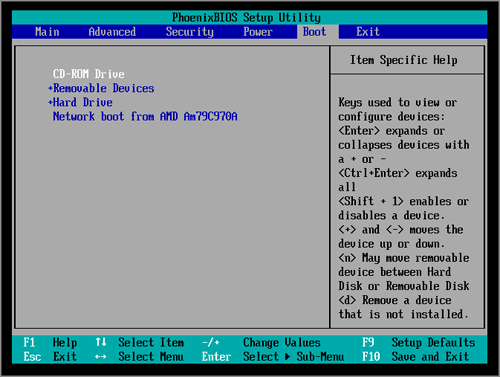
3. Once you are in BIOS, go to the Boot tab and use the arrows keys to select USB Drive as the first Boot Device.
4. If Secure Boot is enabled, go to the Security Tab and disable Secure Boot, as it allows the computer to boot from devices that do not have a security certificate.
5. Press the F10 key to save the changes and exit from BIOS utility.
After this, you should find your computer always booting up from the USB Drive.