If you are trying to find the Serial Number of your computer, it should be available on a sticker attached to the bottom of your Laptop computer. If you are using a Desktop computer, it should be available on a sticker attached to the back of the computer.
If the sticker attached to your laptop or desktop computer has been removed or become unreadable, you won’t be able to find the serial number of your computer.
Adding to the problem, Windows does not display the Serial Number of computer on its System Information screen or anywhere else in the Settings menu.
How to Find Computer Serial Number?
It is not uncommon for the sticker containing the serial number of the computer to become faded, difficult to read and even be torn or removed by the users in certain cases.
In such cases, you can try to find the serial number of your computer by using Command Prompt. If this does not help, you can try a number of other methods as provided below in this guide.
1. Run WMIC Command to find Computer Serial Number
On both Windows 11 and Windows 10 computers, you should be able to find the serial number of the computer by opening Command prompt and running the WMIC command.
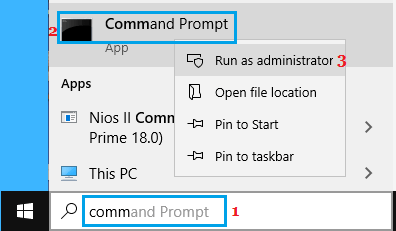
1. Type CMD in the Search bar > right-click on Command Prompt in the search results and select Run as Administrator option.

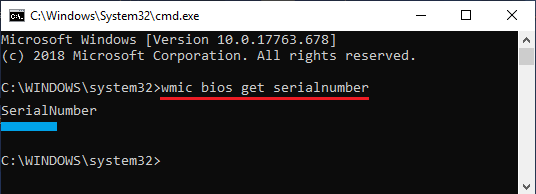
2. On the next screen, type wmic bios get serialnumber > press the enter key on the keyboard of your computer.

3. Once the command is executed, it should list the Serial Number of your computer below “SerialNumber” entry on the Command Prompt screen (see above image).
If WMIC command does not display the serial number properly, the problem is due to the serial number not being entered by the manufacturer in the firmware.
The WMIC command can display the serial number, only if this information is available in the firmware (BIOS/UEFI), otherwise it may display the serial number as blank space, 0 (zero) or as “To be filled by O.E.M”.
The same thing happens, if your computer was self-built or you purchased an assembled PC from someone else. In such cases, you can try other methods as provided below.
2. Check the Computer Box
If you still have the box in which your Laptop or Desktop computer was bought or delivered, it should have a sticker containing information about the computer, including its Serial Number.
3. Check Your Email
If you had purchased the laptop/desktop online from Dell, HP or any other manufacturer, try to find Emails received from them.
If there is an Email containing the Receipt for your purchase, you should be able to find the Serial Number mentioned in the Email Receipt.
4. Check Registration and Warranty Documents
If you were provided with a warranty certificate or purchased an extended warranty, the serial number of your computer should be available on the warranty certificate.
Similarly, if you registered the computer with the manufacturer, the Serial Number should be available on the registration document.
5. Check Battery Compartment and Case
If you have a laptop with removable battery, check its battery compartment. The Serial Number might be present on a sticker attached in the battery compartment.
In the case of desktop computers, the serial number of the computer can be usually found on a sticker attached inside the computer case.
6. Find Microsoft Serial Number on Surface Devices
In the case of Microsoft devices, the Serial Number is known as Microsoft Serial Number and it usually occurs in the form of a 12 digits long number.
If you do not have the original packaging or the sticker has become faded or damaged, you should be able to find the Microsoft Serial Number of your computer using the Surface App.
1. Open the Surface App and click on the Feedback button.
2. On the next screen (“Your Surface”), you will find the Microsoft Serial Number listed.
Tip: Check the bottom of Surface Keyboard, check the bottom/sides of Surface clipboard that attaches to the Keyboard. Also, flip out the kickstand and look for a string of numbers near its base.