As you must have noticed, there is no clear option to rotate pictures in Google Docs, which leaves users clueless when a picture inserted into a Google document turns up the wrong way.
Hence, let us go ahead and insert a Photo in Google Docs and take a look at the steps to rotate pictures in Google Docs.
1. Rotate Pictures in Google Docs on Mac or Windows PC
Follow the steps below to insert a picture in Google Docs and Rotate the inserted picture.
1. Visit docs.google.com and sign into your account
2. Open the Document which contains the picture that you want to rotate. If you haven’t yet uploaded a picture, you can open a New Document to try these steps.
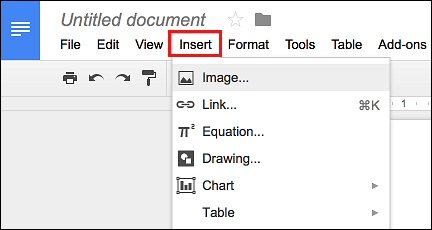
3. To Insert a Picture in Google Docs, click on the Insert tab located in top-menu bar and select the Image option in the drop-down menu.

4. On the pop-up that appears, select the Picture that you want to upload to Google Docs.
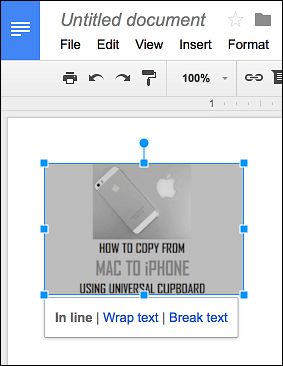
5. Once the picture is inserted into Google Docs, click on the Picture and you will see it becoming surrounded by small square boxes and an editing menu at the bottom.

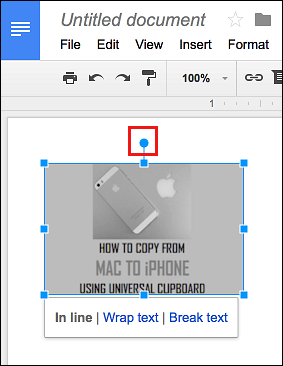
6. To Rotate the picture, click and hold on small blue circle and you will be able to move the picture using your mouse.
Moving the mouse to the right will rotate the image clockwise and moving it to the left will rotate the image anti-clockwise.

7. Once the picture is oriented properly, release the mouse cursor or take your finger OFF from the trackpad.
Rotate Pictures in Google Docs App
Unfortunately, the mobile version of Google Docs does not allow users to rotate pictures. This means that you will have to rotate the photo on your phone before uploading it to Google Docs.
If you are using an iPhone or iPad, you can refer to this guide: How to Rotate Photos on iPhone and iPad.
The other option is to upload the photo from your Phone to Google Docs and then access the Google Document on a computer to Rotate the picture.