A common reason for SD Card not working on Mac is due to the SD Card being in Windows default NTFS format, which is not recognized by macOS.
If you want to use the SD Card on both MacBook and Windows PC, it needs to formatted in FAT32 (works on all versions of macOS) or exFAT format (Works only on newer versions of macOS).
Similarly, the most common reasons for SD Card not showing up in Finder on Mac is due to SD Card being locked and the Finder not being setup to show External Drives.
SD Card Not Working on MacBook
If SD Card is Not Working on MacBook or not showing up in the Finder, you should be able to fix the problem using the following troubleshooting steps.
1. Restart Mac
1. Click on Apple Logo in top-menu bar > select Restart in the drop-down menu.
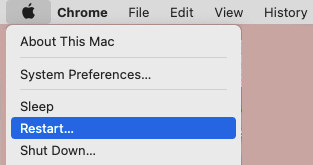
2. After Mac restarts, you may find the SD Card showing up in the Finder window.
2. Unlock SD Card
SD Cards come with a slider lock that can be used to write protect the SD Card. The Card is write protected, if the slider is down and writable when the slider is up.

Remove the SD Card from Mac and check the position of Lock switch to make sure that it is not set to locked position.
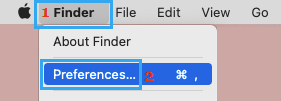
3. Enable External Discs in Finder Preferences
Make sure that your MacBook is setup to show External storage devices in the Finder.
1. Open the Finder on your Mac.
2. Click on the Finder tab in the top-menu bar and select Preferences in the drop-down menu.
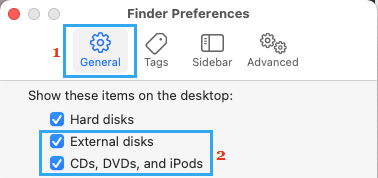
3. On Finder Preferences screen, switch to General Tab and select External Disks option.
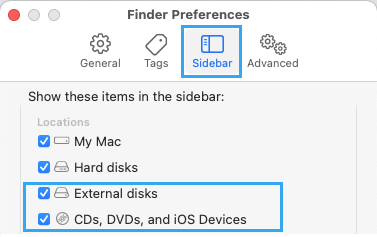
4. Next, switch to Sidebar tab and make sure both External Disks and CDs, DVDs and iOS Devices options are selected.
If the SD Card is still not being recognized by Mac, try to mount the SD Card manually by using the next step.
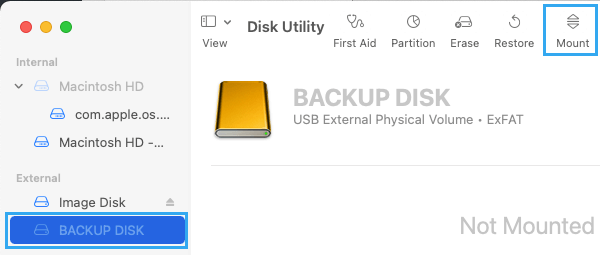
4. Manually Mount SD Card on Mac
Follow the steps below to manually Mount the SD Card on your Mac.
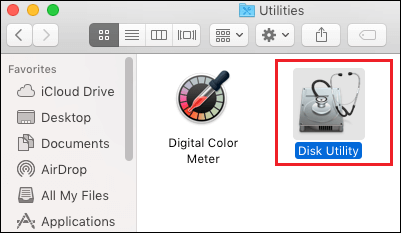
1. Click on the Finder Icon to open the Finder on your Mac.
2. From the Finder screen, navigate to Applications > Utilities > click on Disk Utility.
3. On the Disk Utility screen, select the SD Card in the side-bar and click on the Mount tab.
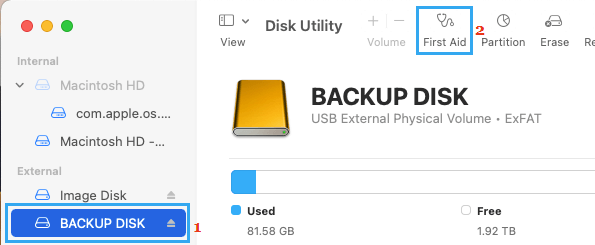
5. Run First Aid
The built-in “First Aid” tool on Mac can be used to fix corrupted files and other issues, which might be preventing the SD Card from functioning properly on your Mac.
1. Open Finder > navigate to Applications > Utilities > click on Disk Utility.
2. On the Disk Utility screen, select your SD Card in the sidebar and click on First Aid.
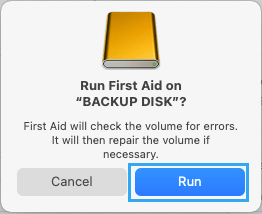
3. On the confirmation pop-up, click on Run to confirm.
If the First Aid tool is able to fix the problem, the Drive should now appear in the sidebar. If not, try to manually mount the External Drive.
Change SD Card Adapter
If you are using SD Card Adapter, the problem might be due to the Adapter becoming faulty or damaged. The only way to rule out this possibility is to switch to another SD Card Adapter and see if it makes any difference.
7. Reformat SD Card
As mentioned above, you won’t be able to use the SD Card, if it is in NTFS format. To fix this issue, you need to Format the External Drive to a macOS compatible File Format.
Note: The format process will wipe out the entire data on the disk.
1. Open Finder > navigate to Applications > Utilities > click on Disk Utility.
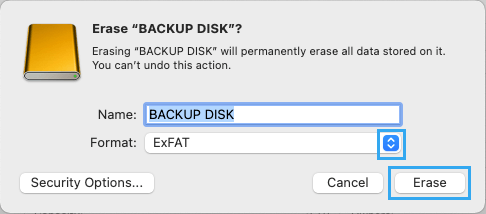
2. On the Disk Utility screen, select the External Hard Drive in sidebar and click on Erase.

3. On the confirmation pop-up, type a Name for the External Drive > select the desired Format type and click on the Erase button.
Patiently wait for the Format Process to be completed, after which it should show up in the Finder window.