If you are like most users, it is likely that you have used the Reminders App to setup simple Time and Date based Reminders to make your iPhone Remind you about Birthdays and other special events.
However, the Reminders app can go much beyond simple Birthday alerts and it can be used as a powerful tool for managing tasks, being organized and boosting your productivity.
Hence, let us go ahead and take a look at the impressive set of built-in features that are available in the native iPhone Reminders App; followed by the actual steps to create most commonly used type of Reminders on iPhone.
Notable Features of iPhone Reminders App
You can find below a listing of the key features of the Reminders App that can be used to manage important events, day-to-day tasks, shopping lists, team events and projects.
1. Built-in iOS Integration
The Reminders App is deeply integrated with some of other commonly used native apps on iPhone like Calendars, Contacts, Messages, Mail and Siri.
For example, when you add a Date to any Reminder, it automatically appears and gets marked as a Reminder in the Calendars App.
The built-in iOS integration allows you to create Reminders from within Contacts, Calendars, Messages and the Mail App. In-fact, you can even ask Siri to Remind you to send a message to a particular Contact of yours, while you are using the Messages or the Mail App on your iPhone.
2. Organize Reminders by Tags
The Reminder App provides the option to Group & Filter Reminders by creating and attaching Tags to the Reminders on your iPhone.
For example, you can attach the “Home” tag to Shopping Lists and other Reminders of personal nature and attach the “Work” tag to Reminders that are related to your Office or Business.
3. Use Sections in Reminders
If a particular Reminders List on your iPhone has a long list of items, it can be divided into Sections for better clarity and workflow management.
For example, you can divide a Reminders list into “Self Performed” and “Delegated” sections to separate tasks that need to be delegated to others and tasks that need to be executed by you.
4. Use Templates
Reminders App provides the option to create Templates for Shopping, Travel and other types of Reminders.
This allows you to save time by making use of templates to create Reminders Lists, instead of creating Reminders from scratch.
5. Share & Collaborate
You can share Reminders List with family, coworkers and assign specific tasks in a Reminders List to specific family members, coworkers or team members.
This ensures that everyone in the team is on the same page and well informed about collective and individual responsibilities.
6. Smart Lists
The Smart Lists feature in Reminders Apps can be used to automatically filter and gather tasks from all your Reminders Lists; that match a particular condition.
In-fact, the Reminders App comes with certain built-in Smart Lists that can provide quick overviews like Today (items that are due today), Scheduled (dated items) and Completed.
7. Auto-categorizing Reminders
When you create a grocery shopping list, Reminders App can automatically sort the listed items into categories like Produce, Dairy, Frozen, etc.
8. Location‑based Reminders
In addition to regular Time and Date based reminders, the Reminders app also provides the option to create Location Based Reminders, which can be set to trigger when you are leaving or arriving at a particular Location.
For example, you can setup the Reminders app to remind you to bring Marshmallows for junior; right when you step out of the office at 4-30 PM to return back home from work.
9. Use Icons & Emojis
You can make use of colourful Icons and Emojis to add spice and fun to Reminders and to make Reminders easy to identify at a glance.
For example, you can add a Shopping Cart Icon to shopping related lists and suitcase emoji to a business trip or travel related Reminders List.
Set Time, Date, Location Based Reminders on iPhone
You can find below the steps to create New Reminders, Location Based Reminders and also the steps to Modify and Delete Existing Reminders on your iPhone.
1. Create New Reminder on iPhone
You can follow the steps below to create regular Time and Date based Reminders on your iPhone.
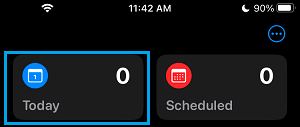
1. Open the Reminders App on your iPhone > tap on the Today card.
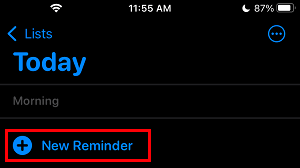
2. On Today view screen, tap on the +Plus Icon (or + New Reminder).
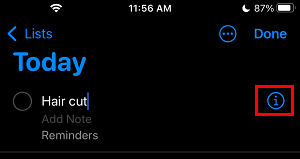
3. On the next screen, type what you want to be Reminded about and tap on Details icon (i).
4. On the Details screen, you can select the Date (Today or another date) and Time by moving the Date & Time sliders to ON position.
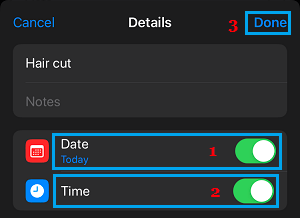
5. After completing the Reminder details, tap on Done to save this reminder on your iPhone.
2. Set Location Based Reminders on iPhone
As mentioned above, you can create Location based Reminders on iPhone; which can be set to trigger when you are Arriving at or Leaving from a particular Location.
1. Open Reminders App > select the Today Card > tap on the +Plus Icon (Or +New Reminder).
2. Type what you want to be Reminded About and tap Done to save the Reminder.
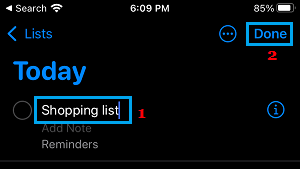
3. Next, select the Reminder that you just created and then tap on the Details Icon.
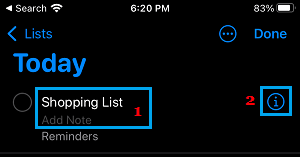
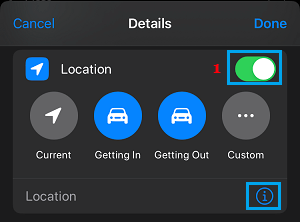
4. On Reminder Details screen, scroll down and enable the Location option, select the Current Location or tap on Custom to select another Location.
5. On the Location Details screen, you can type or Search the New Location and select it.
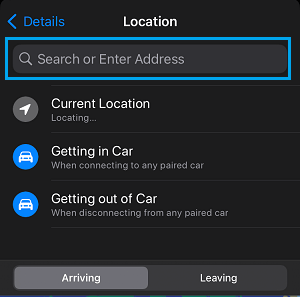
After selecting location, select whether you want the Reminder Alarm to trigger while Arriving or Leaving the selected location.
3. Modify or Edit Existing Reminder On iPhone
You can modify, edit or make changes to any existing Reminder on your iPhone at any time by following the steps below.
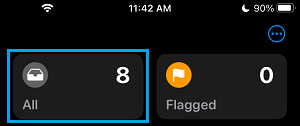
1. Open Reminders App > tap on the All Card (or any other Card where the Reminder is located).
2. On the next screen, select the Reminder that you want to edit and then tap on the Details “i” icon that appears.
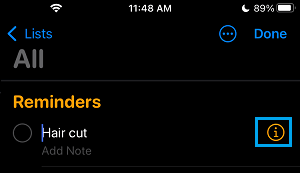
Note: Do not tap in the Circle, as it will remove the Reminder.
3. On Reminder Details screen, you can change the Date, Time and other details by tapping on them.
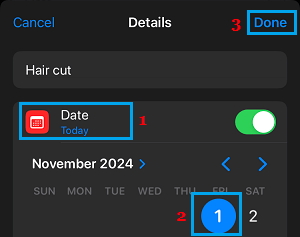
4. Make sure you tap on Done to save the changes that you made to this Reminder.
4. Delete Reminders from iPhone
You can delete any existing Reminder from your iPhone by following the steps below.
1. Open Reminders App > tap on All Reminders tab.
2. On the next screen, swipe left on the Reminder that you would like to delete and select the Delete option.
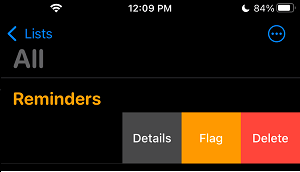
This will immediately delete the selected Reminder from your iPhone.