Even if you have an iCloud Account with a large storage capacity, it is still a good practice to download all photos from iCloud to Mac as an additional backup. This way you can ensure that a copy of all your iCloud photos is available on the Local Storage of your MacBook; which provides the following benefits.
- Offline Access: A Local Backup allows you to access your memories without an internet connection; which can be useful while travelling and staying in areas with poor network connectivity.
- Save Storage Cost: You can free up iCloud storage by downloading photos to Mac and removing them from your limited or low cost storage plan.
- Data Security: An additional Local Backup guarantees that your photos are still available, even if your iCloud Account is compromised or iCloud data gets accidentally erased or corrupted.
Download All Photos from iCloud to Mac
If iCloud Photos is enabled on your device, you can download your entire iCloud Photo Library to Mac by making use of various download options; as available within the native Photos App on your MacBook.
1. Download Originals to Mac: You can enable “Download Originals to Mac” option in Photos App and this will ensure that an exact replica of original photos as available in your iCloud Account is downloaded to the Photos App on your MacBook.
2. Export Unmodified Originals to Mac: This option allows you to download an exact or unmodified copy of iCloud photos to any desired location on your MacBook (outside the Photos App).
3. Export iCloud Photos to Mac: This option allows you to download a copy of iCloud photos to Mac in your desired File Format (JPEG, PNG. HEIC, TIFF); with or without Titles, Captions, Key Words and Location data.
If iCloud Photos is not enabled on your MacBook, you can still download all your photos from iCloud to Mac by going to icloud.com and using the 4th method; as provided below in this guide.
1. Download Original Photos from iCloud to Mac
Make sure that you are signed-in to your Apple ID Account and follow the steps below to download all iCloud photos to Mac by enabling “Download Originals to Mac” option.
Note: There needs to be enough storage on your MacBook to accommodate all your iCloud photos. Hence, this option is not suitable, if your iCloud photo library is very large.
1. Open the Photos App on your Mac.
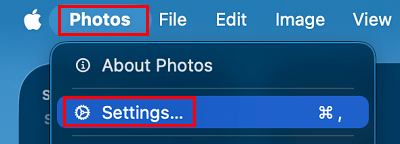
2. Click on Photos tab in the top-menu bar and select Settings in the drop-down menu.
3. On the Settings screen, go to iCloud tab and select Download Originals to this Mac option.
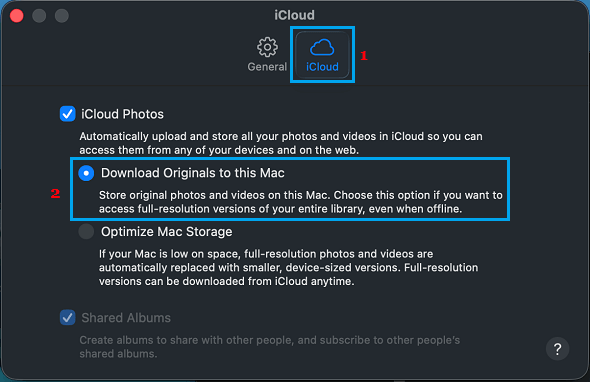
4. Once, iCloud is provided with the option to download originals to Mac; it will start the process of downloading all your iCloud photos to the Photos App on your MacBook.
The time required to complete the download can vary from 30 minutes to hours; depending on the size of your iCloud photo library and the speed of your internet connection.
Note: If your iCloud Photo Library is very large, it is better to download photos to an external storage drive; which is likely to have a much larger storage capacity; compared to a MacBook.
2. Export iCloud Photos to Mac
You can make use of “Export” option; as available within the native Photos App to download a copy of all your iCloud photos to Mac in your desired File Format.
1. Open the Photos App on your MacBook.
2. Click on Edit in top-menu bar > and choose Select All option in the drop-down menu.
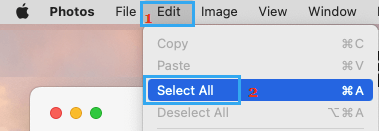
Note: If Select All option is not available or greyed out, click on any photo in the Photo Library.
3. On the next screen, go to File > Export and click on Export XYZ Photos.
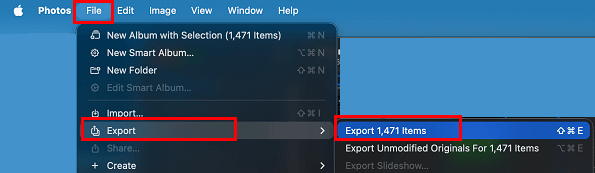
4. On the pop-up, select your desired File Format (JPEG, PNG. HEIC, TIFF) and other applicable options and click on Export.
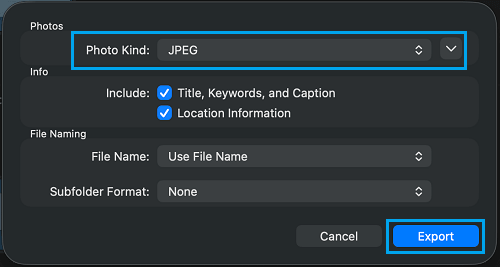
5. On the next screen, select the Location where you want to download the photos on your Mac and click on the Export button.
As mentioned above, the time required to download all photos from iCloud to Mac can vary from minutes to multiple hours; depending on the number of photos in your iCloud Account.
Important: Make sure that you keep iCloud Photos enabled on your Mac; until all the photos are downloaded.
3. Export Unmodified Original iCloud Photos to Mac
As mentioned above, this option can be used to download an exact or unmodified copy of all your iCloud photos to a Folder located on the Desktop of your MacBook.
1. Open Photos App > go to Edit > Select All.
2. On the next screen, go to File > Export and select Export Unmodified Originals option.
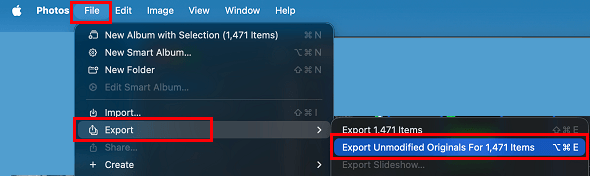
4. On Export Original pop-up, you can select Export IPTC option (if you want to import metadata attached to iCloud photos), select File Naming system (Original File Names, Numbered File Names or Titles from Photos App) and click on the Export button.
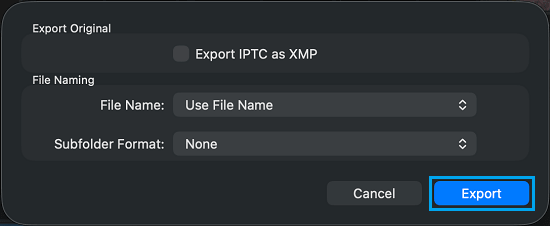
5. On the next screen, select a Folder located on the Desktop of your MacBook as the location for the imported iCloud photos and click on the Export option.
Note: If your iCloud Photo Library is very large, it can take multiple hours for the download process to be completed.
4. Download All Photos from iCloud to Mac Using Web Browser
If iCloud Photos is not enabled on your MacBook, you can download Photos from iCloud to Mac by visiting icloud.com and logging into your iCloud Account. The limitation of this method is that it allows you to download a maximum of 999 photos at-a-time.
1. Open the Safari browser on your Mac and go to icloud.com.
2. Login to iCloud by entering your Apple ID and Password.
3. After you are logged-in to iCloud, click on Apps Icon and then click on Photos.
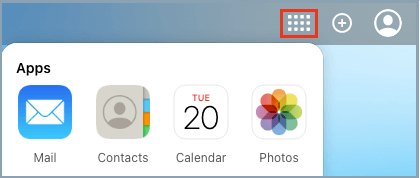
4. In iCloud Photos, switch to Photos Tab and press Command + A to select all iCloud Photos and then click on the Download icon to start the process of downloading All iCloud Photos to Mac.
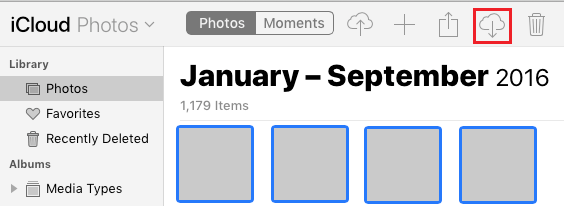
Note: Based on our experience, it is better to select and download only about 500 photos at a time and repeat the process, until all the photos are downloaded.
To select 500 photos, click on the First Photo > Scroll down 50 rows > Press & Hold down the Shift key on and click on the Last Photo in the 50th row.