Did you know that iPhone can double up as your Medical ID in case of emergencies? Continue reading to find out how easy it is to Set Up and Use Medical ID on iPhone.

Set Up Medical ID On iPhone
The Medical ID feature is built right into the Health App on iPhone and it can be used to input your Name, Age, Blood Group, Medical Conditions, Allergies, Drug Interactions and Emergency Contacts.
You can set up Medical ID on iPhone in such a way that it can be easily accessed by medical personnel in case of an emergency, even when your device is locked and protected by a Passcode.
While iPhone makes it easy for medical professionals to access your Medical ID during an emergency, it still restricts access to all other information available on your device.
Anyone that is in possession of your iPhone won’t be able to make calls, access your Contacts or bypass the Lock Screen, without entering its Password.
Steps to Set Up Your Medical ID on iPhone
All that is required to Setup Medical ID on iPhone is to open Health App (Heart Icon), tap on Get Started button and follow the instructions to add information that you want to provide.
1. Open Health App > scroll down to “Get More From Health” section and tap on Get Started button.
2. On Medical ID screen, enter your Name, Date of Birth, Medical Conditions, Medications, Allergies, Blood Type, Weight, Height, Primary Language, Emergency Contacts and tap on Done.

On the same screen, scroll down to “Emergency Access” section and move the toggle next to Show When Locked to ON position.

This will ensure that your medical information can be accessed by emergency medical personnel, even when your iPhone is locked.
In case you want to, you can even upload a picture of yourself and provide any other information that can be useful in an emergency.
Note: You can always go back and make changes to information on your Medical ID at any time by going to the Health App.
How to Access Medical ID Without Passcode
If “Show When Unlocked” option is enabled, anyone who wants to help you during an emergency will be able to access your Medical ID, even if your device is Locked by a Passcode.
This can be done by switching on your device and tapping on Emergency option, located at bottom-left corner of the Lock Screen.
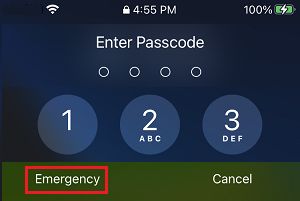
On the next screen, your Medical ID information can be accessed by tapping on Medical ID tab and the same screen provides the option to call 911 and call your Emergency Contacts.