Using a VPN (Virtual Private Network) on a Windows computer can help in protecting your online privacy by masking IP Address, encrypting data and hiding your online activities from hackers, trackers and also from the Internet Service Provider (ISP).
In general, using a VPN connection to browse the internet from a Windows computer or phone can provide the following advantages.
- Data Encryption: Protects personal/business data; especially on unsecured public Wi-Fi networks.
- IP Masking: Provides advanced online privacy & security by hiding actual location, IP address & identity from trackers, advertisers and hackers.
- Geo-Restrictions & Censorship: Helps access geo-restricted content and bypass censorship.
- Better Deals: Can help users find better deals (flights, hotels & products) on booking & e-commerce sites that alter prices based on location.
Use VPN On Windows Computer
You can use VPN on a Windows computer by downloading a dedicated app from your preferred VPN service provider (like NordVPN, ExpressVPN) and also by manually setting up a VPN connection by making use of the built-in VPN client as available in Windows operating system.
In both cases, the web address (www.myvpn.com) or IP Address (example: 192.000.981) of the VPN server or service provider will be required to connect to VPN and User Name/Password may be required to authenticate your connection to the VPN service/server.
1. Use VPN on Windows Using Third Party Apps
The easiest way to use VPN on a Windows computer is by downloading and installing a dedicated VPN App from your desired free or paid VPN service provider.
1. Sign up for a VPN service and download their official App for Windows.
2. After the App is downloaded, click on the downloaded .exe file and follow the steps to install the App.
3. Open the VPN App and Login using your User Name & Password.
4. Click on the Connect button to make use of the best available server or select your desired Country from the list.
Note: You may find the need to allow the VPN App through Windows Firewall.
2. Use VPN on Windows Using Built-in VPN Client
While the built-in native Windows VPN client is free to use, it is only a tool or client for connecting to a VPN server and not a VPN service by itself. Hence, it is mostly used to by schools, businesses and corporations to provide access to remote employees with “Always on VPN” setting.
Using the built-in Windows VPN client eliminates the need for a third-party software, reduces background resource usage and avoids the possibility of software conflicts. It supports both the basic PPTP (Point to Point Tunneling Protocol); which is easy to setup (but less secure) and also industry-standard high security protocols like L2TP/IPsec, SSTP and IKEv2.
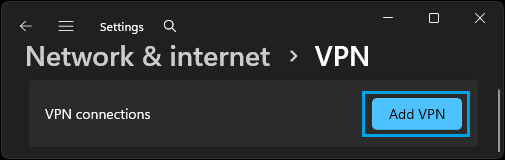
1. Go to Settings > Network & Internet > click on VPN in the right-pane.
2. On the VPN screen, click the Add button located in VPN Connections tab.
3. On the next screen, you will be required to provide details about your VPN Connection. For the sake of simplicity, we have broken the screen into two sections.
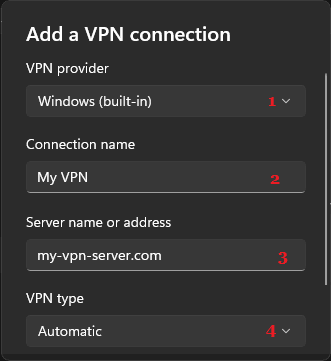
In the first section, you will be required to provide information about your VPN Provider, VPN Connection name, VPN Server address and VPN Connection Type.
- VPN Provider: Select Windows (built-in).
- Connection Name: Type any Name that you want to use.
- Server Address: Provide the web address to your VPN Server (www.yourVPN.com)
- VPN Type: Select PPTP (Point to Point Tunneling Protocol) or L2TP/IPsec; both are natively supported by Windows operating system.
After providing above details, scroll down and provide more required details about your VPN Connection.
- Type of Sign-in-info: Select User Name and Password as the method that you will be using to sign-in to the VPN.
- User Name & Password: Enter your VPN credentials.
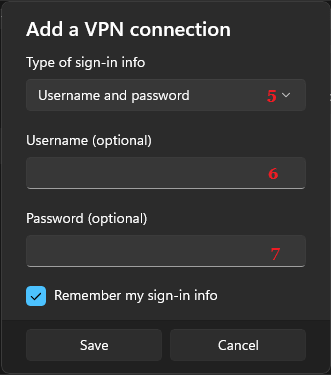
You can check “Remember my Sign-in info” box, if you want Windows to remember your User Name and Password; which allows you to sign-in to VPN without entering your User Name and Password.
4. After providing all the details, click on the Save button to save these settings.
3. Connect to VPN on Windows Computer
Once the VPN network is setup on the computer, you can connect to the VPN Network directly from the Taskbar.
1. Click on the Network Icon located in the Taskbar and select your VPN Network Name in the menu that appears.
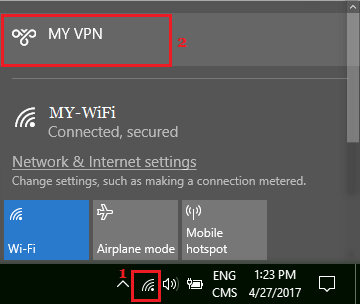
2. On the next screen, you may be requested to enter User Name and Password; in order to login to your secure VPN Network.
Note: You can also connect to VPN by going to Settings > Network & Internet > VPN > VPN Name and clicking on the Connect button.