While iPhone provides the option to Hide Photos, you can add yet another layer of security to your private and personal photos by protecting them with a Password.
This ensures that anyone that manages to gain access to your device won’t be able to open the Hidden Photos Folder, which can be easily accessed by going to Photos app.
Password Protect Photos on iPhone
The easiest way to password protect photos on iPhone is by using the built-in “Use Passcode” feature as available within the Photos App.
As you must have guessed it, this method requires you to move your personal and private photos to Hidden Album within Photos App and Lock this Hidden Folder with a password.
In addition to this, you can also password protect photos on iPhone by moving them to a Note and Locking this particular Note with a password, which is different from your Lock screen password.
1. Password Protect Photos Using Photos App
You can follow the steps below to move photos to a Hidden Folder within Photos App and lock this Hidden Folder with your Lock screen password.
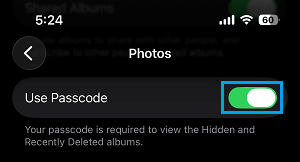
1. Go to Settings > Apps > Photos.
2. On Photos screen, move the toggle next to Use Passcode to ON position.
3. After this, open Photos App and select the Photos that you want to hide > Once the Photos are selected, tap on 3-dots icon (top-right) and select the Hide option.

5. On the confirmation pop-up, tap on Hide Photos to confirm.
The selected photos will be moved to the Hidden Photo Folder on your iPhone and they will be protected by your Lock Screen Password.
2. Password Protect Photos Using Notes App
As mentioned above, this method requires you to add photos to a Note and Lock this particular Note with a unique password (different from the Lock screen password).
1. Open the Photos App on your iPhone and select the photos that you want to hide.
2. Once the Photos are selected, tap on the Share icon located in bottom menu.
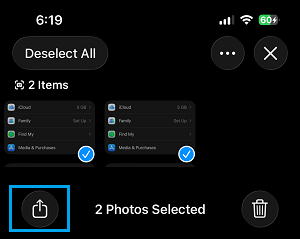
3. On the Sharing Menu that appears, select the Notes App.

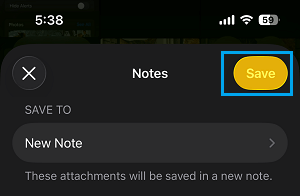
5. On the New Note screen, tap on the Save option to save the selected photos to this New Note.
After the photos are saved to the New Note, the next step is to password protect the Note containing photos by using the next steps.
6. Open the Notes App on your iPhone and open the New Note which contains the photos that you added (Saved Photos in this case).

7. Once the Note is open, tap on 3-dots Icon (top-right corner) and then tap on Lock Icon in the menu that appears.

8. On the pop-up, enter the Password that you want to use to Lock Notes on your iPhone and tap on OK.

Note: After this make sure, you tap on the open Lock Icon to Lock this particular Note on your iPhone.
Once the Photos are placed in a Locked Note, no one will be able to access or view those photos, without entering the password that is required to Unlock Notes on your iPhone.
However, you are not done yet! – The original copy of Locked photos will still be available in the Photos App.
Hence, the final step is to go to Photos App and Delete those photos from their original location in the Photos App.