If your computer is coming up with “WiFi Doesn’t have valid IP Configuration” error, you can find below the steps to fix this problem in Windows 11/10.

WiFi Doesn’t Have Valid IP Configuration Error
When a Windows computer is unable to connect to internet, it usually comes up with an error message, providing a reason for its inability to connect to network.
If the network connectivity problem is being caused by the IP Address of the computer or Modem, you may find the computer coming up with “WiFi Doesn’t Have Valid IP Configuration” or “Unidentified Network” error message.
In most cases, this common WiFi Connectivity error can be fixed by using the following methods.
1. Restart WiFi Network Adapter
Restarting the WiFi Network Adapter can help in fixing Network connectivity problems.
Windows 11: Go to Settings > Network & Internet > Advanced Network Settings > scroll down to “Related Settings” and click on More Network Adapter Options.

On the next screen, right-click on your WiFi Network and select the Disable option.

After 10 seconds, right-click on WiFi and select the Enable option.
Windows 10: Go to Settings > Network & Internet > scroll down and click on Change Adapter Options > On the next screen, right-click on your WiFi Network and select the Disable option.
After 10 seconds, right-click on your WiFi Network and select the Enable option.
2. Try Network Troubleshooter
Start by using the built-in Windows Network Troubleshooter to find and fix the problem.
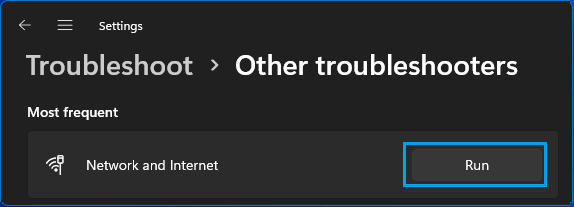
Windows 11: Go to Settings > System > scroll down in the right-pane and click on Troubleshoot > On the next screen, click on other Troubleshooters.

On the next screen, click on the Run button located in “Network & Internet” tab.
Follow onscreen instructions as the troubleshooter tries to find and fix internet connectivity problems on your device.
Windows 10: Go to Settings > Network & Internet > scroll down in the right-pane and click on Network Troubleshooter > Follow the Instructions to fix problems on your computer.
3. Reset Wireless Network Adapter
Right Click on the Start button and click on Device Manager.
1. On Device Manager screen, expand Network Adapters entry > right-click on Wireless Adapter and click on Uninstall device option.

2. On the confirmation pop-up, check Delete driver software for this device option and click on Uninstall.

3. Restart your computer and Windows should automatically install the right driver software.
Note: In rare cases, Windows may fail to install the right driver. If this happens, manually download the driver software from the manufacturers website and install it on your computer.
4. Power Flush the Modem/Router
Unplug the Modem/Router from its power supply source and patiently wait for 60 seconds.
After 60 seconds, reconnect the Modem/Router to power supply source and wait for all the lights to turn green.
Now, check to see if the computer is able to connect to internet, without displaying any error message.
5. Reset Winsock Protocol
A Winsock reset uninstalls unidentified or harmful network connections on your computer (if any) and restores the computer to default settings.
1. Open Command Prompt As Admin > Type netsh winsock reset in the Command Prompt window and press the Enter key.

2. Close the Command Prompt window and Restart your computer.
6. Release/Renew IP Address
1. Open Command Prompt as Admin > type ipconfig /release and press the enter key. This will release the current IP Address of your computer.

2. Next, type ipconfig /renew and press the Enter key to renew the IP Address of your computer. Close Command Prompt window and restart your computer.
7. Update Network Driver
1. Right Click on the Start button and click on Device Manager.
2. On Device Manger Screen, expand Network Adapters > right-click on the WiFi Adapter and click on Update Driver Software option.

Tip: If you see multiple entries, look for something that has Wi-Fi in it or says Network or 802.11b.
3. On the next screen, click on Search Automatically for Updated Driver Software.
Wait for your computer to search for the Latest Driver Software as available for the WiFi Adapter. Follow the onscreen instructions to Install the driver software (If available).
8. Disable Antivirus Program
In certain cases, the problem is caused by the Antivirus program installed on your computer. Hence, temporarily disable the Antivirus software program installed on your computer and see of this helps.
In most cases, you should be able to right-click on the Antivirus Program icon in the taskbar and select Disable option.
If you cannot find the program icon in the Taskbar, it should be available in the System Tray. If you are using Windows Defender, disable Windows Defender for a temporary period.