While the default setting in Windows is to use the DNS Servers of your Internet service provider, it also provides the option to change the DNS Server on your computer to any available public DNS service.
In general, the default DNS setting is convenient for most users, who do not want to go through the hassle of manually setting up DNS Servers on their computers.
Change DNS Servers in Windows 11/10
If you are experiencing slow browsing speeds during certain periods of the day, the problem is usually due to DNS Servers of your Internet service provider being busy or over-crowded.
In such cases, you can consider the option of switching the DNS Servers on your computer to Google Public DNS, OpenDNS or Amazon DNS and see if this helps in fixing the problem.
Another reason for changing DNS Servers is to make use of advanced DNS features like content filtering, Anti-phishing and child protection controls as available in OpenDNS and other providers.
1. Steps to Change DNS Servers in Windows 11/10
You can follow the steps below to change the DNS Server on your Windows 11 computer.
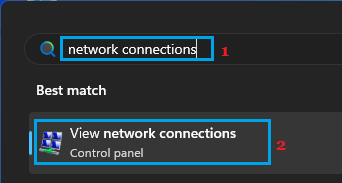
1. Click on the Start button > Type Network Connections in the search bar and select View Network Connections in the Search Results.
2. On Network connections screen, right-click on your active network (Wi-Fi or Ethernet) and click on Properties.
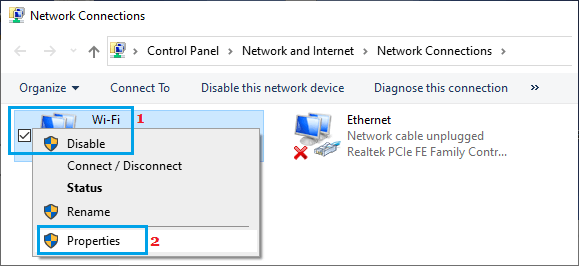
3. If Prompted, enter your Admin Password to gain access to Wi-Fi Properties screen.
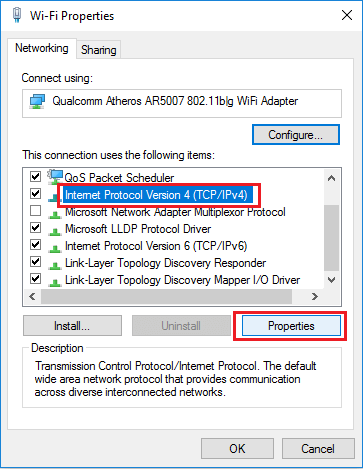
4. On Wi-Fi Properties screen, select Internet Protocol Version 4 (TCP/IPv4) entry and click on Properties.
5. On the next screen, select Use the following DNS Server addresses option and enter 8.8.8.8 as your Preferred DNS Server and 8.8.4.4 as the Alternate DNS server.
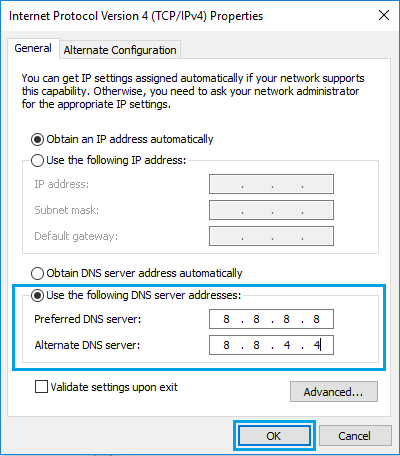
6. Click on OK to save the new DNS Server settings on your computer.
Make sure you restart the computer in order to implement this change in DNS settings.
2. Change DNS Server On Windows Computer Using Settings
If you prefer using the Settings menu, you can follow the steps below to change DNS Servers on your computer.
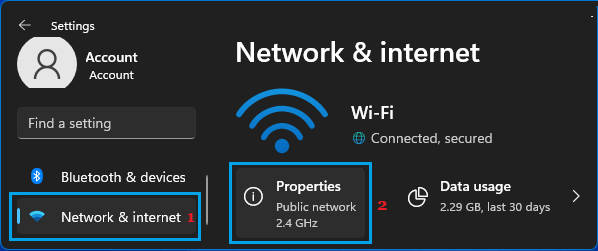
1. Go to Settings > select Network & Internet tab in the left-pane. In the right-pane, click on Properties tab, located below your current active Network.
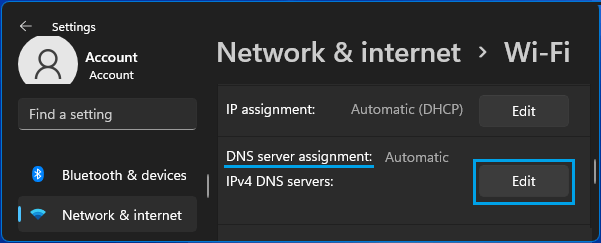
2. On Wi-Fi Properties screen, scroll down to DNS Server Assignment section and click on the Edit option.
3. On Edit Network DNS Settings pop-up, use the drop-down to select the Manual option and enter 8.8.8.8 as Preferred DNS and 8.8.4.4 as Alternate DNS Address.
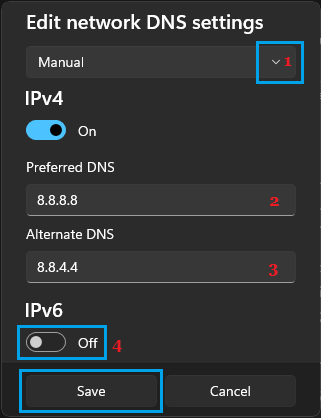
Note: If you want to use OpenDNS, type 208.67.222.222 as Preferred DNS and 208.67.220.220 as Alternate DNS.
Once you are done, make sure you click on the Save button to save the new DNS Server settings on your computer.
Switch to Google Public DNS or OpenDNS
Both Google Public DNS and OpenDNS are free to use and you can change the DNS Servers on your computer to Google Open DNS by entering 8.8.8.8 as Preferred DNS and 8.8.4.4 as the Alternate DNS Address.
If you want to use OpenDNS, type 208.67.222.222 in Preferred DNS Server box and 208.67.220.220 in Alternate DNS Server box.