The Network Access Denied Error in Google Chrome appears with ERR_NETWORK_ACCESS_DENIED error code and an error message reading “Unable to access the network”.
In addition to the error message, you may also see a suggestion to allow access to Chrome browser in Windows Firewall or the Antivirus settings on your computer.
If there is no reference to Antivirus or Firewall in the error message, the problem could be due to use of proxy servers and other network connectivity issues.
Err Network Access Denied Error in Chrome
If the Google Chrome browser on your computer is coming up with “ERR NETWORK ACCESS DENIED” error, you should be able to fix the problem using the following steps.
1. Clear Browsing History
The first step would be to clear the browsing cache and see if this helps in fixing the problem.
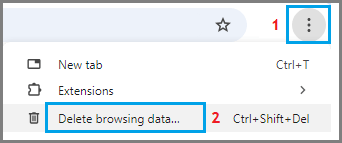
1. Open Google Chrome > click on 3-dots icon > select Delete Browsing Data option in the drop-down menu.
2. On the next screen, switch to Advanced tab, select All Time as the Time Range and click on Clear Data button.
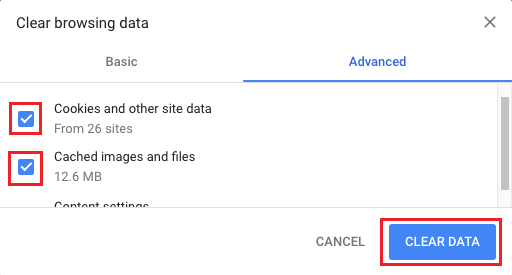
After clearing the cache, see if you can connect to the internet.
2. Update Network Adapter Driver
The problem could be due the Driver software for the Network Adapter on your computer not being automatically updated by Windows.
1. Right click on the Start button and click on Device Manager.
2. On Device Manger Screen, expand Network Adapters entry > right-click on the Wi-Fi Adapter and click on Update Driver Software option.
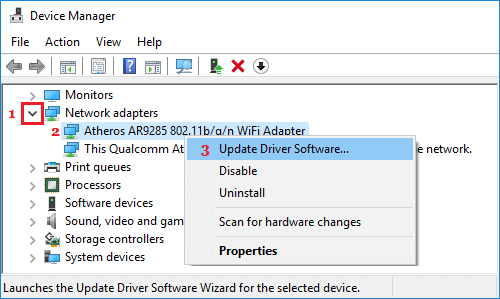
Tip: If you see multiple entries, look for something that has Network, 802.11b or Wi-Fi in it.
3. On the next screen, select Search automatically for updated driver software option and follow the instructions to install updated driver software (if available).
3. Disable Proxy Servers
The use of proxy servers is known to cause network connectivity issues. Hence, make sure that your computer is not connecting to internet using a proxy server.
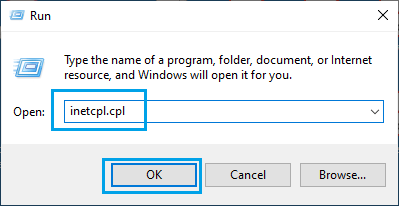
1. Open Run Command > type inetcpl.cpl and click on OK.
2. On internet Properties screen, switch to Connections tab and click on LAN Settings button.
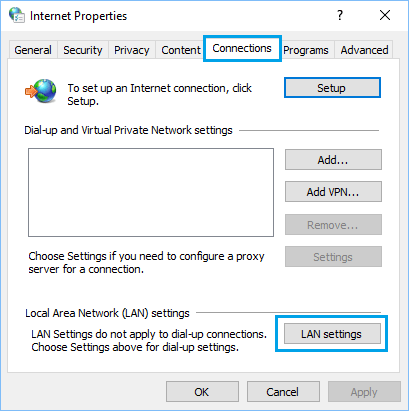
3. On the next screen, uncheck Use a Proxy server for your LAN option and make sure Automatically detect settings option is selected.
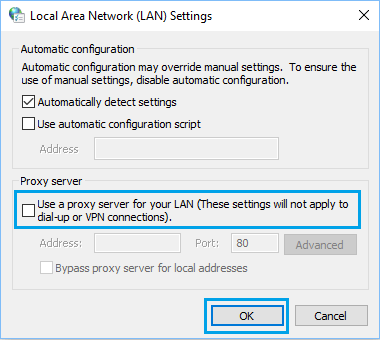
4. Click on OK to save this setting on your computer.
4. Run Network Troubleshooter
Windows comes with its own built-in Network & Internet Troubleshooter that can be used to find and fix network related problems on the computer.
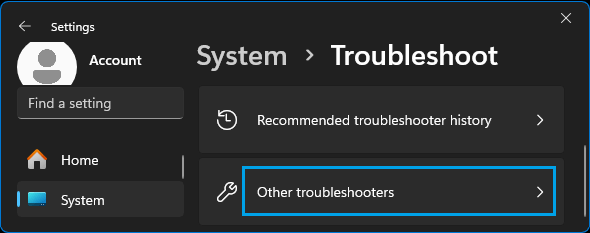
1. Go to Settings > System > scroll down in the right-pane and click on Troubleshoot.
2. On the next screen, scroll down and click on Other troubleshooters.
3. On the next screen, click on the Run button located in “Network & Internet” tab.
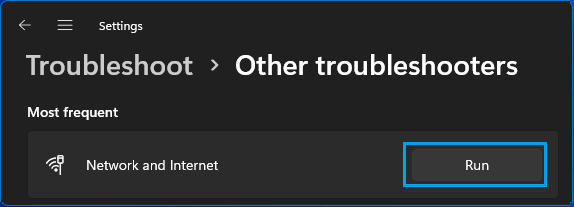
4. Follow onscreen instructions as the troubleshooter tries to find and fix internet connectivity problems on your computer.
Windows 10: Go to Settings > Update & Security > Troubleshoot > Internet Connections > click on Run the Troubleshooter.
5. Allow Google Chrome in Windows Defender Firewall
As mentioned above, the problem could be Google Chrome browser being blocked by Windows Firewall on your computer.
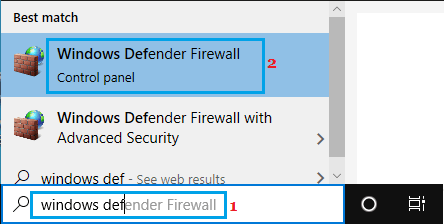
1. Type Windows Defender in the search bar and click on Windows Defender Firewall in the search results.
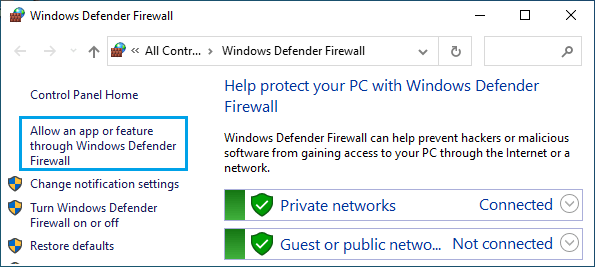
2. On the next screen, click on Allow an app or feature through Windows Defender Firewall option.
3. On the next screen, make sure that the little box next to Google Chrome is selected.
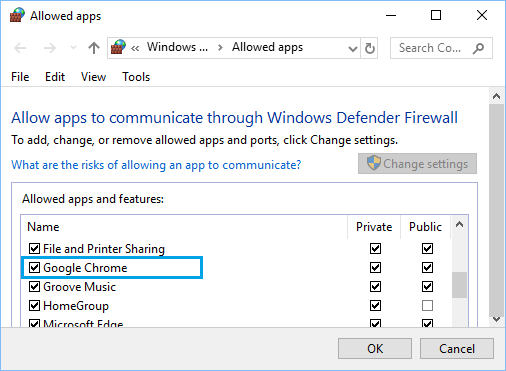
Now, you should be able to access the internet on your computer, without any problems or error messages.
6. Temporarily Disable Antivirus Program
The next step would be to make sure that Chrome browser is not being blocked by the Antivirus program installed on your computer.
1. Right-click on the Program icon in the system tray and click on Disable Auto Protect.
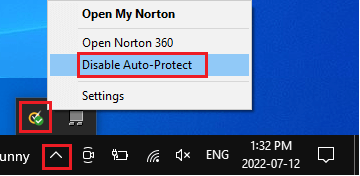
2. On the next screen, select the time period up to which you want to disable the antivirus program on your computer and click on OK.
If the antivirus program was blocking Google Chrome, you will have to remove the Antivirus program from your computer and reinstall it back again.
7. Reset Chrome Browser
If above methods did not help, follow the steps below to Reset Google Chrome to default its original or default settings and see if this helps in fixing the problem.
You can find the steps to Reset Google Chrome in this guide: How to Reset Google Chrome to Default Settings.