You can instantly transfer files, photos and videos from Mac to iPhone or another Mac by using AirDrop, without the need to use a cable to connect your Mac to the receiving device.
The AirDrop feature is supported by almost all native Apple Apps, which means; you can wirelessly transfer Notes, Calendar and even Contacts from your Mac to iPhone and other Apple devices.
AirDrop from Mac to iPhone and Mac
The AirDrop feature on Mac transfers data using Wi-Fi Network and relies on Bluetooth technology to locate nearby Apple devices.
Hence, you need to make sure that both the sending and receiving devices are connected to the same Wi-Fi network and Bluetooth is enabled on both devices.
Step 1. Enable Wi-Fi And Bluetooth on Both Devices
As mentioned above, the first step is to enable Wi-Fi and Bluetooth on your MacBook (sending device) and also on the receiving device (iPhone or another Mac).
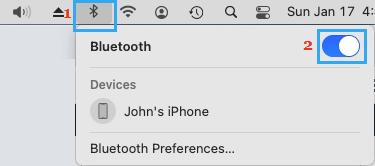
On Mac: Click on Bluetooth Icon located in the top menu-bar (top-right corner) > enable Bluetooth in the drop-down menu.
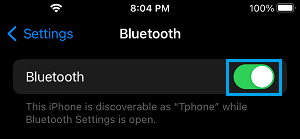
On iPhone: Go to Settings > Bluetooth > Make sure Bluetooth is enabled.
Similarly, make sure that your MacBook and the receiving device (iPhone or another Mac) are connected to Wi-Fi.
Step 2. Setup AirDrop on Both Devices
The AirDrop feature is not enabled by default on Apple devices. Hence, the next step is to manually enable AirDrop on your Mac and also on the receiving device (iPhone or another Mac).
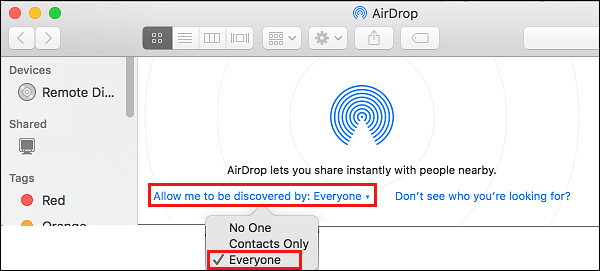
On MacBook: Open Finder > click on the Go tab in the top-menu bar and select AirDrop in the drop-down menu.

On the AirDrop screen, click on Allow me to be Discovered by option and select Everyone from the drop-down.
On iPhone: Go to Settings > General > Airdrop > select the Everyone option.
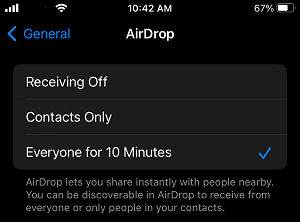
Note: While you can select Contacts Only option, selecting Everyone is known to help in preventing AirDrop problems.
1. AirDrop Files, Photos From Mac to iPhone and Mac
Once AirDrop has been enabled on your Mac (sending device) and receiving device (iPhone or another Mac), you can follow the steps below to wirelessly transfer Photos, Notes and Files from your Mac to any other Apple device using AirDrop.
1. Open the Finder on your Mac > click on Go tab in the top-menu bar and select AirDrop option in the drop-down menu.
2. On the next screen, wait for the receiving device (iPhone or another Mac) to appear in the right-pane.
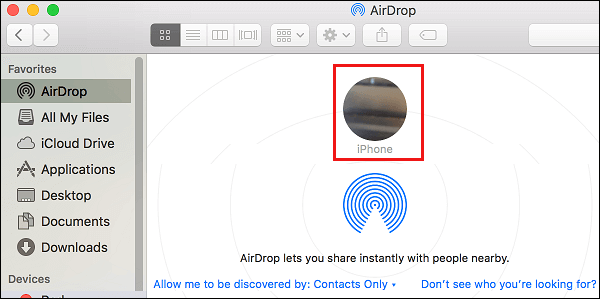
3. Once the receiving device (iPhone or another Mac) appears on the screen, you can transfer Files or Photos located on the Desktop or any folder on your Mac by dragging them into the iPhone circle or Mac circle (if transferring to another Mac).
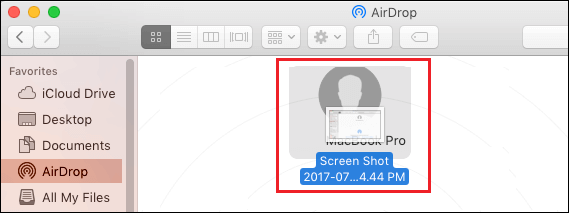
4. On the receiving device, you will see an AirDrop pop-up > tap on the Accept option to recieve the Files from Mac.
2. AirDrop From Mac to iPhone and Mac Using Sharing Icon
Another way to AirDrop Files, Photos and Notes from Mac to iPhone or another Mac is by using the Sharing Menu that is available in Photos, Notes and other apps on your device.
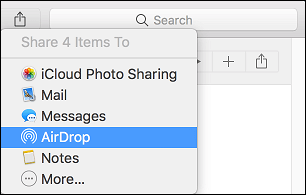
1. Open the Photos app on your Mac and select the Photos that you want to AirDrop.
2. Once the Photos are selected, click on the Share icon located at top-left corner of the screen.
![]()
3. From the drop-down menu, select the AirDrop option.
4. On the pop-up that appears, select the receiving device (iPhone or Mac).
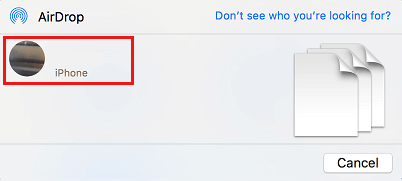
The selected Photos will be magically transferred to the receiving device.