If your computer is coming up with “Audio Service Not Responding” error message, it is likely that you were trying to fix sound problems by using the Audio or Sound Troubleshooter as available in Windows.
This error message can also be generated due to “Sound Troubleshooter” running automatically on the computer, due to Windows being unable to respond or interact with Audio Devices on the computer.
Fix Audio Services Not Responding Error in Windows 11/10
In order to fix “Audio services not responding” error, it is highly recommended that you begin by restarting the computer, in order to rule out the possibility of the problem being caused due to a glitch.
If the problem persists after the restart, you can move to other troubleshooting steps as provided below in this guide.
1. Update Audio Drivers
In many cases, the reason for Sound problems on a Windows computer is due to drivers not being updated to the latest available version.
1. Right-click on the Start button and click on Device Manager.
2. On Device Manager screen, expand Sound, Video and Game Controllers entry > right-click on the Audio Device and click on Update driver option.
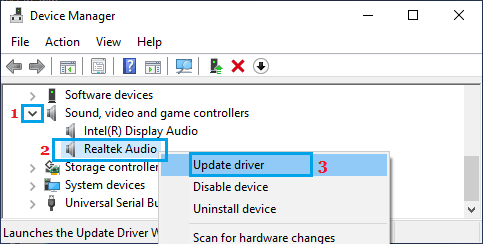
3. On the next screen, click on Search Automatically For Driver Software and follow the instructions to install updated audio drivers (if available).
2. Check Status of Windows Audio Service
The problem could be due to Windows Audio Service getting stuck or being disabled on the computer.
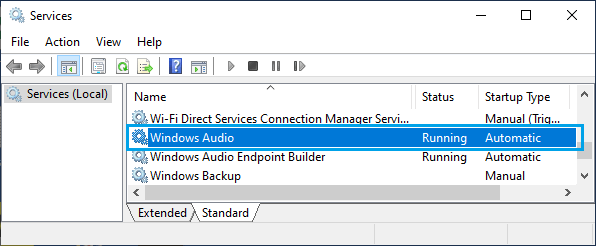
1. Press Windows + R keys to open the Run Command on your computer.
2. Type services.msc in the Run Command window and click on OK.

3. On the Services screen, take a look at Windows Audio and make sure it is Running and the Startup Type is Automatic.
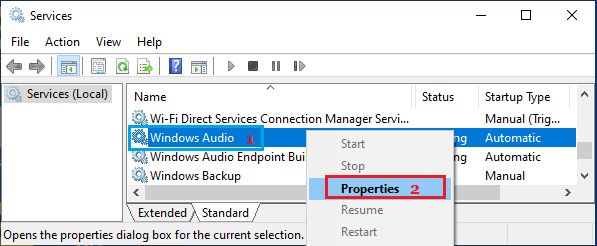
If Windows Audio Service is not running or set to Manual, right-click on Windows Audio and click on Properties.
4. On the next screen, set Startup Type to Automatic and start Windows Audio Service by clicking on the Start button.
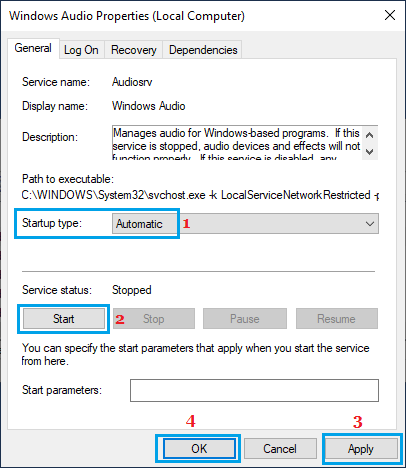
5. Make sure you click on Apply & OK to save this change on your computer.
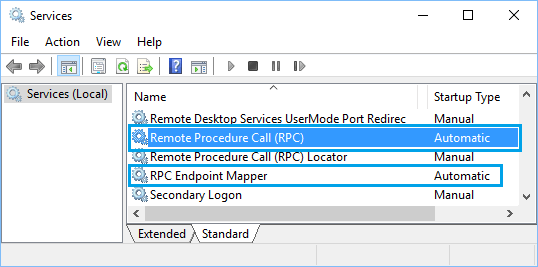
3. Check Status of Other Audio Services
If the problem is not yet fixed, there could be other Audio Services that are not Running or not set to start automatically on your computer.
1. Open Run Command > Type services.msc and click on OK.
2. On the Services screen, make sure Remote Procedure Call (RPC), RPC EndPoint Mapper, Windows Audio Endpoint Builder and DCOM Service Process Launcher are running and “Startup Type” for these services is set to Automatic.
3. If any of these Services are running, right-click on the Stalled Service and click on Properties.

4. On the next screen, set Startup type to Automatic and click on the Start button.
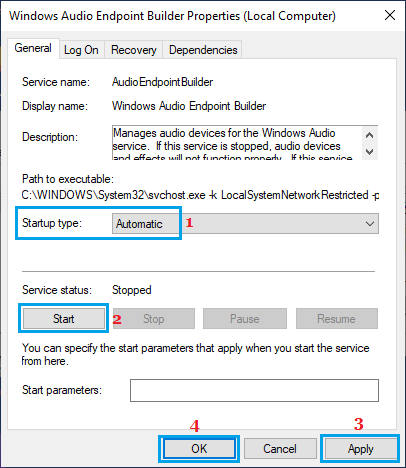
5. Click on Apply & OK to save the changes.
4. Run Local & Network Service Commands
Adding permissions to Local and Network services can help in fixing this problem.
1. Type CMD in the Search bar, right-click on Command Prompt in Search Results and select Run As Administrator option.

2. On the elevated Command prompt screen, type net localgroup administrators /add networkservice and press the Enter key.
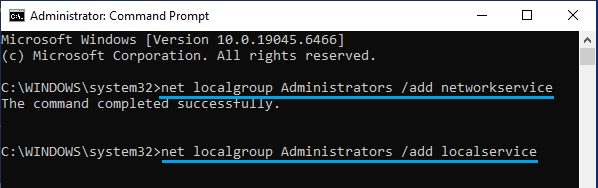
3. After this, type net localgroup administrators /add localservice and press the Enter key.
4. Type Exit and press the Enter key to close the Command prompt screen and Restart the computer.
5. Use System Restore
If your computer was setup to automatically create System Restore Points, you should be able to fix the problem by using a System Restore Point that was created prior to start of this problem.
For the actual steps to System Restore Windows computer, you can refer to this guide: How to System Restore Windows 11/10 Computer.
6. Uninstall Windows Update
If the problem has started after a Windows update, you should be able to fix the problem by uninstalling the latest installed update on your computer.
In this regard, you can refer to this guide: How to Uninstall Updates in Windows 11.