The easiest way to Backup Mac to an External Hard Drive is by using the built-in Time Machine utility or application as available within macOS.
All that is required to Backup Mac to an external storage drive by using Time Machine is to connect the external storage drive to Mac and enable Time Machine Backups.
Once the first Backup is completed, Time Machine automatically keeps the backup updated by scanning the computer for new, revised and deleted files on an hourly basis.
If sufficient storage space is available in the backup drive, Time Machine can keep hourly backups, daily backups and weekly backups of all the previous months. If the storage device runs out of space, Time Machine automatically deletes the older backups.
Enable Time Machine Backup to External Hard Drive on Mac
Connect External Hard Drive to Mac and follow the steps below to Enable Machine Backups on your Mac.
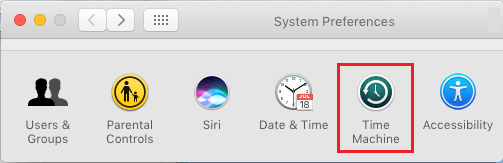
1. Click on Apple Logo in top-menu bar > select System Preferences in the drop-down menu.

2. On System Preferences screen, click on Time Machine option.
3. On Time Machine screen, click on Select Backup Disk… button.
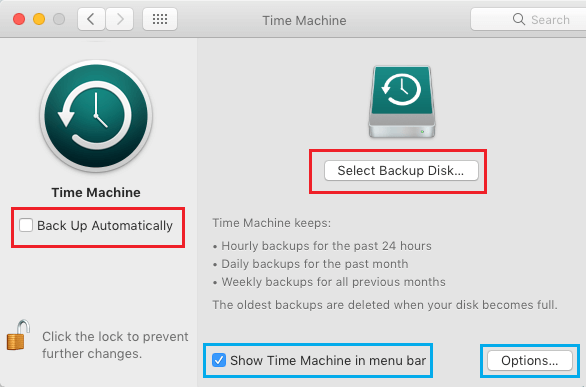
Note: Make sure you select Show Time Machine in Menu bar option.
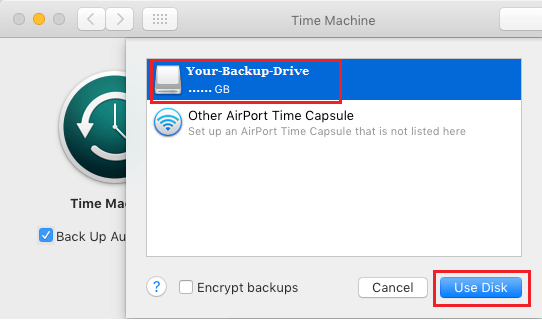
4. On the next screen, select the External Hard Drive connected to your Mac and click on Use Disk button.
Note: You can select Back Up Automatically option, if you want Time Machine to automatically keep the Backup updated.
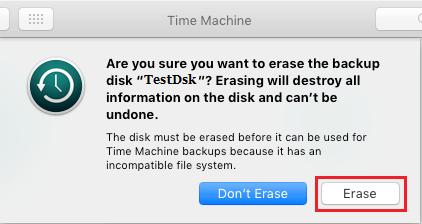
5. If the Format of attached External Hard Drive is incompatible with macOS, you will be prompted to Erase the Disk.
6. Patiently Wait for the Backup process to be completed. The time to complete the first Backup can be long.
Eject – Do Not Pull Out the External Drive (Important!)
When the Backup process is completed, do not pull out the external drive from Mac. Unplugging the external drive after a Time Machine Backup is known to cause data corruption and disk problems.
To avoid such problems, open the Finder on your Mac, right-click on the External Backup Drive and select the Eject option in the right-click menu.
After this, you can safely unplug the device from your Mac and keep it in a safe place.
External Hard Drive Capacity for Time Machine Backup?
Time Machine can practically backup to any Storage Device connected to USB, Thunderbolt or the FireWire Port of your Mac. If the attached Storage Drive is not in the right format, Time Machine will automatically prompt you to Format the Drive.
To make the best use of Time Machine Backups, the storage capacity of External Drive should at-least match the storage capacity of the Hard Drive on your Mac.
This will allow Time Machine to store multiple versions of data, which in-turn will allow you to go back in time and recover files before you made any changes to them.
Note: Time Machine can also be setup to Backup Mac wirelessly to an External Drive available on the same Network.
What is Not Included in Time Machine Backup?
According to Apple, Time Machine should automatically backup all Files on your MacBook, Mac Mini or iMac that are not part of macOS installation.
This means, Time Machine should backup all your Documents, Photos, Videos, Music, Books and Third Party Apps.
Going by user experiences, Time Machine tends to skip the Index database in Photo Library, which can lead to problems while Restoring Photos from a Time Machine Backup.
Hence, it is better to make a Manual Backup of Photos & Videos to External Drive. You can do this by simply dragging Photos to External Drive.
How to Update Time Machine Backup?
If you had selected “Back up Automatically” option during the first Backup, you can expect Time Machine to automatically Backup all new and revised files to External Drive, whenever it is plugged in to your Mac.
Periodic Time Machine Backups will continue in background, as long as the External Hard Drive is connected to your Mac.
Advantages of Time Machine Backups
Most Data backup solutions are based on making a backup of the whole system. The benefit of Apple’s Time Machine Backups is that it makes a backup of the entire Data on your computer only for the first time.
After the first backup, Time Machine copies only New & Revised files, instead of making a copy of all the data on your Mac all over again. This ensures that Time Machine Backups are quick and do not waste resources.
Also, Time Machine provides the option to Recover All or selected files from a specific point in time.