You won’t be able to make video calls or join Live meetings, if the Camera Icon is Greyed out or the Camera is not working in Microsoft Teams.
This problem is known to occur, both on Laptop computers that come with built-in camera and also on Desktop computers using an attached or external camera.
Reason For Camera Not Working in Microsoft Teams
The most common reason for camera not working in Microsoft Teams is due the Teams App not being provided with access or permission to access the Built-in or the External Camera attached to the computer.
In other cases, this problem is due to the Camera being busy or occupied by another program, External Webcam not being selected in Microsoft Teams, the Camera being disabled and other reasons.
1. Close Other Programs
As mentioned above, the problem could be due to the Camera being busy or occupied by another App like Zoom, which has a tendency to start up with the computer and remain active in the background.
Hence, make sure that other Apps that also make use of the Camera are closed and restart Microsoft Teams.
2. Allow Apps to Access Camera in Privacy Settings
The next step would be to make sure that access to Camera is not being blocked the Privacy Settings of your computer.
Go to Settings > Privacy & Security > Enable Camera Access by moving the slider to ON position.
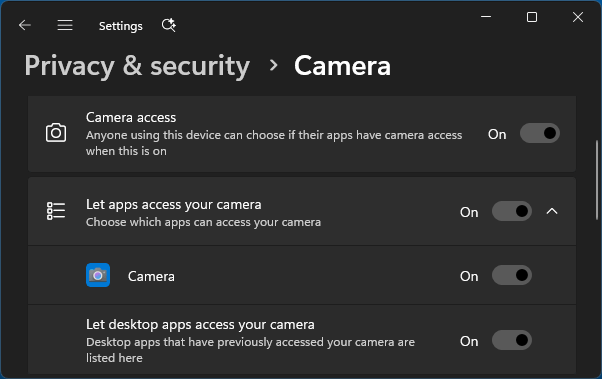
Make sure “Let Apps Access your Camera” and “Let Desktop Apps access your Camera” options are switched ON.
After this, restart Microsoft Teams and see if you are able to use the Camera.
3. Select Camera in Teams App
Microsoft Teams requires that you clearly identify the Camera that can be used by the Teams App. This is generally the case, if your computer is connected to an External Webcam or using Multiple Cameras.
1. Open Microsoft Teams > click on your Profile Icon and select Settings in the drop-down menu.
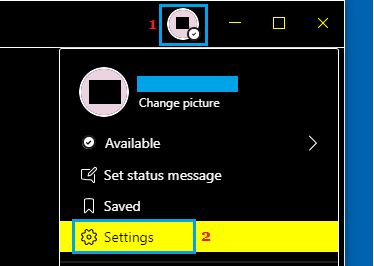
2. On the Settings screen, select Devices in the left-pane. In the right-pane, manually select your External Camera.

Note: If you are not using an External Camera, make sure Integrated Webcam is selected.
4. Allow Media Access for Apps in Microsoft Teams
The Microsoft Teams App comes with its own Permissions Settings, which can be use to restrict Media, Location, Notifications and other settings.
1. Open Microsoft Teams > click on your Profile Icon and select Settings in the drop-down menu
2. On the Settings screen, select Permissions tab in the left-pane. In the right-pane, provide Media (Camera, microphone, speakers) access by moving the Slider to ON position.
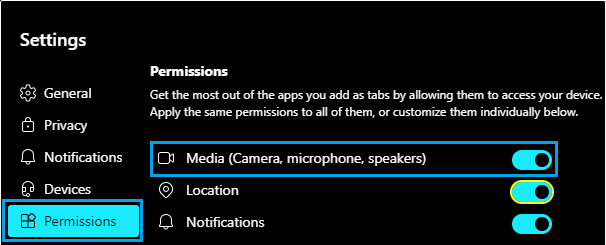
This will allow Apps that you add as tabs in Teams to access the Camera on your computer.
5. Enable Camera Using Device Manager
It is possible that you may have disabled the use of Camera on your computer accidentally or due to security reasons.
1. Right-click on the Start button > select Device Manager.
2. On Device Manager screen, open Cameras entry > right-click on the Camera and select Enable Device option.
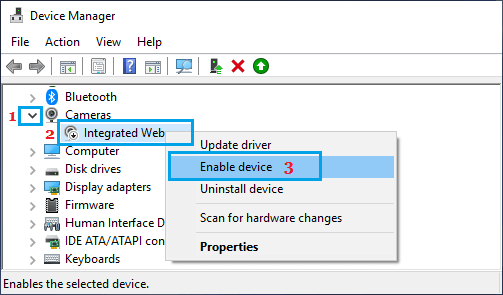
3. Exit Microsoft Teams > Restart the computer and see if the Camera is now working in Microsoft Teams.
6. Update Camera Drivers
Make sure that the Driver software for the Camera on your computer is up-to-date.
1. Open Device Manager > go to Cameras > right-click on the Camera and select Update Driver option.
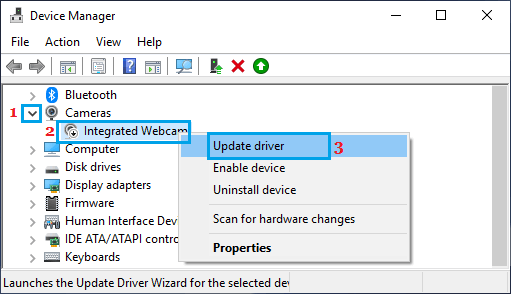
2. On the next screen, select Search Automatically for updated driver software option and follow the onscreen prompts to install updated drivers (If available).
3. Exit Microsoft Teams > Restart the Computer and see if the Camera is now working.
7. Allow Camera Through Web Browsing
If you are using Teams via Google Chrome or any other browser, make sure the Camera Access is not blocked in the web browser.
1. Open Google Chrome > click on 3-dots icon > select Settings in the drop-down menu.
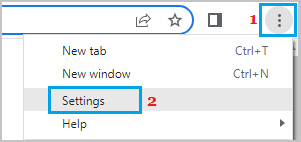
2. From the Settings screen, go to Privacy & Security > Site Settings > Camera > select Sites can ask to use camera option.
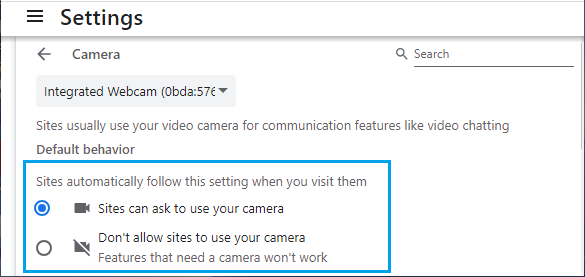
After this, open Microsoft Teams and select the Allow option on the Camera Permission Prompt.
8. Allow Camera Through Antivirus
Third-party Antivirus programs like Norton, Bitdefender, Kaspersky and others can end up blocking access to the Camera on your computer.
1. Open the Antivirus Program on your computer.
2. Go to Privacy Protection > Video & Audio Protection > toggle OFF Webcam Protection.
Note: The actual steps may vary, depending on the Antivirus program installed on your computer.
9. Re-Register Camera Using Windows PowerShell
In rare cases, the problem could be due to the Camera not being properly registered as a Windows device.
1. Type PowerShell in the search bar > right-click on Windows PowerShell App in the search results and select Run as administrator option.
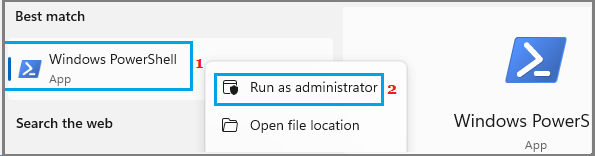
2. In the PowerShell window, type the following Command and press the Enter key on the keyboard of your computer.
Get-AppxPackage -allusers Microsoft.WindowsCamera | Foreach {Add-AppxPackage -DisableDevelopmentMode -Register “$($_.InstallLocation)\AppXManifest.xml”}
3. Close the PowerShell window and see if the Camera is now working in Microsoft Teams.