While the default Dock position on MacBook is located at bottom of the screen, you can change the position of the Dock on your Mac to the Left or Right side of the screen.
Before changing the position of Dock from Bottom to Side of the screen, you need to be aware that moving the Dock position from its usual location at bottom to the screen to Side of the screen is likely to reduce the size of the App Icons.
Depending on the screen size of your Mac, you may notice a significant reduction in App icon sizes, when you change the Dock position to Left or Right side of the screen.
Change Dock Position On Mac
You can find below 3 different methods to change the position of the Dock on your Mac from its default bottom of the screen location to the left or right side of the screen.
1. Change Dock Position Using System Preferences
Follow the steps below to change the Position of Dock on your Mac using the System Preferences.
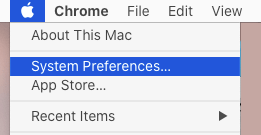
1. Click on Apple Logo in the top-menu bar and select System Preferences… in the drop-down menu.
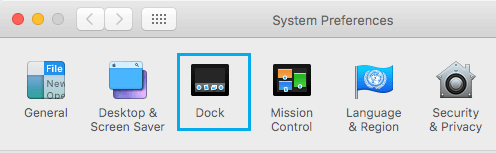
2. On System Preferences screen, click on the Dock Icon.
3. On the next screen, you will see the default Bottom option selected as the position for the Dock on your Mac.
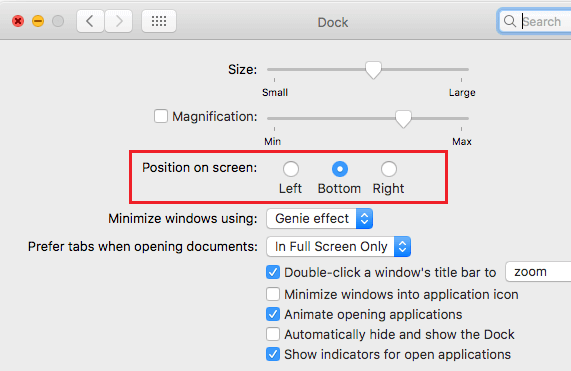
4. To change the Dock Position, simply select the Left or Right option, depending on whichever Dock position suits you better.
2. Quick Way to Change Dock Position on Mac
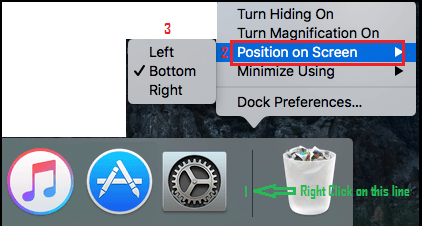
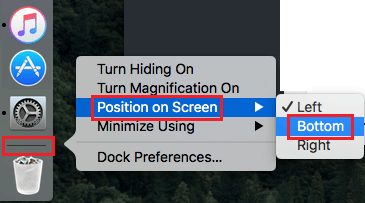
A quick way of changing the Dock position on a Mac is by right clicking on the Dock Line that separates the Apps and the Trash Icon.
1. Right click your mouse on the Dock line.

2. On the menu that appears, hoover the mouse over Position on Screen and select the Left or the Right option, depending on whether you want to place the Dock to Left or Right of the screen.
3. At any time you can change the Dock position to its default bottom position once again by right-clicking on the Dock bar and choosing the Bottom Position in the Menu that appears.
3. Change Dock Position By Dragging With Mouse
You can also quickly change the position of Dock on Mac by dragging the Dock from its usual Bottom position to the Right or Left of the Screen.
1. Press and Hold the Shift Key on the Keyboard of your Mac
2. Next, click and hold your mouse on the Dock Line and drag the Dock either to the Left or Right Side of the screen.

This way of changing the Dock position is useful in case you need the Dock to be on the Right or Left side of the screen for specific apps only.
After you are done with the app, you can quickly drag back the Dock to its default Bottom position.