You can change the Username that you use to login to the computer, both for Local User Accounts and also for the Microsoft User Account on your computer.
In the case of Local Accounts, you can change the Username of any Local User Account on your computer, including the Admin Account by using Control Panel, Run Command and also by using Command Prompt.
If you are using Microsoft Account to login to the computer, the easiest way to change the Username of your Microsoft Account that appears on the Login screen of the computer is by going to Microsoft’s website.
Change Username in Windows 11/10
Before going ahead with the steps to change Username, you need to be aware that the Username that appears on the login screen of the computer is linked to a User Folder located at C:\Users\<username>.
When you change the Username, only the Name that appears on the Login screen of the computer will be changed and the Name of the User Folder will continue to remain the same (previous username).
Windows does not change the User Folder Name, in order to protect the User Profile; which is deeply linked with apps, programs and settings associated with that particular user.
Tip: The only way to change both Username and User Folder Name is by creating a New User Account and transferring all your files to the New User Account.
1. Change Username By Using Control Panel
You can change the Name of any Local User Account on your computer by using Control Panel.
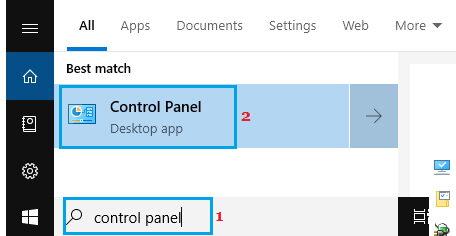
1. Type Control Panel in the Search bar and click on Control panel in the search results.
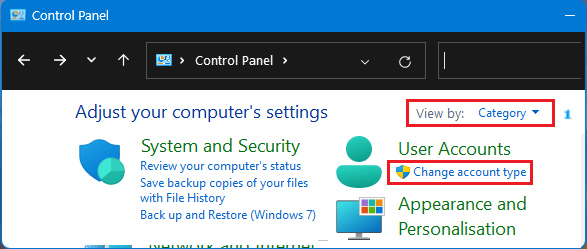
2. On the Control Panel screen, switch to Category view and click on Change account type link.
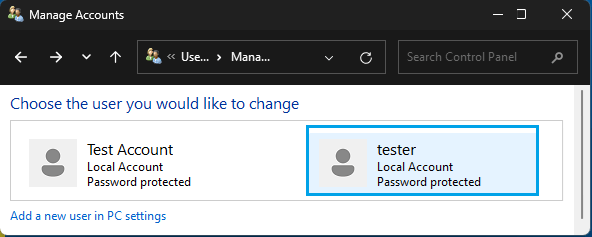
3. On the next screen, select the User Account that you want to Rename.
4. On the next screen, click on Change your account name link.

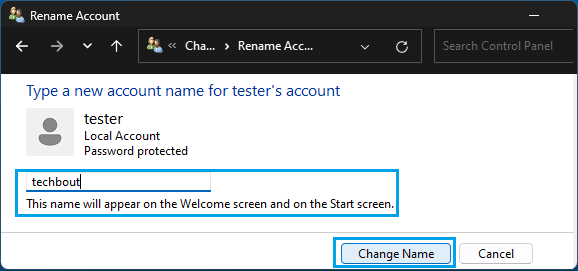
5. On Rename Account screen, type the New Name for the User Account and click on Change Name button.
You can check if the Username has been changed by restarting the computer or wait till you login to the computer the next time.
2. Change Admin Username
An easy way to change Username of any User Account on your computer, including the Admin Account is by running netplwiz (Network places wizard) command, which provides quick access to Advanced User Accounts Control Panel.
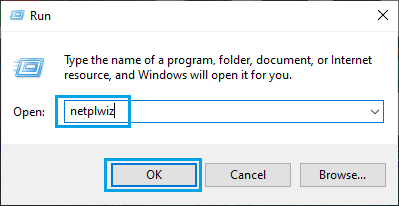
1. Press Win + R keys > Type netplwiz and click on OK.
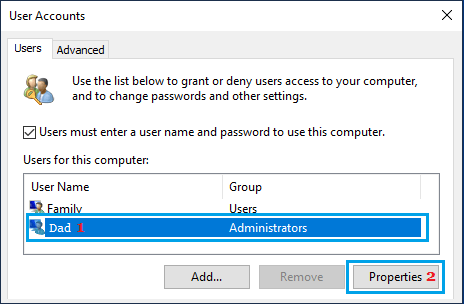
2. On User Accounts screen, select your Admin Account and click on Properties.
3. Type the New Name for the User Account and click on Apply & OK.
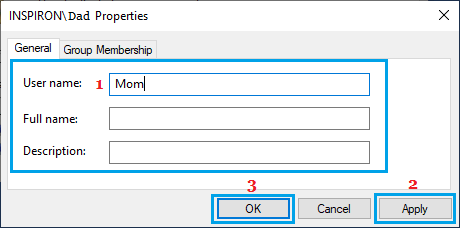
4. Restart the computer to implement this change.
3. Change Microsoft Account Username
In the case of Microsoft Account, the Username is pulled directly from your online profile. In most cases, the “First Name” will become the Login Name and “Full Name” along with Email Address will be displayed on the Welcome and Login screens.
1. Open the web browser on your computer and go to account.microsoft.com.
2. Login to your Microsoft Account by entering your Email Address and Password.
3. On the next screen, click on Your Info in the left-pane. In the right-pane, click on Edit Name link.
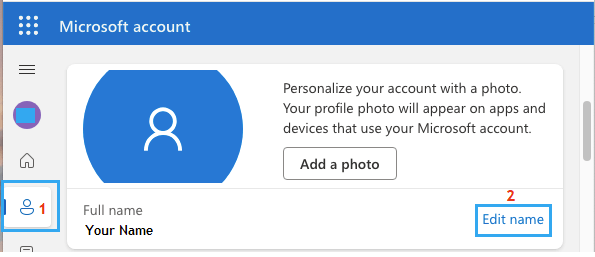
4. On the Edit Name screen, enter your New Name and click on the Save button.

5. Restart the computer to apply the change.
After the computer restarts, you should be able to see your New Name. If you do not see the change, you may have to wait for a few hours for the changes to sync to your computer.
Also, you need to be aware that changes to your First and Last Name will also be reflected in your online ID and your Microsoft Email Account.