When print commands are issued on a Windows computer, they are sent to the Print Spooler service; which is responsible for managing Print Queue or the List and order of print jobs issued from your computer.
While this setup works well most of the times, it can sometimes choke up and prevent print jobs from being executed.
In such cases, the problem can be fixed by clearing the stuck print job or clearing the entire Print Queue, which results in all the pending print jobs being removed from the computer; including the corrupted print job that had interrupted the printing process.
Related: Fix: Printer Icon Not Showing in Windows 11/10.
Clear Print Queue in Windows 11
The easiest way to clear the Print Queue on a Windows computer is by accessing the Print Queue screen by double-clicking on the Printer Icon; located in the System Tray area of the Taskbar.
In addition to this, you can clear the Print Queue by using Settings, Windows Search, Command Prompt and by navigating to the Printers Folder on your computer.
1. Clear Print Queue from System Tray
As mentioned above, this is the easiest way to clear the Print Queue on a Windows computer.
1. Click on the Printer Icon; located in the system tray area of the taskbar on your computer.
![]()
Note: You may have to open the hidden Icons menu to access the Printer Icon.
2. On the next screen, click on three-dots menu icon located at top-right corner of the screen and select Cancel All option.
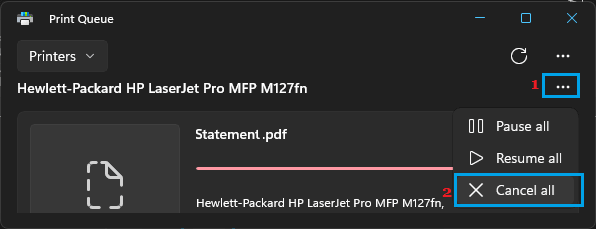
This will clear all the printing job that were waiting to be printed in the Print Queue on your computer.
2. Clear Print Queue Using Settings
You can follow the steps below to clear Print Queue by using the Settings App on your computer.
1. Press Windows + I keys to open the Settings App on your computer.
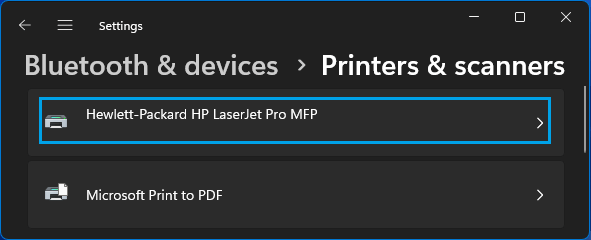
2. From the Settings screen, go to Bluetooth & devices > Printers & Scanners > click on your Printer.
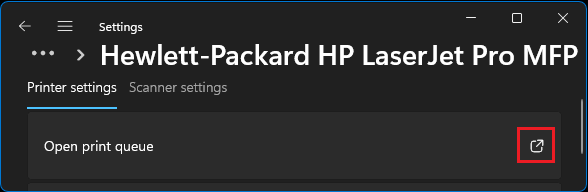
3. On the next screen, click on Open queue option.
4. On the Print Queue screen, click on 3-dots icon and select Cancel All option.
Note: You can clear individual print jobs by right-clicking on the listed Print Jobs and selecting the Cancel option.
3. Clear Print Queue Using Windows Search
Another quick way to open and clear the Print Queue on a Windows computer is by using Windows Search.
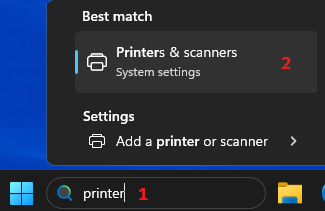
1. Type Printers in the search bar > click on Printers & Scanners in the search results.
2. On Printers & scanners screen, select your Printer > On the next screen, click on Open Print Queue.
3. On the Print Queue screen, click on 3-dots icon and select Cancel All option.
This will clear all the Print Jobs that were waiting in the Print Queue to be printed from your computer.
4. Clear Print Queue Using Command Prompt
You can make use of the “net stop spooler” command to clear the print Queue on your computer.
1. Press Win + X keys on the keyboard of your computer and select Command Prompt (Admin) option.
2. On the Command Prompt screen, type the following commands one-by-one and press the Enter key after each command.
- Type net stop spooler and press the Enter Key.
- Type del %systemroot%\System32\spool\printers\* /Q and press the Enter Key.
- Type net start spooler and press the Enter Key.
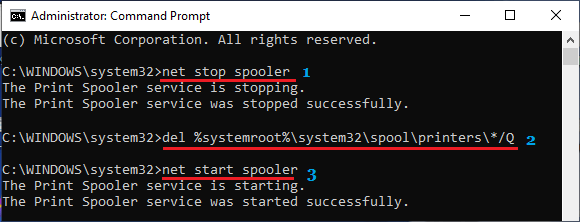
3. Once these commands are executed, you will find the Print Queue totally cleared on your computer.
5. Clear Print Queue from Printers Folder
If you are unable to clear a stubborn Print Job using above methods, you should be able to clear it by going to Printers Folder; located at path (C) > Windows > System32 > Spool > Printers.
This method requires you to stop the Print spooler service, before deleting the Print Jobs and restart the Print Spooler service after the Jobs are deleted.
1. Stop the Print Spooler Service on your computer by using steps as provided in this this guide: How to Start, Stop, Restart Print Spooler in Windows 11/10.
2. After stopping the Print Spooler Service, press Win + R keys to open Run Command on your computer.
3. In the Run Command window, type %systemroot%\System32\spool\printers\ and click on OK.
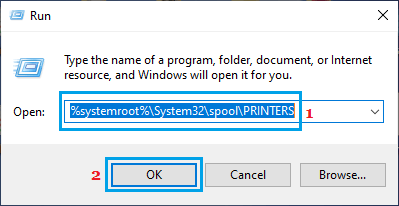
Note: You can also navigate to OS (C) > Windows > System32 > Spool > Printers by using File Explorer.
4. On the next screen, select All Files in the Printers Folder and Delete them.
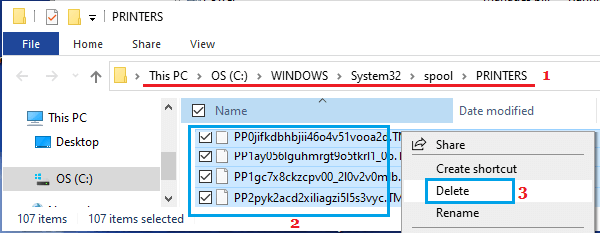
After this, you need to restart the Print Spooler service by using steps as provided in the above link.