Since, the option to create Guest User Account has been removed in Windows, we are providing below the steps to create a Limited Privileges Account and use it as a Guest User Account on your computer.
The idea behind Guest User Account that was available in previous versions of Windows was to provide users with a Limited Privileges User account, in addition to other User Accounts.
Guest User Account was ideal for use as a common User Account that anyone in the house could be allowed to use, without the risk of important files, programs and apps being deleted from the computer.
For quite some reason, Microsoft removed the option to create Guest Account in Windows 10 and also prevented the Users from naming any User Account as a “Guest Account”.
Hence, we are providing below the steps to create a User Account with limited privileges and name this User Account as a Visitor Account on any Windows 11/10 computer.
1. Steps to Create Guest User Account in Windows 11/10
Follow the steps below to create a Limited Privileges account on your Windows 11/10 computer.
1. Right-click on the Start button and click on Command Prompt (Admin).
2. On the Command Prompt screen, type net user Visitor /add /active:yes and press the Enter key on the keyboard of your computer.
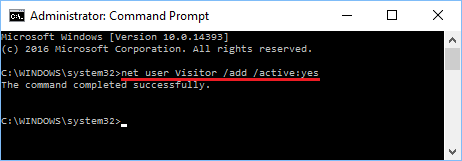
Note: The word Visitor is the Name of Guest User Account, you can use any other User Name for your Guest Account, except “Guest” which is reserved by Windows OS.
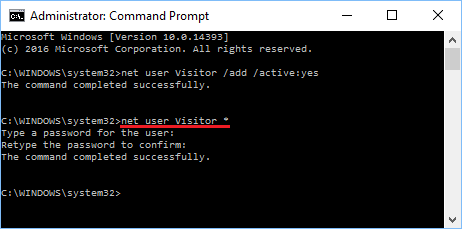
3. Next, type net user Visitor * in the Command Prompt window and press the Enter key > skip Type Password and Retype Password prompts by pressing the Enter key twice.
4. The next step is to delete the newly created Guest Account from Users Group and add it to Guests Group.
Type net localgroup users Visitor /delete and press the Enter key > Next, type net localgroup guests Visitor /add and press the Enter Key.
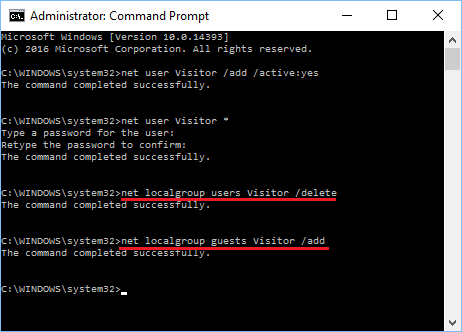
This completes the creation of Guest User Account on your Computer and you can trust this User Account to remain at Guest Level (Limited privileges).
The Guest User Account that you created, allows Users to browse the Internet, Watch Videos, Play Music and use almost all the Apps and programs on your computer.
However, Guest Account cannot be used to Change system settings, install new programs/apps, delete or remove programs and perform other action that require admin privileges.
2. Login or Switch to Guest User Account
Once the Guest User Account is available on your computer, you can switch or login to the Guest User Account at any time on your computer by selecting the Guest Account in the Start Menu.
Simply, click on the Start button and select your Guest User Account (Visitor in this case).
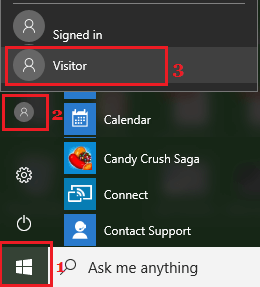
This will immediately log you into the Guest User Account, without any need to enter the Login Password.