If you are looking for a way to Bulk Delete Emails from the Mail App on iPhone, it is likely that your Email Account has become full or over crowded with hundreds (if not thousands) of Email Messages.
Another common reason for Bulk Deleting Emails is due to corporate or company requirements, which usually advice employees to archive important Emails and delete all unwanted Emails on a yearly basis.
Bulk Delete Emails on iPhone
Before Bulk Deleting Emails from iPhone, it is always a good idea to create a New Folder in your Email Account and move Emails that appear important or worth a second look to this New Folder.
Once emails that require a second look are moved to the New Folder, you will have the confidence to Bulk Delete all the remaining Emails from iPhone and start fresh with a clutter free Inbox (hopefully it stays so!).
Step 1. Move Important Emails to Another Folder
As mentioned above, the first step is to move emails that appear important or worth keeping to a New Folder within your Email Account. Later on you can review these Email Messages and decide whether to delete or save them.
1. Open the Mail App on your iPhone > tap on the Edit option located at top-right corner of the screen.
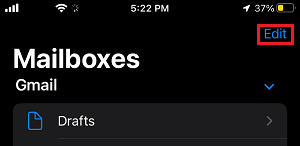
Note: If you are not on the Mailboxes screen, tap on < Mailboxes and it will take you to the Mailboxes screen.
2. Select the New Mailbox option that appears at bottom-right corner.

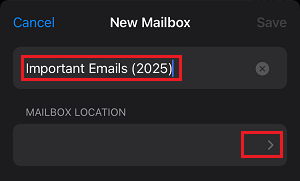
3. On the next screen, type a Name for the New Mailbox and tap on the Mailbox Location box.
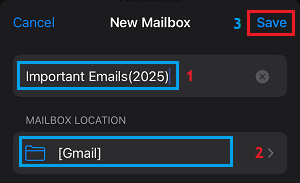
4. On the next screen, select the Mail Folder in which you want to create the new Mailbox and tap on Save.
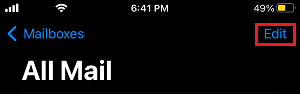
5. After creating the New Mailbox, go back to your Inbox or All Mail and tap on the Edit option.
6. Next, select the important Emails that you want to keep in the New Folder and tap on the Move button located in the bottom-menu.
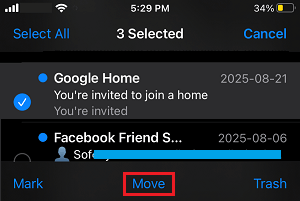
7. On the next screen, select the New Folder that you had created.
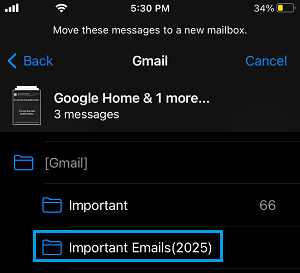
All the selected email messages will be moved to the New Folder that you had specifically created for this purpose.
2. Bulk Delete Remaining Emails from iPhone
After moving important Email Messages to New Folder, you can Bulk Delete all the remaining Emails from the Mail App on your iPhone.
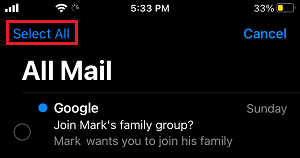
1. Open Mail App > tap on the Edit option located at top-right corner of the screen.
2. Next, tap on the Select All Option that becomes available.
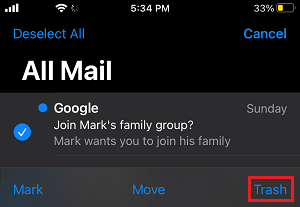
3. Once all the Emails are selected, tap on the Trash option to move all the selected Emails to the Trash bin on your iPhone.
After this, you can either wait for the Trash to empty at its scheduled time (30 days) or manually delete all the Emails from Trash by going to Trash Icon > tapping on the Edit option and selecting the Delete All option.