The Settings App and Control Panel provide access to privacy, security and other settings on a Windows computer, which is why you may want to keep Settings and Control panel disabled on your computer.
By disabling these key access points, you can largely prevent the possibility of anyone with access to your device being able to make unwanted changes on the computer, which may lead to performance, privacy and security related issues.
Disable Control Panel and Settings in Windows 11/10
If you are using the Professional Edition of Windows, you can prevent access to Settings and Control Panel on your computer by using Group Policy Editor.
Since, Group Policy Editor is not available in the Home Edition of Windows, you will have to make use of Registry Editor to disable access to Control Panel and Settings on your computer.
Note: Disabling Control Panel and Settings cannot prevent users from accessing Command Prompt and Run Command,
1. Disable Control Panel and Settings Using Registry Editor
Before making changes to registry files, it is recommended that you make a Backup of your computer. Also, refrain from making any changes to registry files that you do not understand.
1. Right-click on the Start button and click on Run.
2. In the Run Command window, type regedit and click on OK to open Registry Editor.

3. On Registry Editor screen, navigate to HKEY_CURRENT_USER\Software\Microsoft\Windows\CurrentVersion\Policies and expand the Policies Folder.
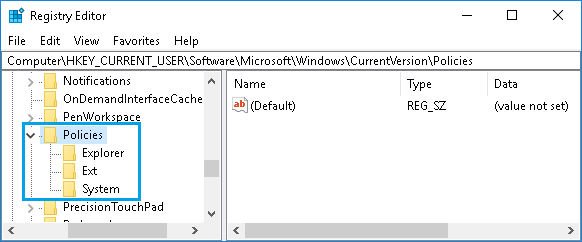
Note: If you do not see “Explorer” Folder, right-click on Policies > select New > Key and Name the new key as “Explorer”.
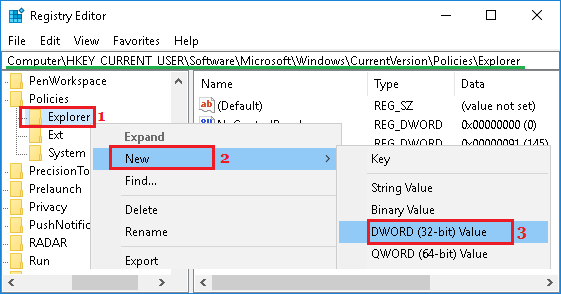
4. Next, right-click on Explorer and select New > DWORD (32-bit) Value in the contextual menu that appears.
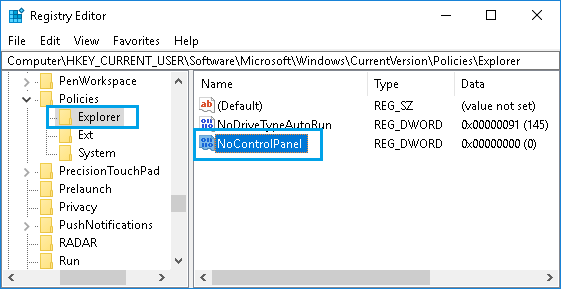
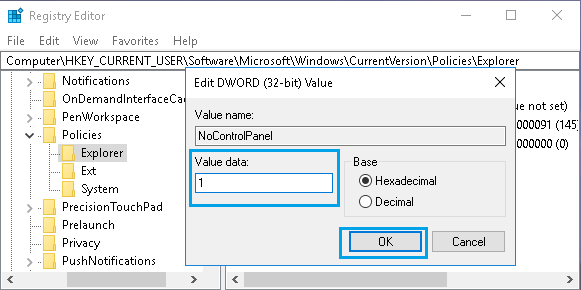
5. Name the newly created key in Explorer Folder as NoControlPanel.
6. Next, right-click on NoControlPanel and select the Modify… option in the contextual menu.
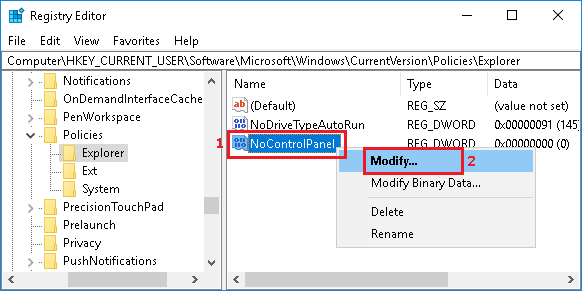
Note: You can also double-click on NoControlPanel to reach Edit DWORD Value screen.
7. In Edit DWORD Value screen, change the Value Data for NoControlPanel from 0 to 1 and click on OK.
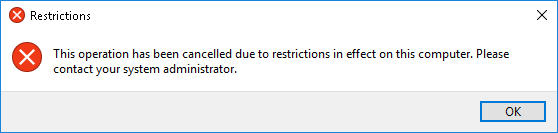
After this change in Registry, you will still see Settings Icon and Control Panel Shortcuts on your computer. However, clicking on Control Panel or Settings Icon will not provide access to Settings menu or Control Panel Items.
In-fact, anyone trying to access Settings or Control Panel on your computer will be greeted with an Error Message, providing information about Restrictions placed on this action by the System Administrator.
At any time, you can enable access to Control Panel and Settings Menu on your computer by changing the Value Data in NoControlPanel DWORD back to its original value (0).
2. Disable Control Panel and Settings Using Group Policy Editor
If you are using the Professional or Enterprise Edition of Windows, you can disable access to Control Panel and Settings Menu by making use of Group Policy Editor.
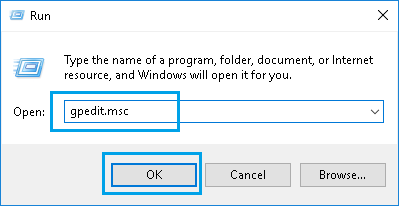
1. Right-click on the Start button and click on Run.
2. In the Run Command window, type gpedit.msc and click on OK to open Local Group Policy Editor.
3. On Local Group Policy Editor screen, browse to User Configuration > Administrative Templates > Control Panel and click on the Control Panel Folder.
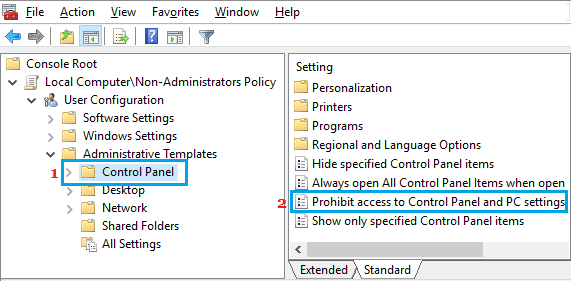
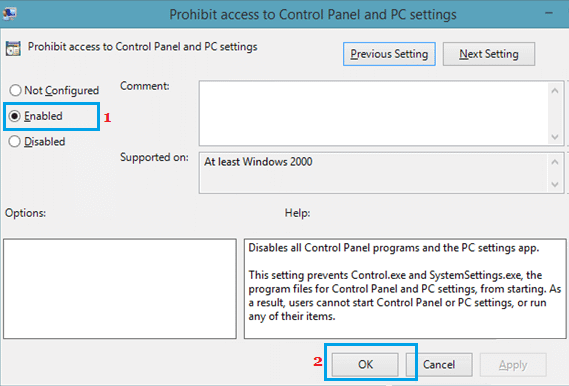
4. Next, Double-click on Prohibit Access to Control Panel and PC settings policy in Control Panel (See above image).
5. On the next screen, select Enabled option and click on OK to save this setting on your computer.
After this change, Control Panel and Settings Screen will no longer be accessible to anyone using your computer.
Anyone trying to access Settings menu or Control Panel on your computer will see a notification about restrictions placed on this activity by System Admin.
At any time, you can change this Policy and provide access to Settings menu and Control Panel on your computer by selecting Not Configured option in Local Group Policy Editor screen.