The default option in Windows Search is bring up “web results” or suggestions from the Internet, in addition to Local Search Results from data stored locally on the Hard Disk of your computer.
This happens, because Windows Search is built on Microsoft’s Bing Search Engine, which is basically a Search Engine that Powers Internet Explorer and Microsoft’s Edge browser.
Disable Web Suggestions in Windows Search
While “Web Results” or Suggestions from the Internet can be useful, they are totally unnecessary when a user is only trying to look for Files, Programs or Apps located on the Local Hard Disk of the computer.
Another good reason for disabling Web Results/Suggestions in Windows Search is to speed up Windows Search by limiting its Focus to the Local Hard Disk of the computer.
1. Limit Windows Search Index to Local Hard Disk
An easy way to prevent Web Results from appearing in Windows Search is by limiting Windows Search to the Hard Disk on your computer. If this does not work, you can try the Registry fix.
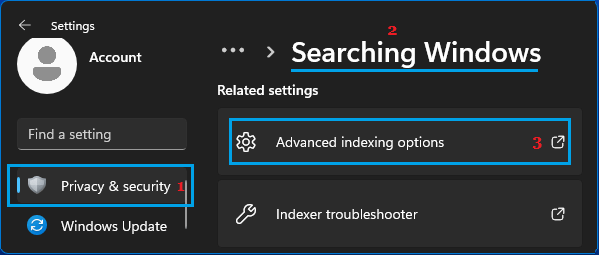
1. Go to Settings > Privacy & Security > Searching Windows > Advanced Indexing Options.
Windows 10. Go to Settings > Search > Permissions & History > Searching Windows > Advanced Search Indexer Settings.
2. On the next screen, click on the Modify button.
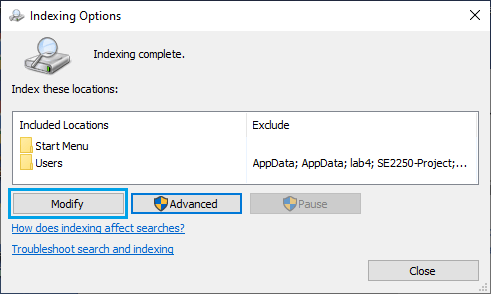
3. On Indexed Location screen, click on Show All Locations button.
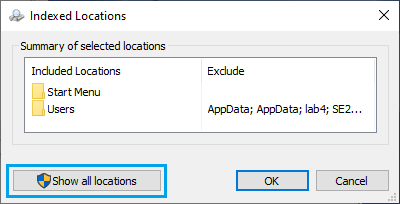
4. On the next screen, uncheck Internet Explorer History and select your Hard Disk.

5. Click on OK and allow Windows to Rebuild the Search Index.
2. Disable Web Results in Windows Start Menu Search Box
You can follow the steps below to disable Web Results in Windows Search bar.
1. Right-click on the Start button and click on Run.
2. In Run Command window, type regedit and click on OK.

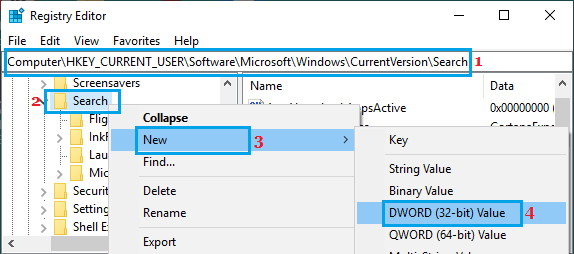
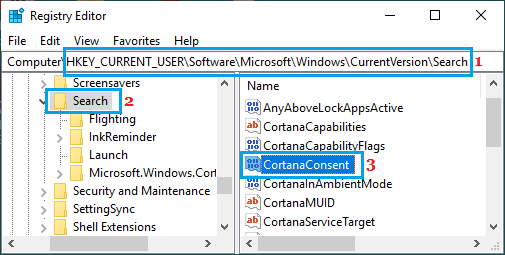
3. On the Registry Editor screen, navigate to HKEY_CURRENT_USER\SOFTWARE\Microsoft\Windows\CurrentVersion\Search.
Right-click on the Search Folder and select New > DWORD (32-bit) option in the contextual menu.
4. Name the newly created DWORD as BingSearchEnabled and double-click on it.
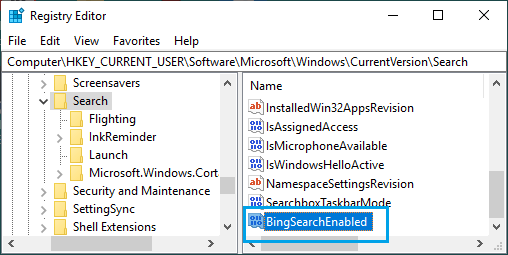
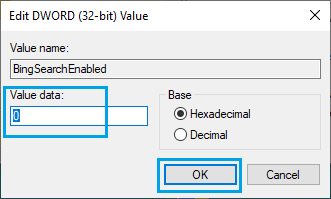
5. On Edit DWORD pop-up, make sure the Value data field is 0 and click on OK.
6. Next, double click on CortanaConsent entry.
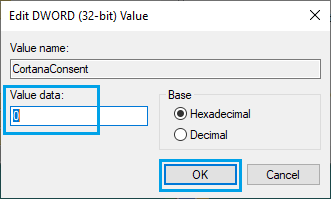
7. On Edit DWORD pop-up, type 0 in the Value Data field and click on OK.
Note: If you do not see CortanaConsent, create this entry by using steps as used to create BingSearchEnabled.
After this change to Registry, Windows 10/11 computer will no longer bring up search results from the internet and all your searches in the Start Menu search bar will be limited to the computer.
In case required, you can always bring back the web search results by opening Registry Editor and changing BingSearchEnabled and CortanaConsent Data Values to 1.
3. Prevent Web Suggestions in Windows Explorer Using Registry
You can prevent Web Suggestions in Windows Explorer by editing registry.
1. Right-click on the Start button and click on Run.
2. In Run Command window, type regedit and click on OK to open the Registry Editing screen.
3. On the Registry editor screen, navigate to HKEY_CURRENT_USER\Software\Policies\Microsoft\Windows and create a New Key by right-clicking on Windows and choosing New > Key in the contextual menus.
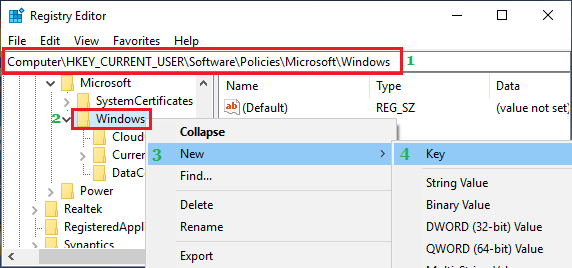
4. Name the New Key as Explorer.
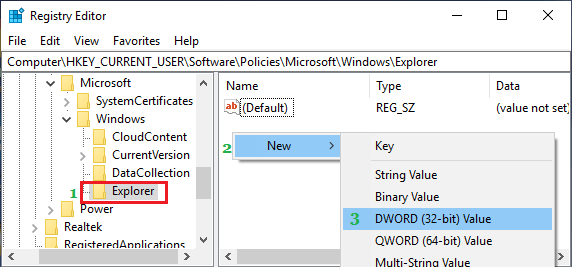
5. Next, right-click on Explorer select New > DWORD (32-bit) Value in the contextual menu. Name this newly created DWORD as “DisableSearchBoxSuggestions” and hit the Enter Key.
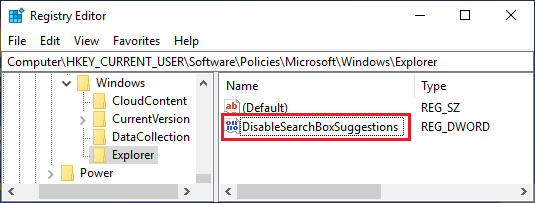
6. Now, Double-click on newly created DisableSearchBoxSuggestions DWORD.
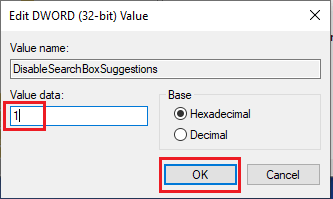
7. On the pop-up, change the Data Value for DisableSearchBoxSuggestions to 1 and click on OK.
8. Restart your computer for the changes to apply on your computer.
After the computer restarts, use the Search Box and you won’t find Web Search Results appearing in Windows Search results.
If you want to see Web Suggestions, you can either delete DisableSearchBoxSuggestions DWORD or change its Data Value to 0.
Note: Above steps disable File Explorer Search History only for the current user Account. Other User Accounts on your computer will still bring up Web Search Results.
To disable Web Search Suggestions for other User Accounts, you will have to login to each of these Accounts and repeat the above steps.