If your Windows computer is coming up with a Blue Screen reading “DPC_WATCHDOG_VIOLATION”, you may not really know as to what this error message really means and how to fix this issue.
Hence, you may want to know as to what “DPC Watchdog Violation” error message really means and why it occurs in Windows computers.
What is DPC Watchdog Violation Error?
According to Microsoft, DPC_WATCHDOG_VIOLATION Error indicates that a DPC watchdog bug test was triggered on your computer, either due to a single long-running deferred procedure call (DPC), or because the system spent a prolonged time at an interrupt request level (IRQL) of DISPATCH_LEVEL.
Basically, this explanation from Microsoft is trying to say that your computer has stopped working as it was unable to get a response from one of its hardware components.
While the most common hardware component involved in this issue appears to be the Hard Drive, the problem can also be triggered due to other device drivers becoming incompatible with the operating system and other issues.
How to Fix DPC Watchdog Violation Error?
If you are dealing with DPC Watchdog Violation Error after installing an update or after downloading and installing a new software program, the logical solution is to Uninstall the Update and remove the new software program.
However, this solution works only if you are able to get access to your desktop. If you are unable to access the desktop, you will have to think in terms of Restoring or Resetting your device.
If you are unable to access the desktop, you will have to use System Restore or Reset the computer.
1. Uninstall the Most Recent Software
If the problem is occurring after installing software updates, you can Uninstall the most recent software update on your computer and see if this helps in fixing the problem.
As mentioned above, this solution works only if you are able to access the desktop on your computer. Hence, move to the next steps, if you are unable to access the desktop.
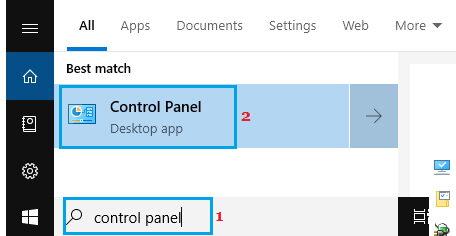
1. Type Control Panel in the Search bar and click on Control Panel Desktop App in the search results.
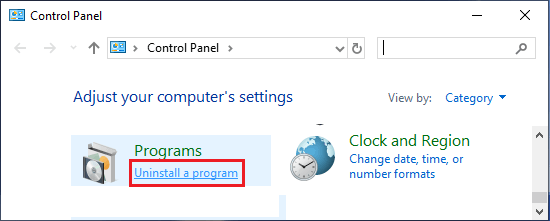
2. On the Control Panel screen, click on Uninstall a program option located under Programs.
3. On the next screen, right-click on the program that want to remove and click on Uninstall.
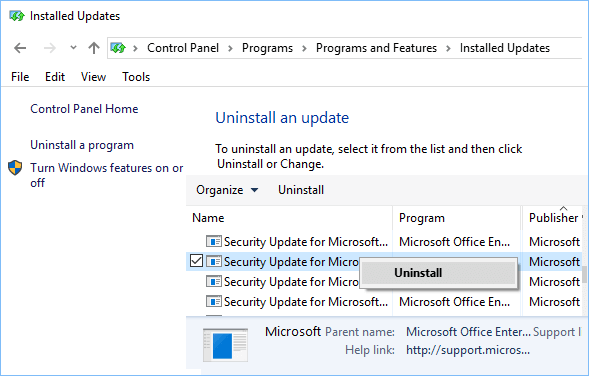
4. On the confirmation pop-up, click on Yes to confirm.
2. Use System Restore
If you are unable to access the desktop and have a System Restore Point stored on the computer, you can follow the steps below to recover the computer using System Restore.
1. Restart the computer by pressing the Power button and you will find it going into Automatic Repair Mode.
2. Patiently wait for the Automatic Repair process to be completed. If Automatic repair is unable to fix the problem, click on the Advanced options.
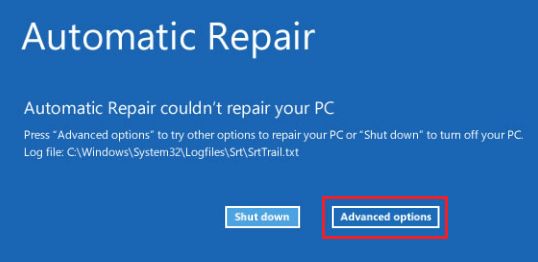
3. On the next screen, click on the Troubleshoot option > On the Troubleshoot screen, select Advanced options.
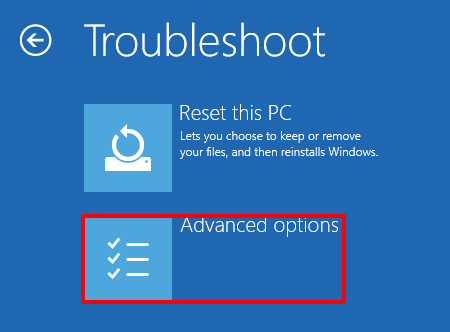
4. On Advanced Options screen, click on System Restore (If a Restore Point is available) or click on System Image Recovery (If a System Image is stored on the computer).
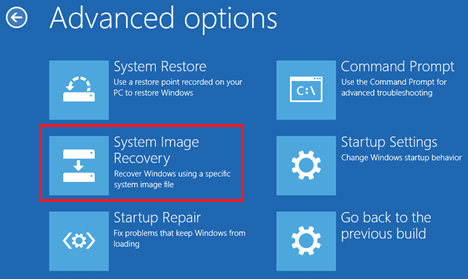
5. Follow the instructions to Restore or Recover Windows.
3. Reset the Computer
If a System Restore Point is not available on the computer, you can follow the steps below to Reset the computer.
1. Restart the computer by pressing the Power button and you will find it going into Automatic Repair Mode.
2. Patiently wait for the Automatic Repair process to be completed. If Automatic repair is unable to fix the problem, click on the Advanced options.

3. On the next screen, click on the Troubleshoot option > On the Troubleshoot screen, click on Reset this PC.
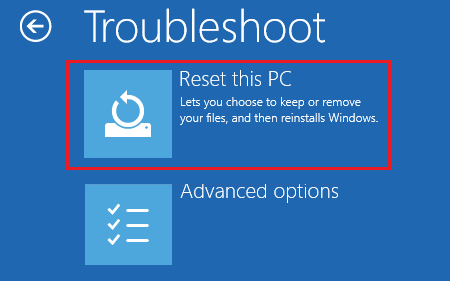
4. On the next screen, click on Keep my Files option.
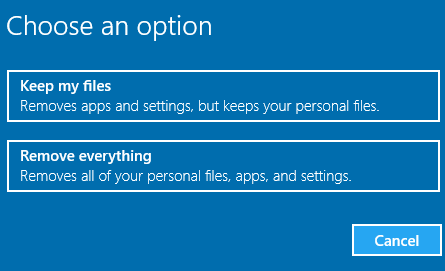
5. Follow the next set of instructions to Reset the computer.
4. Update Hard Disk Driver
In general, Windows update should also update the device drivers on your computer. However, sometimes this may not happen and cause the DPC Watchdog Violation Error.
1. Right-click on the Start button and click on Device Manager in the menu that appears.
2. On the Device Manager screen, expand the entry for IDE ATA/ATAPI controllers. Next, right-click on the Controller having SATA AHCI in its name and click on Update Driver.
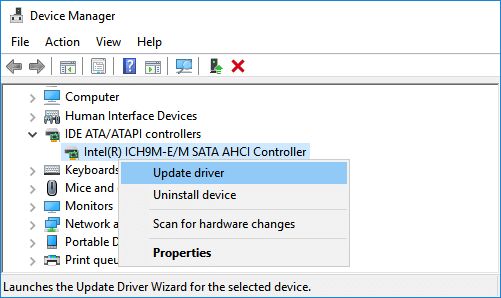
3. On the next screen, select Search Automatically for Updated driver Software option.
4. Follow the next set of instructions to Update Driver for the Hard Disk on your computer.
5. Restart your computer and see if the problem is fixed.
Note: This fix is not applicable in case your computer is using a SSD drive.