In general, the most common reason for users looking for a way to edit the “Hosts File” on a Windows computer is to rule out the possibility of this important File being modified by virus or malware.
Apart from this, the Hosts File can also be used to block websites by redirecting them to a non-existent IP, which can be used to block access to malicious and inappropriate sites.
The default Hosts File on a Windows computer is located at C:\Windows\system32\drivers\etc path and it only contains a few comment lines starting with ‘#’ character.
Hence, any new lines that you see on the Hosts File without the “#” character have been either added by you or added by adware, virus or malware.
Edit Hosts File in Windows 11/10
The easiest way to Edit the Hosts File on a Windows computer is by logging into an Admin Account and using either Run Command or File Manager to navigate to the location of the Hosts File.
However, you can also edit the Hosts File from a non-admin account by opening Notepad As Admin and navigating to the location of the Hosts File on the computer.
1. Edit Hosts File from Admin Account
Login to the Admin Account on your computer and follow the steps below to View or Edit the Hosts File on your computer.
1. Open the Run Command on your computer (press Windows + R keys).
2. In the Run Command window, type C:\windows\system32\drivers\etc and click on OK.

Note: You can also navigate to location of the Hosts file by using File Explorer.
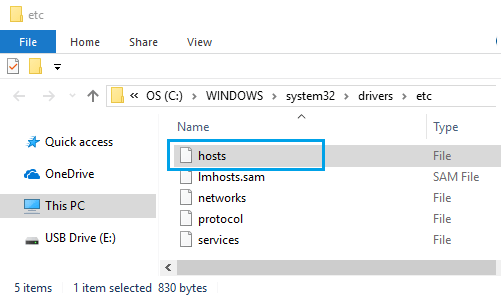
3. On the next screen, double-click on the Hosts File and open the file using Notepad.
4. In the Hosts File, add the new line/lines that you want to add. After adding new lines, click on the File tab and select the Save option.
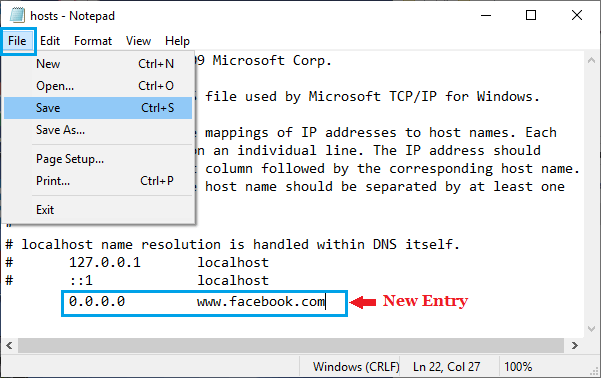
In the above case, a new entry has been added to the Host File to block Facebook on the computer by mapping its domain name to localhost (127.0.0.1) or 0.0.0.0.
Note: If you did not add the new lines, remove them from the Hosts File and save the File.
After removing new lines from the computer, make sure that you scan the computer for Malware using Windows Defender or the a third-part antivirus program installed on your computer.
2. Edit Hosts File from Non-Admin Account
If you are not logged-in to a non-admin account, you can follow the steps below to view or Edit the Hosts File.
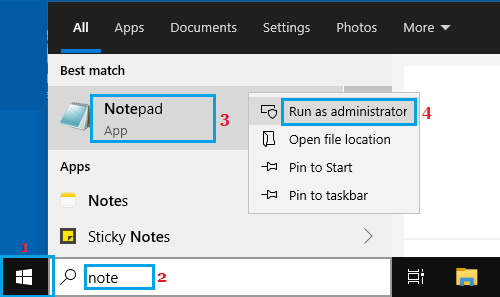
1. Type Note in the Search box, right-click on Notepad and select Run as Administrator option.
2. On the next screen, type your Admin Password and press the Enter key.
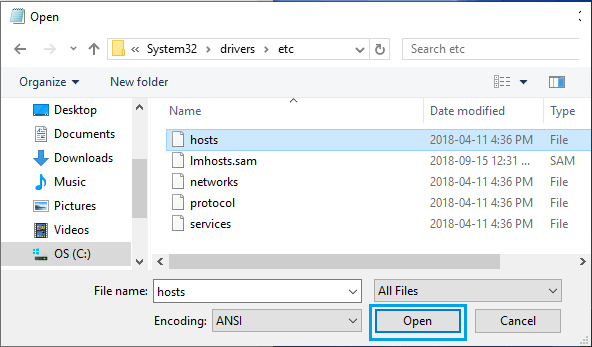
3. In untitled Notepad, select the File tab and click on Open.

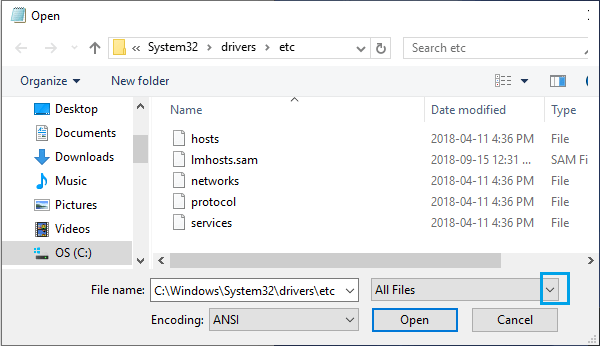
4. On the next screen, type C:\Windows\system32\drivers\etc in the ‘File Name’ entry, use the Down Arrow to switch to All Files view and click on Open.
Note: Alternatively, you can also navigate to C:\Windows\system32\drivers\etc using the left pane menu.
5. Once Files in the “etc” folder are visible, select the Hosts File and click on the Open button.
6. After making changes to Hosts File > select the File tab and click on Save.
As mentioned above, a new entry has been added to the Host File, in order to block access to Facebook on the computer.