Apple’s digital assistant Siri is available on all Apple devices including the MacBook. However, Siri as available on Mac requires you to press the Keyboard shortcut or click on the Mic icon, every time you want to interact with it.
The resulting user experience is not the same as interacting with Siri on an iPhone, where you can voice activate Siri by saying “Siri” or “Hey Siri” and continue interacting with Siri, without having to press any keys.
However, we came across a good workaround by jdcampbell on Reddit that allows users to activate Hey Siri on Mac and allows continuous voice interaction with Siri, without having to press keys or click on the Mic icon.
Enable Hey Siri on Mac
The workaround to enable Hey Siri on Mac can be divided into the following 3 sections.
- Create a Keyboard Shortcut to Activate Siri on Mac
- Enable Enhanced Dictation Mode on Mac
- Create Dictation Command to Activate Siri Keyboard Shortcut on Mac
1. Create Keyboard Shortcut to Activate Siri on Mac
The default Keyboard shortcut to activate Siri on Mac is to press and hold down Command and the Spacebar keys.
However, this keyboard shortcut is not compatible with the Dictation feature on Mac. Hence, the need to create an alternate or new keyboard shortcut that can activate Siri on Mac.
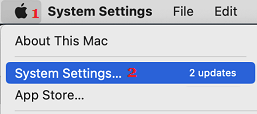
1. Click on the Apple Icon located in the top menu-bar of your Mac and select System Settings or System Preferences in the drop-down menu.
2. On the System Preferences screen, click on the Siri Icon.
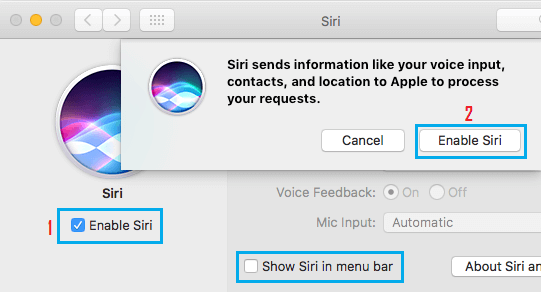
3. On the next screen, check the little box next to Enable Siri (1) and then click on Enable Siri button in the popup that appears.
4. While you are still on the Siri screen, check the option for Voice Feedback and then create a custom keyboard shortcut for Siri on Mac. While you can choose any keyboard shortcut, we are going with Command + S in this tutorial.
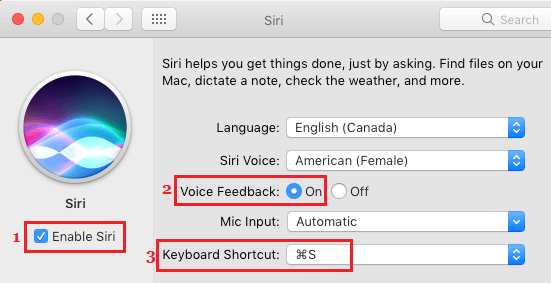
Note: In order to create custom keyboard shortcut, click on the down-arrow next to Keyboard shortcut > next click on Customize in the drop-down menu and then press Command and S keys on the keyboard of your Mac.
2. Enable Enhanced Dictation Mode on Mac
After creating a new keyboard shortcut for Siri, the next step is to enable Enhanced Dictation Mode on your Mac. This will allow you to interact with Siri using continuous voice commands.
1. Click on the Apple Icon from the top menu-bar on your Mac and then click on System Preferences option in the drop-down menu.
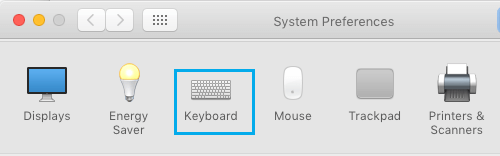
2. On the System Preferences screen, click on Keyboard.
3. On the Keyboard screen, click on the Dictation tab and then check the box for Dictation and Use Enhanced Dictation. Next, choose Command S in the Shortcut field (See image below).
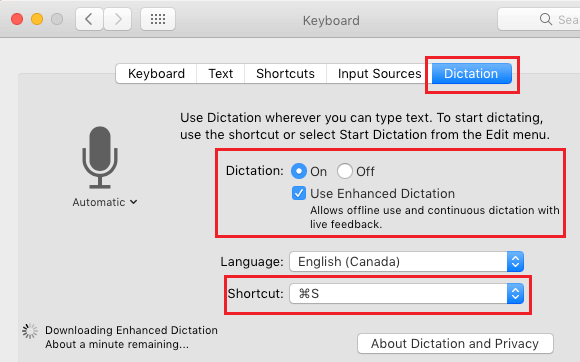
Note: Your Mac may download and install a file for Enhanced Dictation, in case you have not used this feature before.
4. Create Dictation Command to Activate Siri Keyboard Shortcut on Mac
The final step is to make use of the accessibility feature on Mac to create a Voice Command that can trigger the keyboard shortcut for Siri on your Mac.
1. Click on the Apple Icon from the top menu-bar on your Mac and then click on System Preferences option in the drop-down menu.
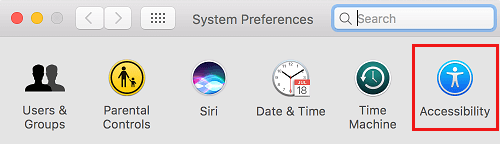
2. On the System Preferences screen, click on Accessibility.
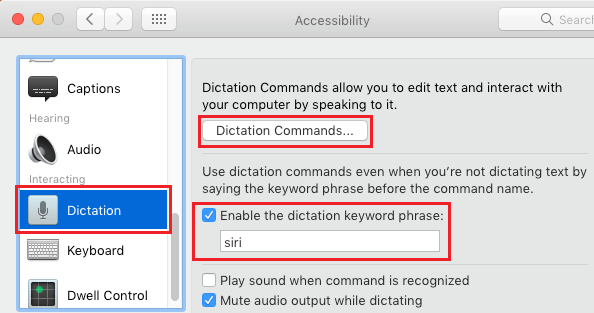
3. On the accessibility screen, click on Dictation in the left sidebar menu. Next, check the box for Enable the dictation keyword phrase, type Siri as the dictation phrase and then click on the Dictation Commands… button (See image below).
4. On the next screen, Check the box for Enable advanced commands and then click the “+” button to add a new command (See image below)
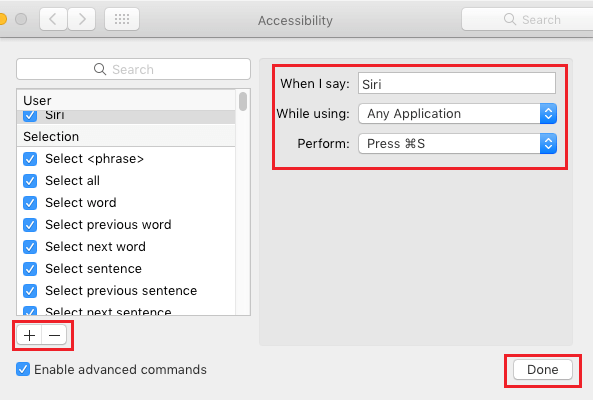
In the New command windows, provide the following input.
- When I say: Siri
- While using: Any Application
- Perform: Click on down-arrow > click on Keyboard Shortcut from the drop-down menu and then enter the Keyboard shortcut that you had created for Siri (Command-S).
Once you are done with this screen, click on the Done button to save the changes
In case this workaround is not working on your computer, go to System Preferences > Siri and then Disable Siri. After a minute Enable Siri again and see if you can activate Siri by saying “Siri”.
Tip: In order to keep Siri being activated both on iPhone and Mac when you say Siri, you may want to enable a different voice command to activate Siri on Mac – something like Hey Mac!