If required, it is possible to Increase or Decrease the Size of the Dock on your MacBook to suit your own unique visual and screen size requirements. You can find below the steps to Resize the Dock on Mac.

Change the Size of Dock on Mac
The Dock on Macs is usually placed at the bottom of the screen and it can be described as a Launching Pad for your most commonly used Apps and programs on Mac.
Most Mac users are known to stick to the default size and location of the Dock. However, at times the Dock can get in the way of doing things, requiring either a change in the location of Dock or simply a change in the size of the Dock.
Luckily, it is really easy to change the position of Dock and also to make the Dock smaller or bigger.
1. Quick Way to Resize Dock on Mac
The quickest and easiest way to resize the Dock on your MacBook is by by right-clicking on the Divider Line on the Dock.
1. Hover your mouse over the Dock Divider Line which separates the App icons on the Dock from the Trash can Icon.

2. When you hover the mouse over Divider Line, you will see the regular mouse pointer changing into a Resize pointer.
![]()
3. Now, simply drag your mouse either up or down (vertically) to resize the dock.
2. Change Dock Size Using Settings
Another way to increase or decrease the size of Dock on a MacBook is by using the Settings Menu.
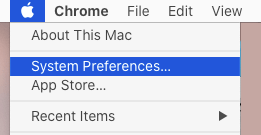
1. Click on Apple icon located in the top-menu bar of your Mac and select System Preferences in the drop-down menu.

2. On System Preferences screen, click on the Dock & Menu Bar Icon.

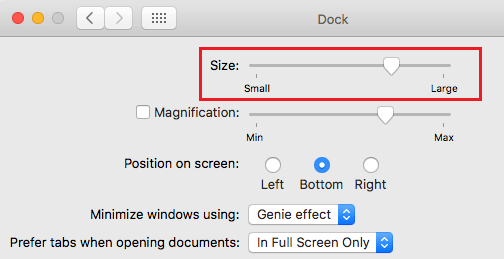
3. On the next screen, you can increase the Size of Dock by moving the Slider to Right and decrease the Size of Dock by moving the slider to left.

You will see the Dock Size changing in real-time, which allows you to position the slider exactly to the size that you want the Dock to appear on your MacBook.
3. Increase or Decrease Size of Dock Using Dock Preferences Menu
You can also increase or decrease the Size of Dock on your Mac by using Dock Preferenses menu.
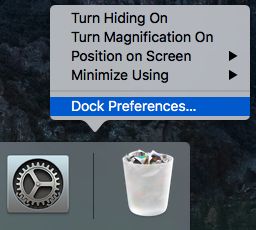
1. Right-click on the Dock Divider Line and select Dock Preferences option in the Menu that appears.

2. On Dock Preferences screen, you can move the Slider next to Size to the Left to make the Dock Smaller and move the Slider to Right to increase the Size of the Dock.

As mentioned above, the change in the Size of Dock happens in real-time, which allows you to size the Dock to your desired size.