When Google Chrome is going through problems on a computer, it is designed to come up with specific type of error messages, which can provide an indication about the nature of the problem.
For example, if Google Chrome is unable to establish connection with a website or online service, it may come up with Err_Connection_Refused, Connection_Timed_Out or Err_Connection_Closed type of error messages.
Similarly, if there is a network connectivity issue on the computer, you may find Google Chrome coming up with Err_Network_Access_Denied or Err_Network_Changed error message.
Google Chrome Error Messages
The troubleshooting steps as provided below should help you fix the most common type of Google Chrome error messages on a Windows computer and help you get back online.
Before going ahead, take a good look at the URL Address or the website name that you had typed in the browser and make sure it is correct and there is no typing error.
1. Quit and Restart Chrome
Your first approach to fix any browser related problem on a Windows computer should be to quit the web browser and restart it.
You can quit the Chrome browser by using Ctrl + Q shortcut or by right-clicking on the Chrome Icon and selecting the Quit option.
Re-launch Google Chrome and try to access the webpage again – You should be able to reopen the previously closed tab by using Ctrl + Shift + T shortcut.
2. Update Google Chrome
The next step should be make sure that you are using the latest version of Google Chrome on your computer.
1. Click on 3-dots icon > hoover mouse over Help and click on About Google Chrome.
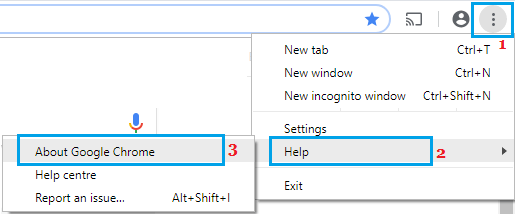
2. On the next screen, you should find Google Chrome checking for update and automatically installing the update (if available).
3. Once the update is installed, click on the Relaunch button to restart Google Chrome and see if you can now access the website.
3. Clear Cache & Cookies
Over a period of time, the browser cache can become stale and even get corrupted, leading to an adverse impact on the performance of Google Chrome.
1. Open Google Chrome (in case you had closed it).
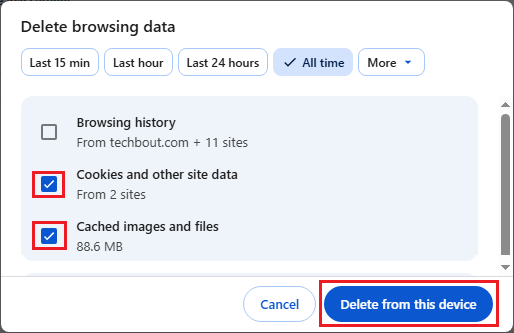
2. Click on 3-dots icon and select Delete Browsing Data or use Ctrl + Shift + Del Shortcut to reach “Delete Browsing Data” screen.
3. On the next screen, click on All Time tab, select Cookies/other site data and Cached images/files options click on Delete from this device button.
After clearing Cache & Cookies, see if you can access the webpage or website that you were trying to reach.
4. Use Incognito Mode
See if you can access the website/webpage in Incognito mode.
1. Click on 3-dots icon and select New Incognito Window option in the drop-down menu.
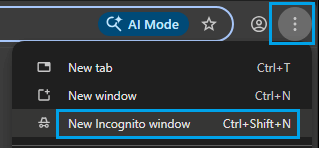
2. Try to access the website/webpage in Incognito mode.
If you can access the website/webpage in incognito mode, it indicates that the problem might be due to a browser extension.
5. Disable Browser Extensions
Follow the steps below to disable/remove all the browser extensions.
1. Click on 3-dots icon > Hoover mouse over Extension > click on Manage Extensions.
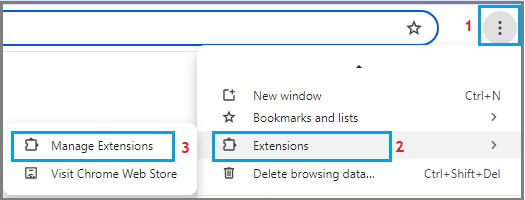
2. On the next screen, disable extensions by moving the toggle to OFF position and delete unwanted extensions by clicking on the Remove option.
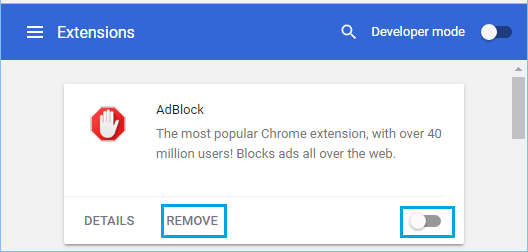
3. Restart Google Chrome and try to access the website.
6. Reset Flags
This can help, if you have been trying the experimental features in Google Chrome.
1. Type chrome://flags in Chrome Address bar and press the enter key.
2. On Chrome Experiments screen, click on Reset All option, located at top-right corner of the screen.
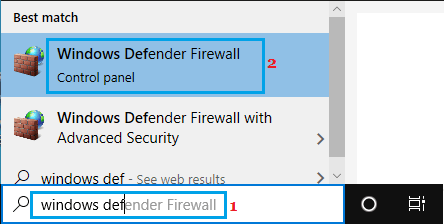
7. Check Windows Firewall
If Google Chrome is being blocked by firewall or antivirus program, you may actually see a suggestion in the error message, asking you to check/allow access to the browser in Windows Firewall.
1. Type Windows Defender in the search bar and click on Windows Defender Firewall in the search results.
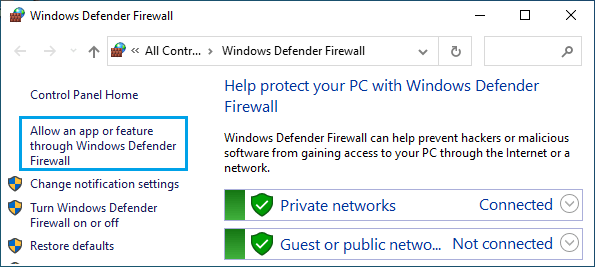
2. On the next screen, click on Allow an app or feature through Windows Defender Firewall option.
3. On the next screen, make sure that the little box next to Google Chrome is selected.
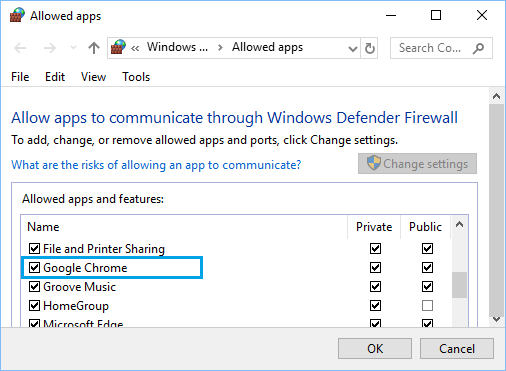
After this, you should be able to access the webpage or website on your computer.
8. Temporarily Disable Antivirus Program
Similarly, make sure that Google Chrome is not being blocked by the third-party antivirus program installed on your computer.
1. Right-click on the Program icon in the system tray and click on Disable Auto Protect.
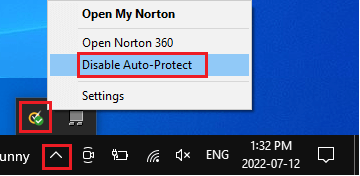
2. On the next screen, select the time period up to which you want to disable the antivirus program on your computer and click on OK.
When the antivirus program gets re-enabled, it should provide access to the web browser. If not, you will have to remove the Antivirus program from the computer and reinstall it back again.
9. Reset Chrome Browser
Sometimes, the problem is due to an unwanted/unknown change in browser settings and this can be fixed by Resetting Google Chrome to its original factory default settings.
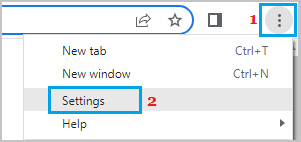
1. Click on 3-dots icon and select Settings in the drop-down menu.
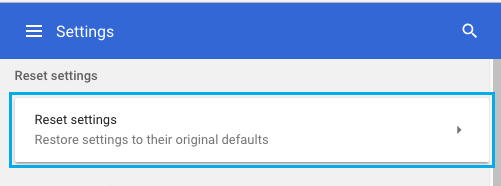
2. On Chrome Settings screen, select Reset Settings tab in the left-pane and click on Restore Settings tab in the right-pane.
3. On the confirmation pop-up, click on Reset Settings button to confirm.
After the browser is reset, you should be able to access the website or the webpage on your computer.
10. Remove and Reinstall Chrome
If above solutions did not help, the problem could be due the installation of Google Chrome on your computer being broken or damaged.
This can be confirmed by using Microsoft Edge or another web browser to access Internet or the same website/webpage on your computer.
However, this issue can be easily fixed by removing the current broken or corrupted installation of Google Chrome from the computer and Reinstalling the latest version.