The default tendency in Google Chrome is to use the maximum amount of CPU and RAM as available on the computer, in order to run as fast as it can.
While this allows Google browser to perform at its best on computers with high RAM capacity, it can lead to problems on regular budget priced computers that usually come with lower RAM capacity.
Apart from this, high RAM & CPU usage by Google Chrome can be caused due to multiple open browser tabs, incompatible browser extensions, corrupted browser cache and other reasons.
High RAM Usage by Google Chrome
If Google Chrome browser is running slow on your computer and the task manager is indicating high RAM & CPU usage by multiple Chrome Processes, you should be able to fix the problem using the following steps.
1. Close Browser Tabs
Opening multiple browser tabs leads to excessive RAM and CPU demand on the computer, which leaves Google Chrome with insufficient resources to function properly.
Hence, close all open Chrome tabs (except the one showing error message), quit all programs on the computer and try to reload the webpage that you were trying to access.
2. Update Chrome Browser
The next step would be to make sure that you are using the latest version of Google Chrome on your computer.
1. Open the Google Chrome browser on your computer.
2. Click on 3-dots menu icon > Hoover mouse over Help and click on About Google Chrome.
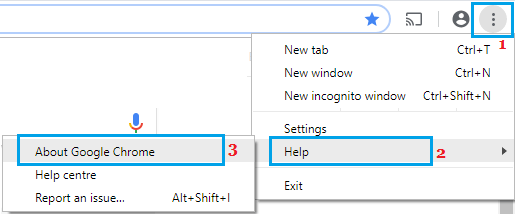
3. On the next screen, wait for Google Chrome to check and apply updates (if available).
3. Clear Browser Cache
Presence of expired and corrupted cached files in the browser cache can interfere with proper functioning of the browser, which in-turn can lead to high resource usage by the browser.
If you are not used to clearing the browser cache, you can refer to this guide: How to Clear Cache in Google Chrome.
4. Prevent Chrome from Running Apps in Background
Allowing Google Chrome to continue running background apps even after the browser is closed can lead to high resource usage on the computer.
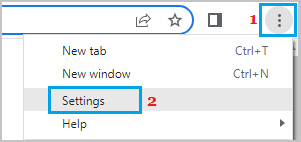
1. Click on 3-dots Icon (top-right) and select Settings in the drop-down menu.
2. On the Settings screen, select System in the left-pane. In the right-pane, disable Continue running background apps when Google Chrome is closed option.
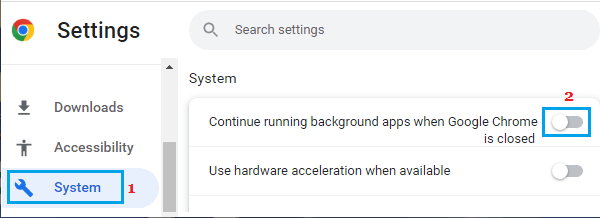
This will prevent the browser from running Chrome processes in background on your computer.
5. Disable Hardware Acceleration
While the hardware acceleration feature can speed up Google Chrome, it can also lead to high resource usage, which can be problematic for computers with low RAM & CPU capacity.
1. Click on 3-dots Icon (top-right corner) > select Settings in the drop-down menu.
2. On the Settings screen, select System in the left-pane. In the right-pane, disable Use hardware acceleration when available option.
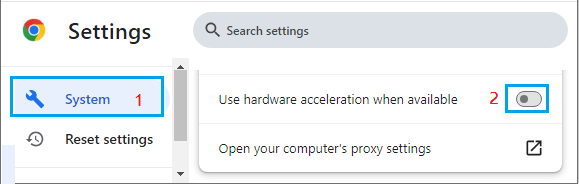
This will prevent the browser from running Chrome processes in background on your computer.
6. Disable Graphics Acceleration
Similarly, the Graphics acceleration feature in Google Chrome is known to cause High CPU & RAM usage problem, especially on budget computers.
1. Click on 3-dots Icon > select Settings in the drop-down menu.
2. On the Settings screen, select System in the left-pane. In the right-pane, disable Use graphics acceleration when available option.
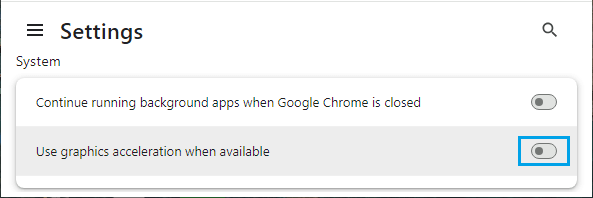
This will prevent Google Chrome from making use of the graphics acceleration feature.
7. Check for Conflicting Software
The reason for high RAM and CPU usage by Chrome on your computer could be occurring due to an app or program being incompatible with the browser.
1. Open Google Chrome on your computer.
2. Type chrome://conflicts into the Address bar and press the Enter key.
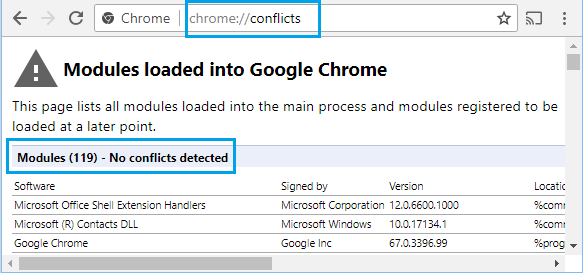
3. If Chrome reports any conflicting software, you need to uninstall the program by going to Settings > Apps > Program Name and click on Uninstall.
8. Disable Browser Extensions
As mentioned above, incompatible browser extensions can lead to high resource usage on the computer.
1. Click on 3-dots menu icon > Hoover mouse over Extension > click on Manage Extensions.
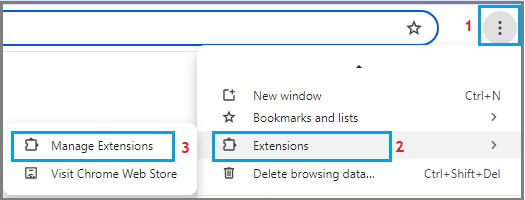
2. On the next screen, disable Extensions by moving the slider to OFF position.

Note: If an extension is unnecessary, you can click on Remove to uninstall the extension.
4. After this, make sure that your Restart the Chrome browser on your computer.
Hopefully, the above steps should lead to a significant reduction in the amount of RAM and CPU usage by Google Chrome on your computer.