When you open the Chrome browser on your computer, it should instantly connect to internet. If this is not happening, you can find below the steps to fix the problem of Google Chrome not connecting to internet.
Google Chrome Not Connecting to Internet
The problem of Google Chrome not connecting to the internet might be occurring due to various reasons, ranging from network connectivity issues, incompatible browser extensions to the Chrome App getting damaged or corrupted.
Hence, we are providing below multiple troubleshooting steps that have been used by different users to fix the problem of Chrome not connecting to internet.
1. Check Network Connectivity
Make sure that the problem is not due to poor network connectivity in your area. You can easily check this by trying to access the internet on another device.
If you are able to access the internet on another device, the problem might be due to a glitch on the computer, which can be fixed by shutting down the computer and restarting it back again.
Completely Shut down the computer > wait for 60 seconds and restart the computer by pressing the power button.
2. Clear Browser Cache & History
Corrupted cookie files and cached error pages can prevent the browser from conecting to internet.
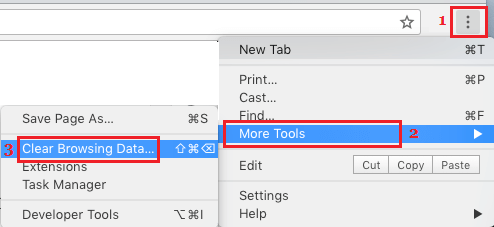
Open Chrome Browser > click on 3-dots menu icon > hoover mouse over More Tools and click on Clear Browsing Data.
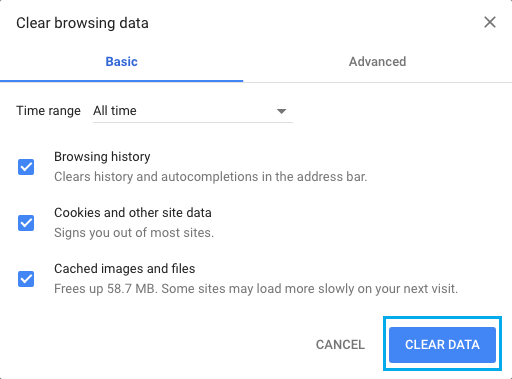
On the next screen, select All Time as the “Time Range” > make sure Browsing History, Cookies and Cached Images are checked and click on Clear Data button.
After clearing Cache and browsing history, try to access the same webpage again and see if you are still getting this error.
3. Disable Browser Extensions
Incompatible browser extensions can interfere with proper functioning of Chrome browser and prevent it from connecting to internet.
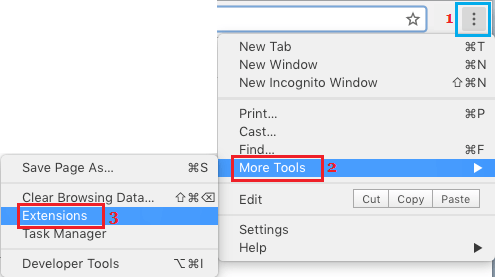
1. Open Chrome browser > click on 3-dots menu icon > More tools > Extensions.
2. On the next screen, disable Extensions by moving the toggle to OFF position. If an extension is unnecessary, click on Remove to uninstall the extension.
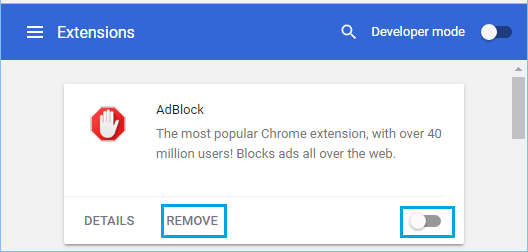
3. Restart Chrome browser and try to download the file again.
4. Temporarily Disable Antivirus Software
It is not uncommon to find third party Antivirus software programs temporarily blocking the browser from connecting to internet due to certain perceived threat or other reasons.
Temporarily disabling the Antivirus Software installed on your computer and see if Chrome can connect to internet.
5. Disable Proxy Servers
The problem might be due to your computer being set to connect to internet using Proxy servers.
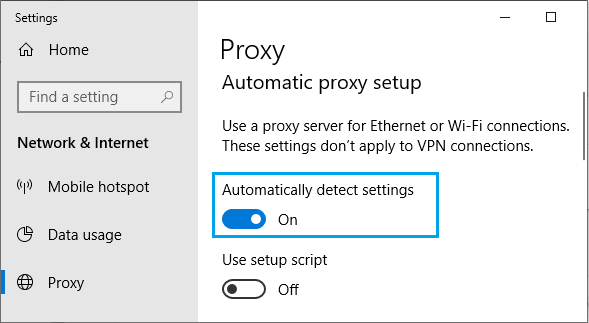
Click on Start button > Settings Icon > Network and Internet. On the next screen, click on Proxy in the left-pane and enable Automatically detect settings option in the right-pane.
6. Flush DNS Cache
The problem might be due to damage or corruption of previous DNS lookup information stored in the DNS cache becoming damaged or corrupted.
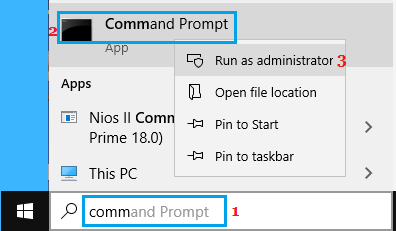
Type CMD in the Search bar > right-click on Command Prompt and click on Run as administrator option.
On the Command Prompt Window, type ipconfig /flushdns and press the Enter key on the keyboard of your computer.
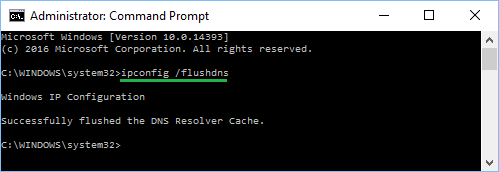
Close the Command prompt window and see of Chrome can connect to internet.
7. Reset Flags
If you have been trying experimental features in Chrome, reset flags and this should help in fixing the problem.
Open Chrome browser and type chrome://flags in the address bar. On Chrome Experiments screen, click on Reset All option, located at top-right corner of the screen.
8. Reset Chrome Browser to Default Settings
Reset Chrome Browser to its default settings and see if this helps in fixing the problem.
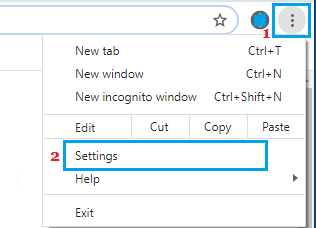
1. Click on 3-dots icon and select Settings option in the drop-down menu.
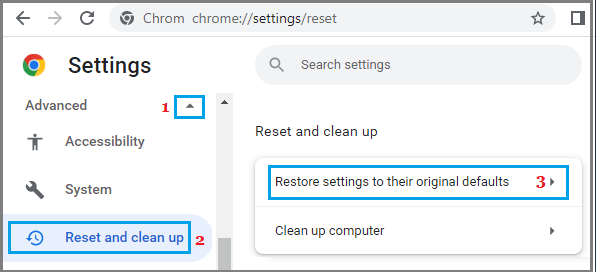
2. On the Settings screen, expand Advanced tab and select Reset & Clean up option in the left-pane. In the right-pane, click on Restore Settings to their original defaults option.
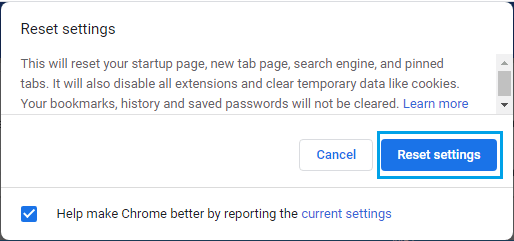
3. On the pop-up, click on Reset Settings button.
After Chrome Browser is Reset, try to access any webpage and see if you are still getting Google Chrome has stopped working error.
9. Switch DNS Servers
If you are frequently running into the problem Chrome not connecting to internet or running slow, consider switching to Google Public DNS which is known to be fast and rated to provide 99.99% uptime.
You can find the steps to switch to Google DNS in this guide: How to Switch to Google DNS On Windows and Mac
10. Reinstall Chrome
If above methods did not help, the only remaining option is to delete and Reinstall Google Chrome browser on your computer.
