In case you are already using Touch ID to unlock your iPhone, you will be pleased to know that it is also possible to Lock Apps on iPhone Using Touch ID.
While almost all native or Apple Apps can be locked with Touch ID, only those third-party apps that support Apple’s Touch ID feature can be locked with Touch ID.
For example, currently popular social media Apps like WhatsApp, Facebook, Twitter and Snapchat do not support Touch ID, while Apps like Dropbox, Mint, PayPal, Evernote, 1Password support Touch ID.
Lock Apps On iPhone Using Touch ID
The first requirement to Lock Apps on iPhone using Touch ID is to enable the Touch ID feature on your iPhone and record your finger print.
Once your Touch ID or Finger Print is available on iPhone, it can be used to Lock all native Apps and supported third-party apps.
With this understanding, let us go ahead and take a look at easy to follow steps to enable Touch ID on iPhone and then Lock any supported app with Touch ID.
Step 1. Enable Touch ID on iPhone
If you are already using finger prints to unlock your iPhone, you can skip this step. If not, you can follow the steps below to Enable Touch ID on your iPhone.
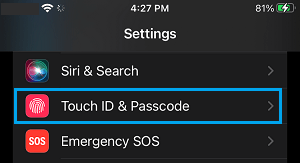
1. Open Settings > scroll down and tap on Touch ID & Passcode.
2. When prompted, enter your 4-digit Lock Screen Passcode.
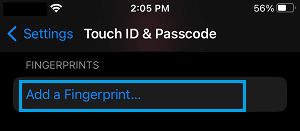
3. On the next screen, scroll down and tap on Add a Fingerprint option.
4. Follow the instructions to record your Fingerprint and complete the Touch ID setup process.
2. Lock Apps on iPhone Using Touch ID
Once your Touch ID is setup on iPhone, you can follow the steps below to Lock any native or supported third-party App on your device using Touch ID.
1. Open the App that supports Touch ID on your iPhone.
2. Next, open the Settings menu of the App.
3. From the Settings menu, go to Privacy > Touch ID (or some similar term).
4. Follow the onscreen instructions to complete the process.