The issue of Microphone not working in Microsoft Teams can occur, both on Laptop computers that come with built-in Microphone and also on Desktop computers using an external Microphone.
In the case of Desktop computers, the problem is usually due to the external Microphone attached to the computer not being automatically selected by MS Teams App.
In other cases, the issue of Microphone not working or malfunctioning in Microsoft Teams is usually due to MS Teams not being allowed to access the Microphone or Microphone not being recognized by the Teams App.
Microphone Not Working in Microsoft Teams
Before going ahead with the troubleshooting steps, it is recommended that you Restart the computer to rule out the possibility of the problem being caused by a glitch or due the Camera driver not being properly loaded by the computer.
1. Select Your Microphone in Teams
Make sure that the right Microphone on your computer is selected by Microsoft Teams.
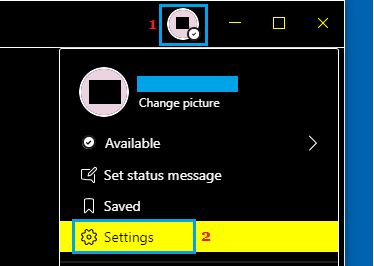
1. Open Microsoft Teams > click on Profile Icon and select Settings in the Drop-down menu.
2. On Teams Settings screen, select the Devices tab in the left-pane. In the right-pane, use the drop-down to select your Microphone.
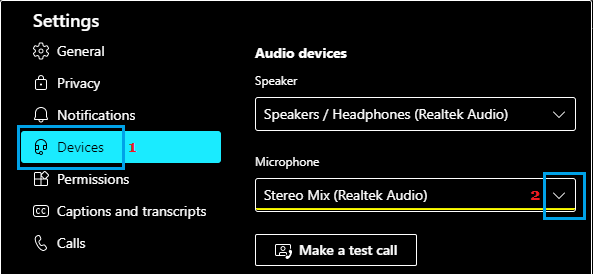
If the Microphone is not listed on this screen, it is either not being recognized or has been disabled in the Privacy settings on your computer.
2. Allow Media Access for Apps in Microsoft Teams
Make sure that Microsoft Teams has been provided with Media access.
1. Open Microsoft Teams Settings.
2. Select Permissions tab in the left-pane. In the right-pane, enable Media (Camera, microphone, speakers) option.
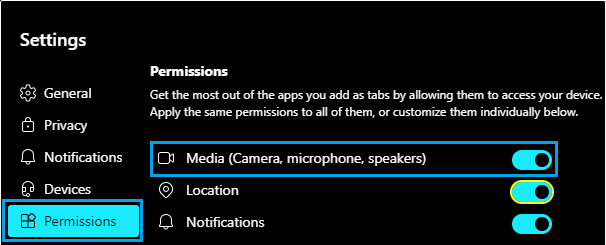
3. This will allow Apps that you add as tabs in Teams to access the Microphone on your computer.
3. Enable Microphone Using Control Panel
In certain cases, you may have to enable the Microphone using the Control Panel.
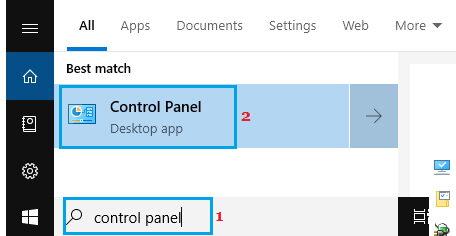
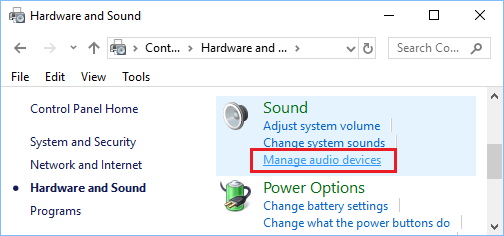
1. Type Control Panel in the search bar and click on Control Panel App in the search results.
2. On the Control Panel screen, navigate to Hardware & Sound > click on Manage Audio Devices.
3. On the pop-up, switch to Recording tab and see if the Microphone is enabled. If the Microphone is disabled, right-click on the Microphone and click on Enable.
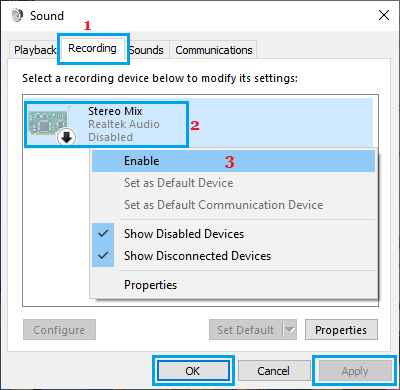
After this, the Microphone should be available for selection in the Teams App.
4. Allow Applications to Control Sound
Follow the steps below to grant Apps the permission to control the sound on your computer.
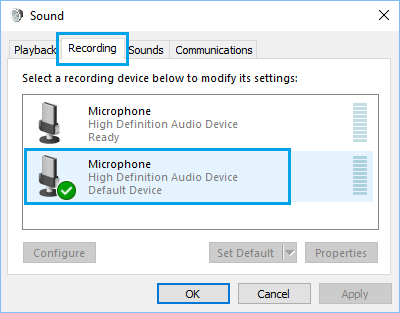
1. Right-click on the Speaker icon in taskbar and click on Sounds.
![]()
2. On the next screen, switch to Recording tab and double-click on your Microphone.
3. On Microphone properties screen, switch to Advanced tab and make sure Allow Applications to take exclusive control of this device option is selected.
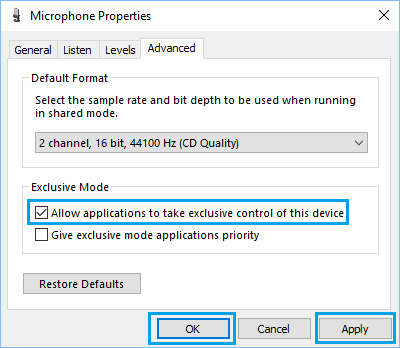
4. Click on Apply and OK to save this setting.
Restart your computer and see if the problem of Skype Audio not working on your computer is fixed.
5. Troubleshoot Sound Problems
Windows comes with a built-in Sound Troubleshooter, which might help in fixing the problem.
1. Right-click on the Speaker Icon in the Taskbar and select Troubleshoot Sound Problems option.
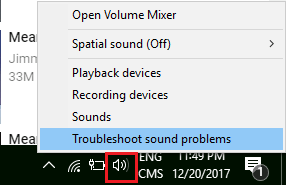
2. On the pop-up, enter your Admin Password.
3. Allow Windows to find and fix the sound problem on your computer.
6. Check Microphone Access in Privacy Settings
Make sure the Microphone is not being blocked by Privacy Settings on your computer.
1. Go to Settings > Privacy.
2. Select Microphone in the left-pane. In the right-pane, click on Change and allow Microphone to access your computer.

After this, you should find the Microphone available for selection in Microsoft Teams.
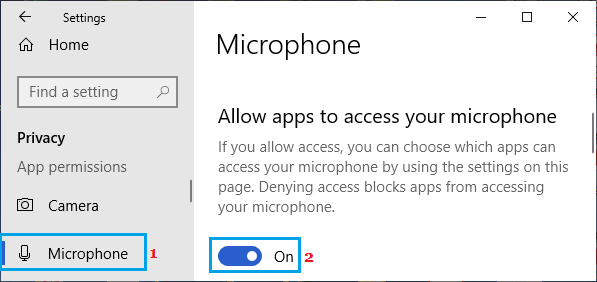
7. Allow Apps to Access Microphone in Privacy Settings
Make sure that Apps on your computer can access the Microphone.
1. Go to Settings > Privacy.
2. Select Microphone in the left-pane. In the right-pane, make sure Allow Apps to access your Microphone is switched ON.
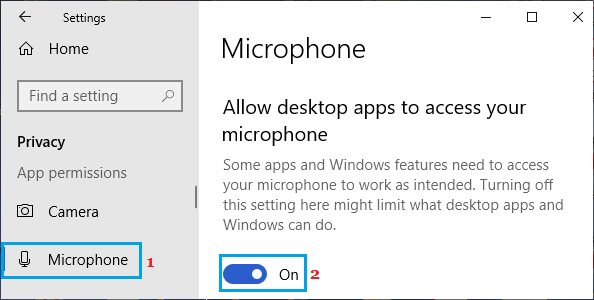
3. On the same screen, scroll down and make sure Allow Desktop Apps to access your Microphone option is switched ON.
4. Restart Microsoft Teams and see if the Microphone is now working.