While the “Network Adapter Not Detected” Error in Windows is more commonly associated with Realtek Network Adapters, it can also occur with any other make of Network Adapter installed on a Windows 11/10 computer.
In another variation of this error, Windows comes up with “Network Adapter Missing’ error message and the Network Adapter actually goes missing from the Device Manager screen.
The reason for “Network Adaptor Not Detected” error on your computer could be due to the Network Adapter Driver not being loaded by the operating system, the driver for the Network Adapter being damaged or corrupted and other reasons.
Network Adapter Missing or Not Detected Error in Windows 11/10
If your computer is coming up with “Network Adapter not detected” error message, you should be able to fix the problem using the following troubleshooting methods.
1. Restart the Computer
Sometimes, the problem is due to the Driver for Network Adapter not being loaded on the computer.
1. Power OFF the computer > Allow the computer to completely Shut Down.
2. Wait for 30 seconds and restart the computer.
This simple troubleshooting step can help, if the problem is being caused due to a stuck program or process interferring with proper functioning of the Network Adapter on your computer.
2. Restart Network Adapter
Restarting the Network Adapter might help in fixing this problem.
1. Right-click on Start button and select Device Manager in the WinX menu.
2. On the Device Manger Screen, expand Network Adapters entry > right-click on Wireless Adapter and click on Disable Device option.
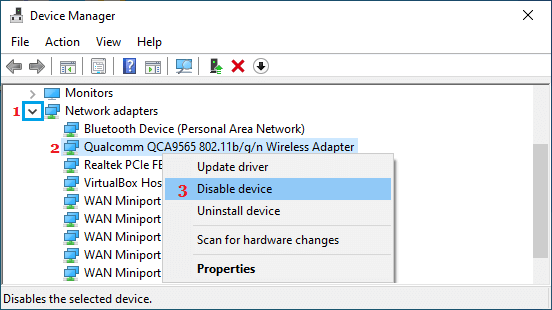
3. After 30 seconds, right-click on Wireless Adapter again and this time select Enable Device option.
Restart the computer and check to see if your computer is still coming up “Network Adapter Not Detected” error message.
3. Update Network Adapter Driver
Follow the steps below to Update the Network Adapter Driver software on your computer.
1. Right-click on Start button and select Device Manager in the WinX menu.
2. On Device Manger Screen, open Network Adapters entry > right-click on Wi-Fi Adapter and select Update Driver Software option.
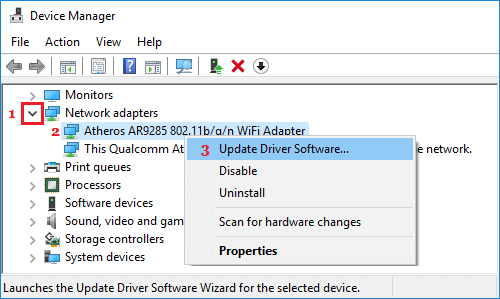
Tip: If you see multiple entries, look for something that reads Network, 802.11b or has WiFi in it.
3. On the next screen, click on Search Automatically for Updated Driver Software and follow the instructions to install the updted driver on your computer.
4. Reset Network Adapter (Winsock Reset)
Follow the steps below to Reset the Network Adapter on your computer.
1. Type Command Prompt in the search bar > right-click on Command Prompt App in the search results and click on Run As Administrator option.

2. On the Command Prompt screen, type netsh winsock reset and press the Enter key.

3. Close the Command Prompt window and Restart the computer.
5. Run Network Adapter Troubleshooter
The built-in Network Adapter troubleshooter might help in fixing this problem.
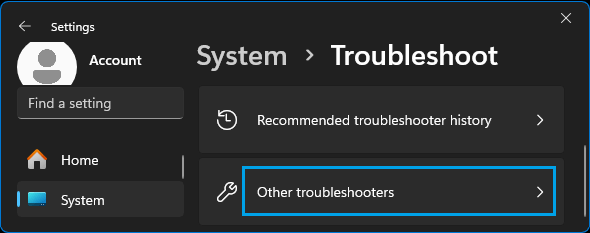
1. Go to Settings > System (left-pane) > click on Troubleshoot in the right-pane.
2. On the next screen, scroll down and click on Other troubleshooters.
3. On the next screen, select Network Adapter and click on Run the Troubleshooter.
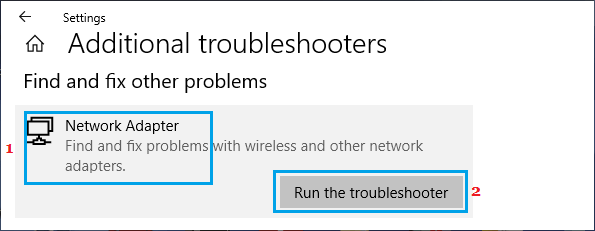
4. Follow the instructions to find and fix problems on your computer.
6. Uninstall Network Adapter
Follow the steps below to uninstall the Network Adapter and force Windows to find and install the right Driver for the problamatic Network Adapter on your computer.
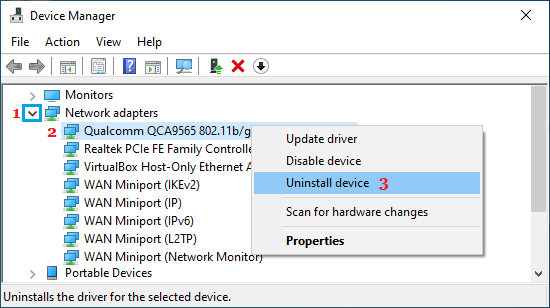
1. Right-click on Start button > click on Device Manager.
2. On the Device Manger Screen, right-click on Wi-Fi Adapter and click on Uninstall device option.
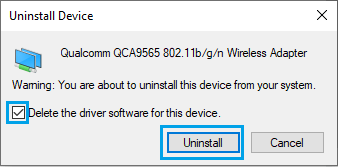
3. On the confirmation pop-up, check Delete driver software for this device option and click on Uninstall.
4. Restart the computer and this time Windows should automatically install the right driver software.
Note: In rare cases, Windows may fail to install the right driver. If this happens, you will have to manually download the driver software from the manufacturers website and install it on your computer.
7. System Restore
If you are still unable to fix this issue, you can use System Restore to revert back the computer to its previous working status.
However, this solution can be used, only if your computer was previously setup to automatically create system restore points or if you had manually saved a System Restore Point on your computer.