In general, “Port in use, please wait” Error message appears while trying to print to a printer attached to the USB port of a computer.
However, this error message can also appear while trying to print to a network or wireless printer from a Windows 11/10 computer.
Interestingly, the same printer works perfectly well and does not come up with “Port in use” error message, when the print command is issued from an iPhone or an Android phone.
Fix Port in use, please wait Printer error
Since, the printer is able to accept print commands from a mobile device, it narrows down the problem to the computer being unable to communicate with the printer.
In most cases “Port in use” Printer error can be fixed by running the Printer Troubleshooter as available in Windows and by using other troubleshooting steps.
1. Restart Printer & Computer
If the problem is occurring due to a minor software glitch, restarting the computer and printer might help in fixing the problem.
1. Power OFF the Printer > Wait for 60 seconds and Restart the printer.
2. Restart your computer and try to print a test page.
2. Run the Printer Troubleshooter
As mentioned above, the built-in Printer Troubleshooter as available in Windows should help in fixing this problem.
1. Go to Settings > System > scroll down in the right-pane and click on Troubleshoot.
2. On the next screen, scroll down and click on Other troubleshooters.
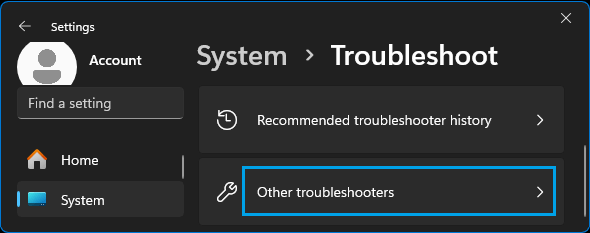
3. On Other Troubleshooters screen, click on the Run option in the Printer tab.

Follow the onscreen instructions as the Troubleshooter tries to find and fix printing problems on your computer.
Windows 10: Go to Settings > Update & Security > Troubleshoot > Additional Troubleshooters > click on Run the Troubleshooter button.
3. Set Correct Printer Port
Follow the steps below to make sure that the right type of Port has been assigned for your printer.
In this regard, you can refer to the User Manual that came with your printer and it should mention the type of Port required or supported by your printer.
1. Type Printer in the search bar and click on Printers & Scanners in the search results.
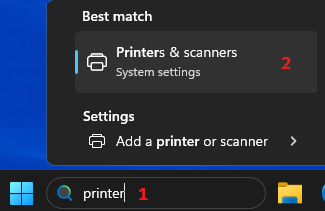
2. On Printers & Scanners screen, locate your printer and click on it. On the next screen, click on Printer Properties tab.

3. On Printer Properties screen, switch to Ports tab and make sure that the selected printer port type matches the connection that is currently in use.
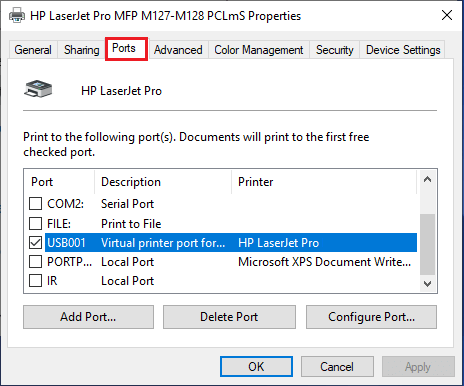
Note: If the printer uses a USB connection, the Port will have a USB in its name & description. Similarly, if the printer is using a network connection, it will have Network, or IP in its name/description.
4. Update Printer Device Driver
Printer Problems can also be caused due to the Printer device driver software being incompatible with the version of Windows OS running on your computer.
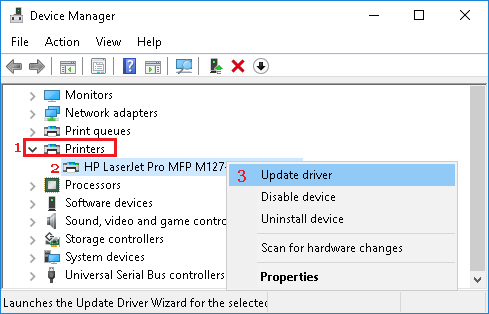
1. Right-click on Start button and click on Device Manager.
2. On Device Manager screen, expand Printers Entry > Right-click on the Printer Name and select Update Driver option.
5. Reinstall Faulty USB Drivers
If you are trying to print to a USB connected printer, the problem might be due to the USB device driver being outdated or corrupted.
1. Right-click on Start button and click on Device Manager.
2. On Device Manager screen, expand Universal Serial Bus Controllers Entry > Right-click on the USB Controller with an exclamation mark and click on Uninstall in the contextual menu.
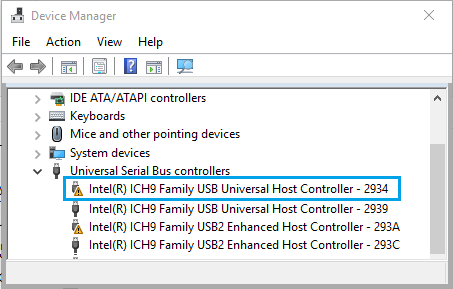
3. Repeat the above steps for other USB Controllers with Exclamation marks and Restart the computer.
Once the computer restarts, your computer should automatically load the right drivers as required for USB Ports on your computer.