Similar to any other software, the BIOS/UEFI firmware can also get damaged or corrupted, in which case you need to know the steps to Reset BIOS/UEFI on your computer.
The purpose of BIOS (Basic Input Output System) on a Windows computer is to initialize the Hardware during the boot up process and provide Run-time services for operating systems and programs installed on the computer.
Hence, any change, corruption or damage to BIOS/UEFI can have an adverse impact on the startup process and proper functioning of the computer
Reset BIOS/UEFI to Default Settings
In general, users find the need to Reset BIOS to default settings, when the computer is going through startup or performance related problems, which cannot be attributed to any other reason.
On newer computers, BIOS has been replaced with UEFI (Unified Extensible Firmware Interface). Both BIOS and UEFI basically perform the same functions and the terms BIOS and UEFI are used interchangeably.
Note: There are multiple way to Enter BIOS/UEFI Settings on a Windows computer.
Steps to Reset BIOS/UEFI to Default Settings
While the steps to Reset BIOS/UEFI can vary from computer to computer, the basic idea is to enter BIOS/UEFI Settings and click on the Reset or Load Default option.
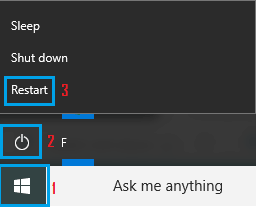
1. Click on the Start button > Press and Hold the Shift key on the keyboard of your computer and click on Restart.
2. From the next screen, go to Troubleshoot > Advanced options and click on UEFI Firmware Settings card or tab.
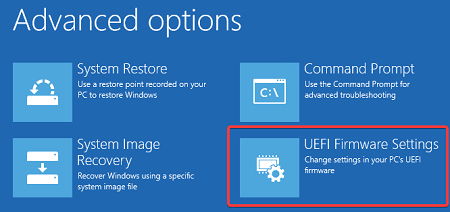
3. On the next screen, select the Restart option to enter BIOS settings on your computer.
4. On BIOS Settings screen, click on Restore Settings button to Reset BIOS/UEFI to its original or Factory Default Settings.
If you do not see Restore Settings button, press the F9 key to bring up the “Load Default Options” prompt and click on Yes to Restore BIOS to default settings.
5. Make sure that you click on the Save option, before clicking on Exit to close the BIOS Settings screen
Note: Your computer may have its own menu option to Reset BIOS.