The default option in Windows is to display the battery icon at bottom-left corner of the screen in the taskbar. If the battery icon is missing, you won’t be able to see how much battery life is left on your Laptop
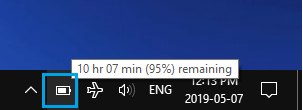
The most common reason for Battery Icon missing or disappearing from Taskbar is due to Battery Icon being moved to System Tray or due to Battery display in the Taskbar being accidentally disabled.
Apart from this the problem of missing battery icon on a Windows computer can also be caused due to the drivers becoming outdated or corrupted.
Battery Icon Missing in Windows 11/10
If the Battery Icon is missing from the taskbar on your computer, you should be able to fix the problem using troubleshooting methods as provided below in this guide.
1. Check Overflow Pane (System Tray)
Start by checking the Overflow Pane (System Tray) to rule out the possibility of the battery icon being moved out to the Overflow Pane. This can happen, if the Taskbar is crowded with multiple icons.
1. Click on the Up Arrow Icon located in the Taskbar and see if the Battery Icon is available.
![]()
2. If the Battery Icon is available, you can place it on the Taskbar by dragging the Battery Icon from System Tray to the Taskbar.
2. Enable Battery Icon Display in the Taskbar
As mentioned above, the problem might be due to the battery icon display in the Taskbar being accidentally disabled or switched OFF during a Windows update.
1. Right-click on the Taskbar and click on Taskbar settings.
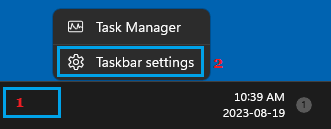
2. Scroll down in the right-pane and click on Taskbar Corner Overflow tab > On the next screen, move the toggle next to Power to ON position.
![]()
Note: Taskbar Corner Overflow Tab is not available in all versions of Windows 11.
After this, the battery icon should be available on the Taskbar or in the System Tray. If it becomes available in System Tray, you can drag it to the Taskbar.
3. Restart Windows Explorer
Some users have reported fixing the problem of missing battery icon by closing Windows Explorer service and restarting it back again.
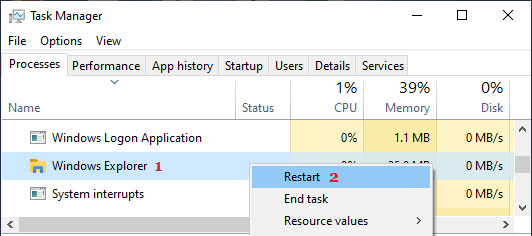
1. Right-click on the Start button and click on Task Manager.
2. On the Task Manger screen, make sure you are on the Processes Tab > right-click on Windows Explorer and click on the Restart option.
Hopefully, one of these methods should help you restore the missing battery icon on your laptop.
4. Scan For Hardware Changes
Sometimes, the case of Missing Battery Icon in Windows is due to Operating System detecting a change in Hardware or Hardware Settings on your computer.
1. Right-click on the Start button and click on Device Manager.
2. On Device Manager screen, click on the Action tab in top-menu bar and select Scan for Hardware changes option.
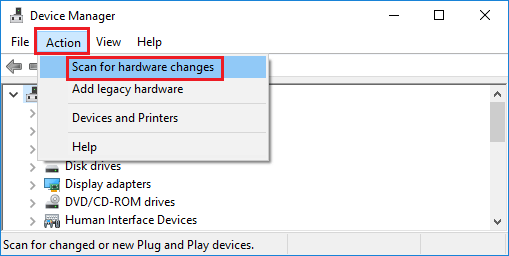
3. Now, check the Notification Area in the Taskbar and see if the Battery Icon is now visible.
5. Enable/Disable Battery Drivers
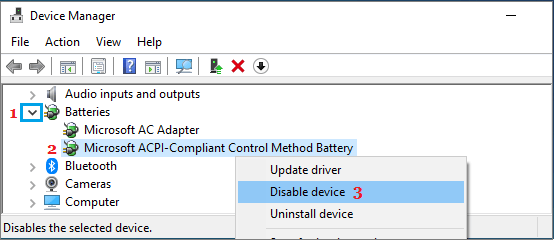
Follow the steps below to disable the Driver for Battery on your laptop and Enable the Driver back again.
1. Right-click on the Start button and click on Device Manager.
2. On Device Manager screen, expand Batteries section, right-click on Microsoft ACPI-Compliant Control Method Battery and click on Disable Device option.
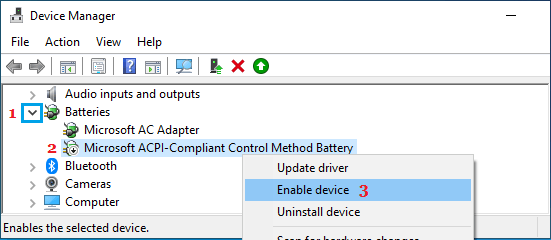
3. Next, right-click on Microsoft ACPI-Compliant Control Method Battery and click on Enable Device option.
4. Restart your computer and see if the battery icon is now visible in the Notification Area of the Taskbar.
6. Power Icon Greyed Out
If the power icon is greyed out, you can follow the steps below to Enable the power icon.
1. Right-click on the Start button and click on Device Manager.
2. On Device Manager screen, expand Batteries section, right-click on Microsoft ACPI-Compliant Control Method Battery and click on Disable Device option.

3. Next, right-click on Microsoft ACPI-Compliant Control Method Battery and click on Enable Device option.

4. Restart the computer and see if the battery icon is now visible in the notification area of the Taskbar.