When you remove any User Profile from a Windows computer, all the Files, Photos, Documents, Settings and Registry entries linked to that particular User Account will be permanently deleted.
However, the User Account will still remain available and you will be able to login to the User Account by using the same password that you were using to Login to that particular User Account.
Now, when you Login to the User Account after deleting its User Profile, Windows automatically creates the familiar User Account structure, comprising of Desktop, Documents, Pictures, Downloads and Favorites Folders.
Note: If you are dealing with a damaged or corrupted User Profile, you can refer to this guide: How to Fix Corrupt User Profile In Windows 11/10.
Remove User Profile in Windows 11/10
The easiest way to remove User Profile from a Windows computer is by going to “Advanced System Properties” screen by using the Run Command.
You can also manually remove User Profile by going to its location (C:\Users\Username) on the computer and then removing the Registry Entries belonging to that particular User Profile.
Note: You cannot remove “User Profile” while you are still logged into the same User Account to which the User Profile is linked.
1. Remove User Profile Using Run Command
This method removes the complete User Profile from the computer along with all Registry Entries related to the User Profile.
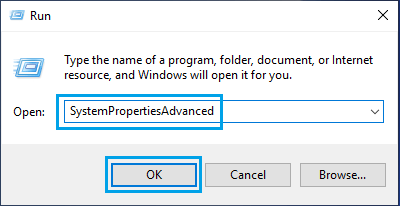
1. Press Windows + R keys to open Run Command.
2. Type SystemPropertiesAdvanced and click on OK.
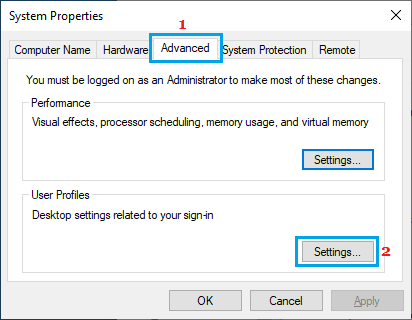
3. On Advanced System Properties screen, make sure you are on Advanced tab and click on the Settings button, located under ‘User Profiles’ section.
4. On the next screen, select the User Profile that you want to remove and click on the Delete button.
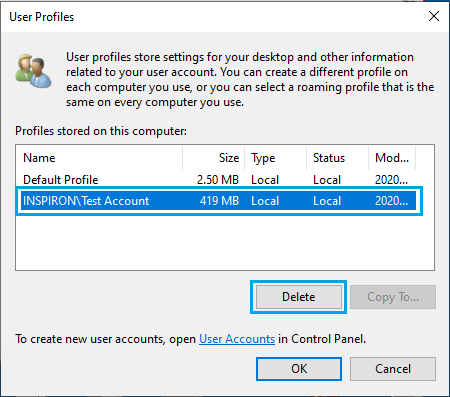
5. On the confirmation pop-up, click on the Delete option to confirm.
The time to delete the User Profile will depend on the number of Files associated with the User Profile.
2. Manually Remove User Profile in Windows 11/10
As mentioned above, you can also manually remove any User Profile from the computer by going to its location on your device.
However, the disadvantage of this method is that it also requires you to locate and delete Registry entries belonging to that particular User Profile.
As you must be aware, any mistake while dealing with Registry files can make the computer unstable and lead to problems. Hence, it is recommended that you save a backup of the registry files on your computer.
2.1 Delete User Profile Folder
Login to your Admin Account and follow the steps below to Delete User Profile Folder.
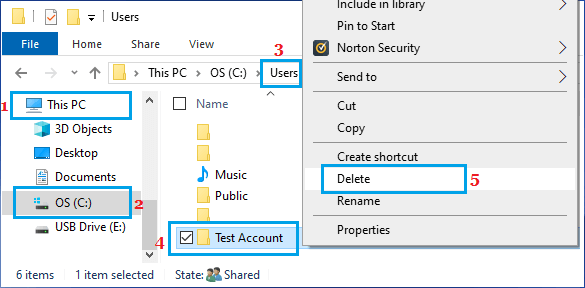
1. Open the File Explorer on your computer.

2. On File Explorer screen, navigate to This PC > Local Disk (C:) and open the Users Folder.
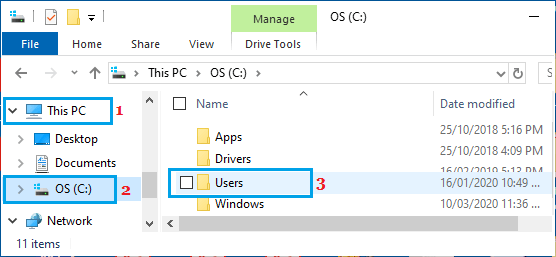
3. In Users Folder, right-click on the User Profile that you want to remove and click on the Delete option.
2.2. Delete User Profile Registry Entry
After the User Folder is deleted, the next step is to delete the Registry Entry related to the User Profile.
1. Open the Run Command > type regedit in the Run Command window and click on OK.

2. On the Registry Editor screen, navigate to HKEY_LOCAL_MACHINE\SOFTWARE\Microsoft\Windows NT\CurrentVersion\ProfileList.
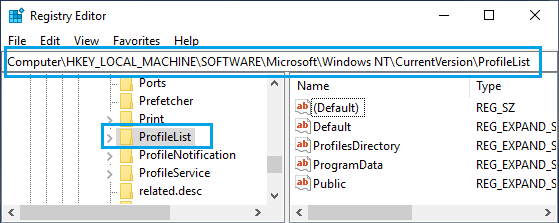
3. Open the ProfileList Folder and find the right S-1-5… Folder that belongs to the particular User Profile that you want to remove from the computer.
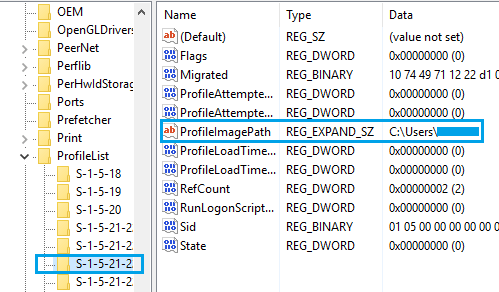
Once the right S-1-5 folder is located, right-click on the S-1-5 Folder and select the Delete option.
Note: The only way to find the right S-1-5 Folder is by opening S-1-5 Folders one-by-one and taking a look at the User Name in Data Column of the ProfileImagePath Entry.
As you can see in above image, the User Name is available in ‘Data’ Column for ProfileImagePath Entry.
4. Close the Registry Editor and Restart the computer.
As mentioned above, Windows operating system will automatically create all the required File/Folder structure for the User Profile, when you Login back in to the User Account.